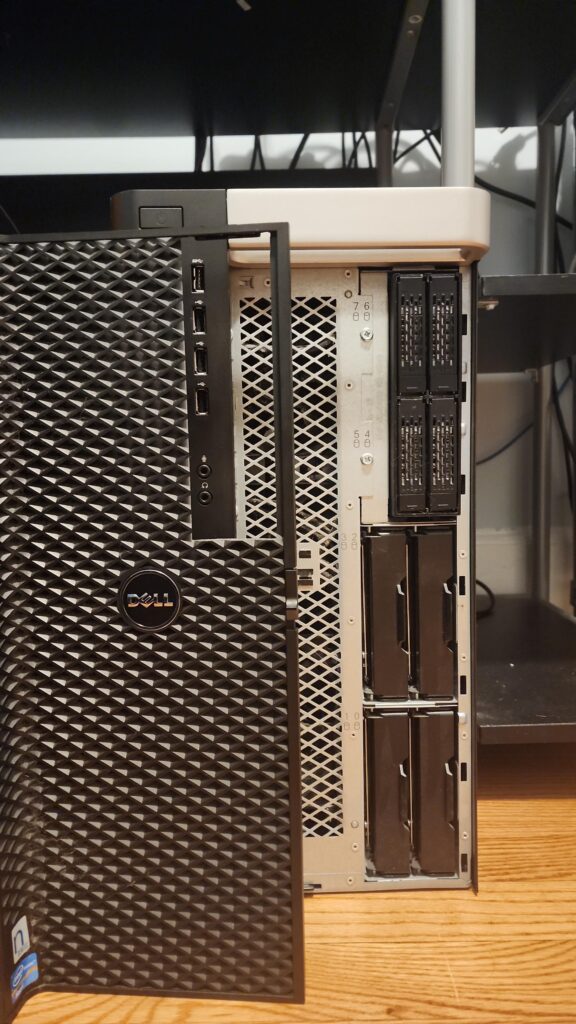
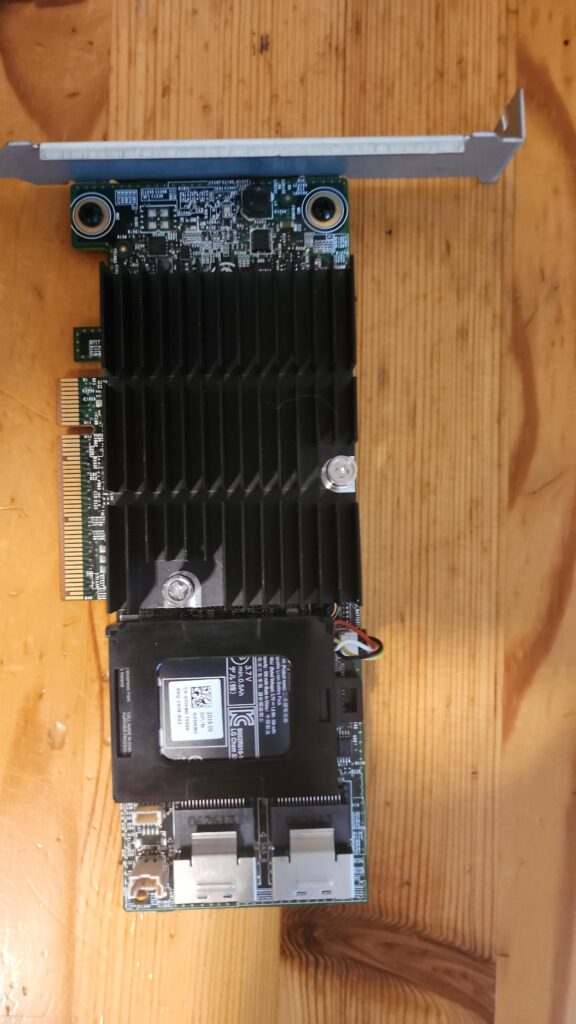
As a brand new System Administrator I have a few technical gaps and one of them is my knowledge of storage. I embarked on an adventure learning about storage and I’ve only scratched the surface I am sure of it. In my home lab I have a Dell Precision T7600 Workstation and it has 8 storage bays. It can host up to four 3.5 inch drives and it also has a 5.25 inch storage bay which I have placed an ICY DOCK storage kit that supports up to four 2.5 inch drives. The T7600 also has an integrated Intel based storage controller that supports various RAID configurations however I wont be using this controller to configure RAID. To configure RAID I will be using a Dell PERC H710P PCIe hardware RAID card.
I purchased all this equipment two years ago when I was very new to IT and just getting my feet wet with ProxMox virtualization. When I setup my storage for proxmox two years ago I didn’t put to much planning into it since my goal at the time was to get up and running as fast as possible and start playing around with virtual machines. I recently got my hands a few used SSDs and because of that I was inspired to revisit how I setup my storage in ProxMox and make it better.
Shortcomings and what I want to make better
Before detailing how and why I want to develop a better storage solution for my T7600, I want describe how I initially set this up when I had no idea what I was doing. In my T7600 I had four 3.5 inch 4TB HDDs, three 2.5 inch 1TB HDDs and one 2.5 inch 128BG SSD. My plan was to use the SSD for the boot drive, configure the 2.5 inch HDDs in a RAID 5 for Virtual machine storage and configure the four 3.5 inch drives in a RAID 10 for additional storage. At first I used a hardware RAID card to configure the storage arrays but I eventually settled on using the integrated storage controller as a host bus adapter (HBA). In my new setup I return to using the hardware RAID card but more on this later. Before I continue I do need to mention one really frustrating quirk of the T7600. The T7600 is so old that it doesn’t support booting from an NVMe drive. An operating system would be able to see the drive and use it for storage but not boot from it. The reason its worth mentioning is because I had to use one of the storage bays to host my boot drive. Since its my lab its not really a big deal but it is a missed opportunity to follow best practice.
My first mistake was thinking that I absolutely needed to use an SSD for the boot drive. Proxmox is a lightweight hypervisor and all my research tells me that not a whole lot of data is written to the boot drive so I really could have gotten away with using an HDD for the boot drive. Updates for ProxMox would have taken longer but I could have lived with that. This brings me to my second mistake which is how I chose to setup virtual machine storage. I only had HDDs so I setup a RAID 5 array with the three 2.5 inch HDDs and used that to install my VMs on. Performance on virtual machines were abysmal! I should have just saved enough money for SSDs but I was impatient and tried to cheap out by getting HDDs. The other mistake I made was that I setup my storage arrays using ZFS and I really didn’t have the patience to set it up properly. As a matter of fact I was so uninformed about ZFS that I actually used a hardware RAID card and configured ZFS RAID on top of that which is NOT recommended by ProxMox.
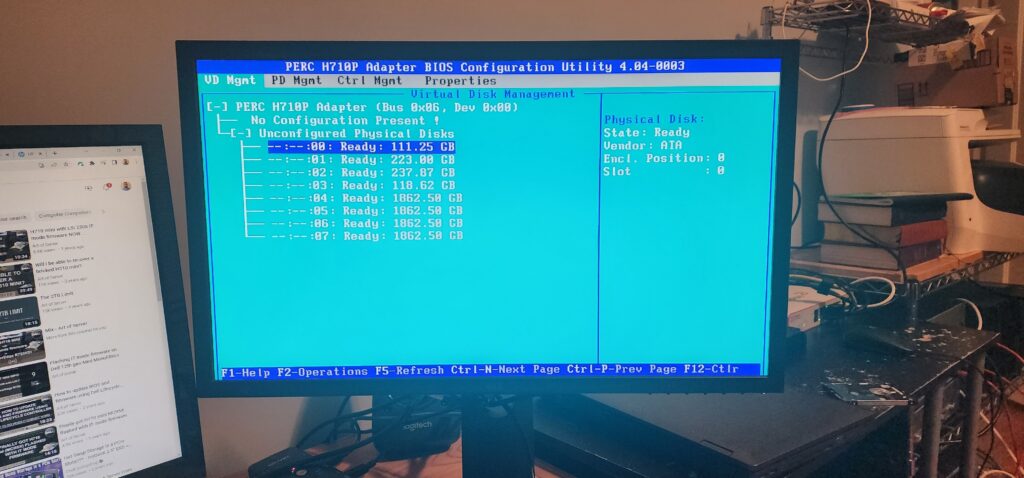
To make my storage setup better, the first thing I did was make a plan. Firstly I will be returning to using the Dell PERC H710P PCIe Hardware RAID card. For simplicity I decided to go with hardware RAID. Only caveat about this is that the software that is used to manage the RAID card is really only compatible with Windows. Figuring out how to monitor data health in this lab environment will be for another day. For VM storage I will be using four 2.5 inch SSDs that vary in capacity and this group of SSDs will be configured in a RAID 5. Unfortunately the boot partition will also need to be installed on this array of disks but this is fine for my lab. I plan to install the boot drives for my VMs on this array and create an additional array of disks for extra storage if needed. For this I will put four 3.5 inch 2TB drives in a RAID 5. Next I decided on a file system and although ZFS sounds really cool and is feature rich, I decided to go with the Linux native file system ext4 with Logical Volume Management (LVM). LVM is really cool and I spent so much time just trying to learn the basics.
My Main Takeaways from this storage exercise
The world of storage technologies is vast and I can already tell that I don’t plan on being a storage expert however I do want to have a solid understanding of storage concepts that would help me be a better tech in the MSP space. One of my biggest takeaways from revisiting how I setup storage arrays in my T7600 is understanding just the nuances of Hardware Raid cards and the generations of technologies and features of RAID that have come and gone. Before settling on the Dell PERC H710P PCIe RAID card, I was trying to use a PCIe Intel RAID controller RS2WC080 with a SAS 2008 chipset. I had acquired a few of these cards and wanted to know if I would be able to use them with Proxmox which turned into a whole project.
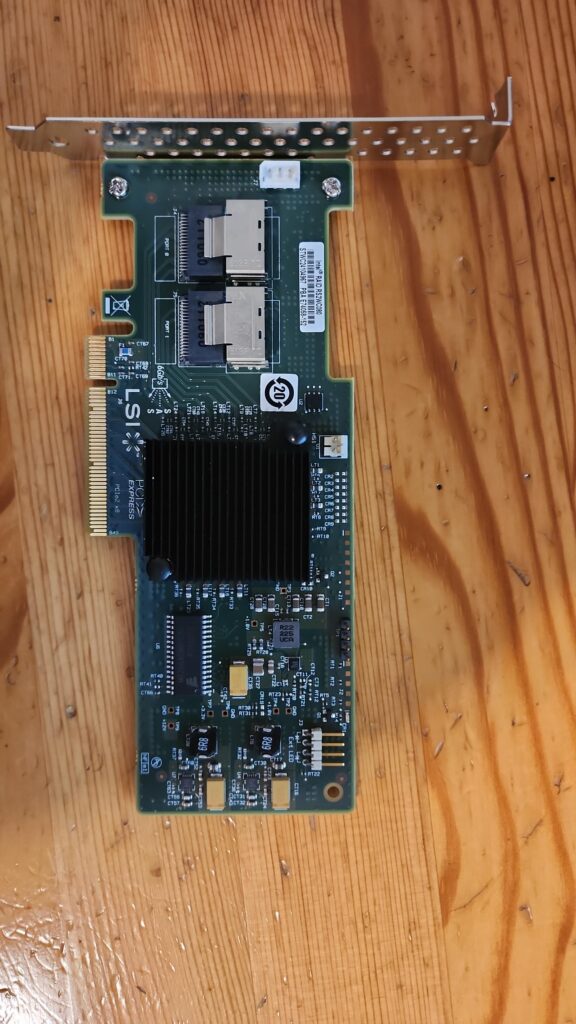
In order for ProxMox to see the drives I needed to flash the firmware on the controller since the firmware on the controller is so old. During this side project I discovered that there are RAID Controllers and there are HBA Controllers. The main difference between these two is that RAID controllers have the RAID functionality on the controller’s chip and with HBA controllers, they don’t. The reason why this became relevant for me is that when searching for the firmware tools I had to decide which firmware to use: IT mode or IR mode firmware. IR mode stands to Integrated RAID and is typically what internal storage controllers on server boards and some external hardware RAID controllers ship with by default. In IR mode, you configure your disks in an array and the controller presents your array to the host as a singular volume. IT mode stands for “Initiator Target” which disables RAID functionality and present yours disks to the hosts individually. IT mode is great to use with HBA controllers in addition with implementing a hybrid hardware + software storage model where the controller passes the disks to the host but the host would use software to manage the disks. This kind of setup is always more flexible then a RAID controller because the software in this kind of setup has way more features then what you would find on a hardware RAID controller. In the end I was successful at flashing the firmware to IT mode but then I realized that I wouldn’t be able to connect the drives to this controller because the SAS breakout cables couldn’t reach all the way to the controller! On this controller, the SAS ports are on the top (fig 1-4) and on the PERC H710P the SAS ports are on the side (fig 1-2) which meant if I wanted to use the Intel controller I needed to purchase a longer SAS breakout cable which was something I did not want to do.
The other major takeaway for me was getting my feet wet with LVM which is what a lot of Linux distros use for file system management. What is really cool about LVM is how easy it is to expand existing storage. The best way to understand LVM is to visualize it and I found this graphic that I returned back to constantly as I was playing around with LVM.
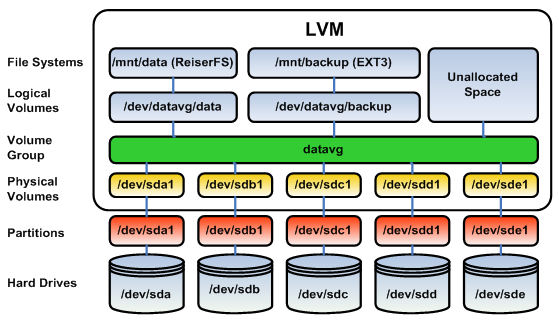
Traditional system storage consists of physical HDDs/SSDs and partitions. Most Windows systems are setup this way where you have a boot partition, the file system that exists on another partition, etc. What LVM does is adds a logical layer on top of the hardware that makes managing storage more flexible. Generally what you want to do is wipe and partition your disks and in my case I formatted my disks in ext4 and spanned one ext4 partition across the entire disk. Then you create the first layer which are the Physical Volumes and you can add as many physical volumes as you have actual disks or partitions. Then you add the Physical Volumes to a Volume Group and you can have up to 255 active Volume Groups. This is the really cool thing about LVM. You can add all of your disks effectively to the same Volume Group and allocate space to create the last layer of LVM which are the Logical Volumes – the layer that host operating systems can mount and use for storage. What LVM allows you to do is provides you the flexibility to scale up without experiencing downtime particularly if your system supports hot swapping drives.
The other thing I was made aware of was the distinction between traditional storage like NAS systems and SANs and software-defined storage. Wiki says that Software-defined storage “typically includes a form of storage virtualization to separate the storage hardware from the software that manages it.” This sounds a lot like software-defined networking where the control plane is outsourced to a centralized controller in order to administer a network.