Introduction
Sometimes the best way to learn Linux fundamentals is to break things apart and rebuild them with intention — this is one of those times.
I’ve been running Proxmox in my home lab on and off for years. Last year, I decided to virtualize pfSense, and I did that with Proxmox. However, I did not set up backups for my VMs.
Part of the reason I delayed is that Proxmox forces you to make a few critical design decisions upfront. What filesystem should I use — ZFS or EXT4 with LVM? Where will backups be stored? These were questions I wrestled with early on, and at the time, I chose ZFS.
But over time, a problem I’d been ignoring became impossible to overlook: ZFS consumes a lot of RAM — too much for my current setup.
This post documents how I re-evaluated my Proxmox storage configuration, revised my priorities, and designed a simpler, more performant layout with an automated backup strategy to support my current workload.
Table of Contents
Step 1: Re-Evaluating My Existing ZFS-Based Storage Setup
Honestly, the reason why I chose ZFS is that I was following a YouTube tutorial, and at the time, there didn’t seem to be too many downsides to just keeping it the way it was.
Before choosing ZFS, I knew that it would consume extra RAM, but I wasn’t planning on running anything other than pfSense and a VM running Docker.
That has changed now since I want to get more serious about learning Linux, and I want the flexibility to spin up multiple virtual machines (Linux or Windows) without the fear of overprovisioning resources.
The Hardware
Proxmox is installed on a trusty HP Z240 SFF desktop with the following specs:
- Intel Core i7-6700 (4 cores, 8 threads, VT-x enabled)
- 32GB RAM
- One 250GB NVMe SSD (Boot drive)
- Two 2.5” 250 GB SSDs (Data)
Current Storage Layout
The boot drive currently uses the Ext4 filesystem and manages volumes via LVM. To display the current logical volumes, I use the following command:
lvs
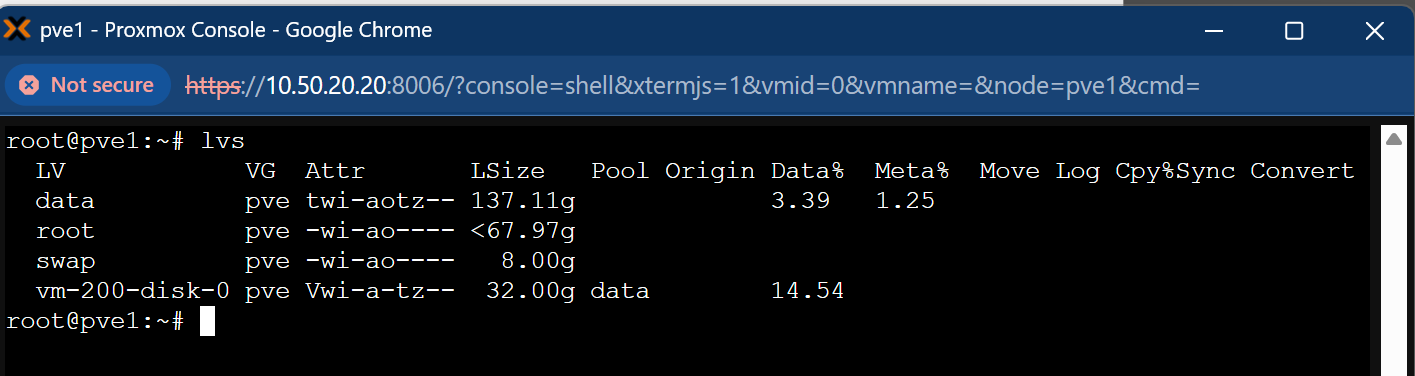
The data volume is 137 GB in total, with only 3.39% currently utilized. This volume is intended as the temporary destination for migrating all virtual disks.
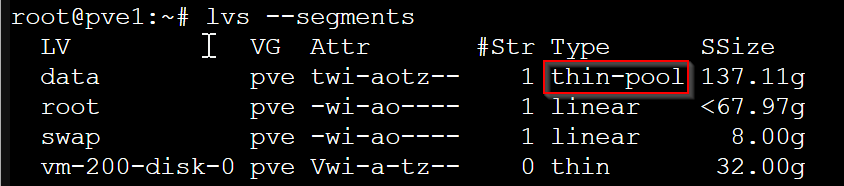
The data volume is configured as a thin-pool, which can be confirmed with:
lvs --segments
Understanding Thin Provisioning
Thin provisioning allows virtual disks to be created with a specified maximum capacity, without immediately allocating that amount of physical storage. Storage is dynamically consumed as data is written.
For instance, a 100 GB virtual disk appears fully allocated to the VM, but may initially occupy just a few gigabytes, depending on actual usage.
This approach optimizes storage efficiency, especially in environments where VMs do not fully utilize their allocated capacity.
To check the actual disk usage of my virtual machines, I run:
du -sh /mnt/ZFSA/images/*
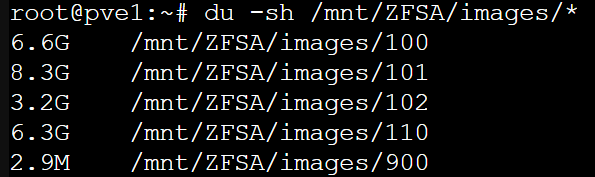
Currently, there are 5 virtual machines consuming a total of 27 GB. Given the available space, the boot drive can accommodate these virtual disks without issue. Most of these disks are in the .qcow2 format, which is inherently thin provisioned.
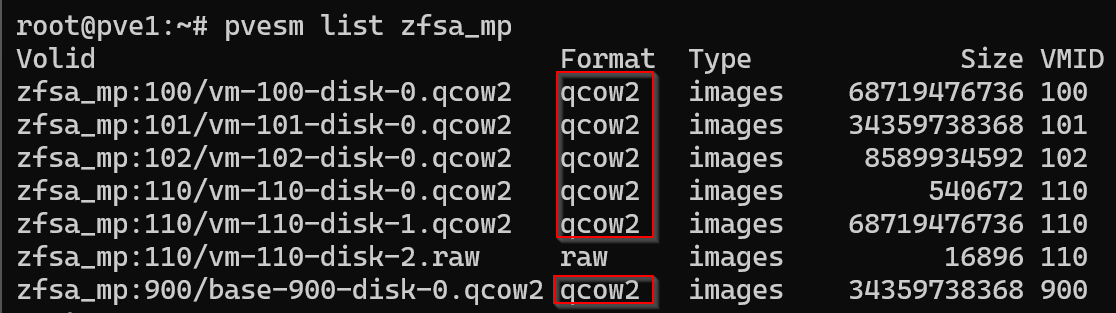
To confirm the storage format and usage, I use:
pvesm list zfsa_mp
Thin vs. Thick Provisioning
During initial setup, I made a configuration decision for VM 102, which runs pfSense. The disk was thin-provisioned.
Although performance has been stable, it’s best practice to use thick provisioning for firewall appliances like pfSense to ensure consistent I/O performance and avoid potential latency.
After reconfiguring the storage layout, I plan to convert VM 102’s disk to a thick-provisioned format. I will also do the same thing for VM 101 which is running docker for the same reason.
Step 2: Redefining My Priorities for Proxmox Storage
After evaluating my current storage layout, I identified three core priorities for my Proxmox environment:
- Simplicity
- Performance
- Automated Backups
To align with these goals, I’ve decided to reconfigure my existing ZFS pool and dataset into a more streamlined setup based on LVM, using a combination of:
Standard LVM Provisioning – for thick provisioning of a Virtual disk if needed
LVM Thin Provisioning – to enable space-efficient, dynamically allocated storage.
This transition reduces complexity, improves I/O performance, and simplifies backup automation. Here’s how each priority is addressed:
Simplicity
LVM is native to Linux and easier to manage than ZFS. I no longer need to think about pools, zvols, or tuning cache behavior. With LVM-thin, snapshot management is fully integrated and just one click away in the Proxmox GUI.
Performance
LVM introduces less overhead than ZFS. It avoids the RAM-hungry ARC (Adaptive Replacement Cache) and provides fast raw I/O performance — ideal for VMs like pfSense and Docker, which don’t benefit significantly from ZFS features.
Backup Automation
LVM-thin integrates seamlessly with vzdump, enabling compressed backups that include both VM configuration and disk data. These backups can be stored anywhere, without the need for complex scripting or third-party tools.
Step 3: Configuring Off-Host Backups to My Lenovo NAS
For off-host backups, my NAS has a few storage options. I could have done manual backups with rsync or used SMB. In the end, I decided to go with NFS since NFS is native to Linux and I want the best performance.
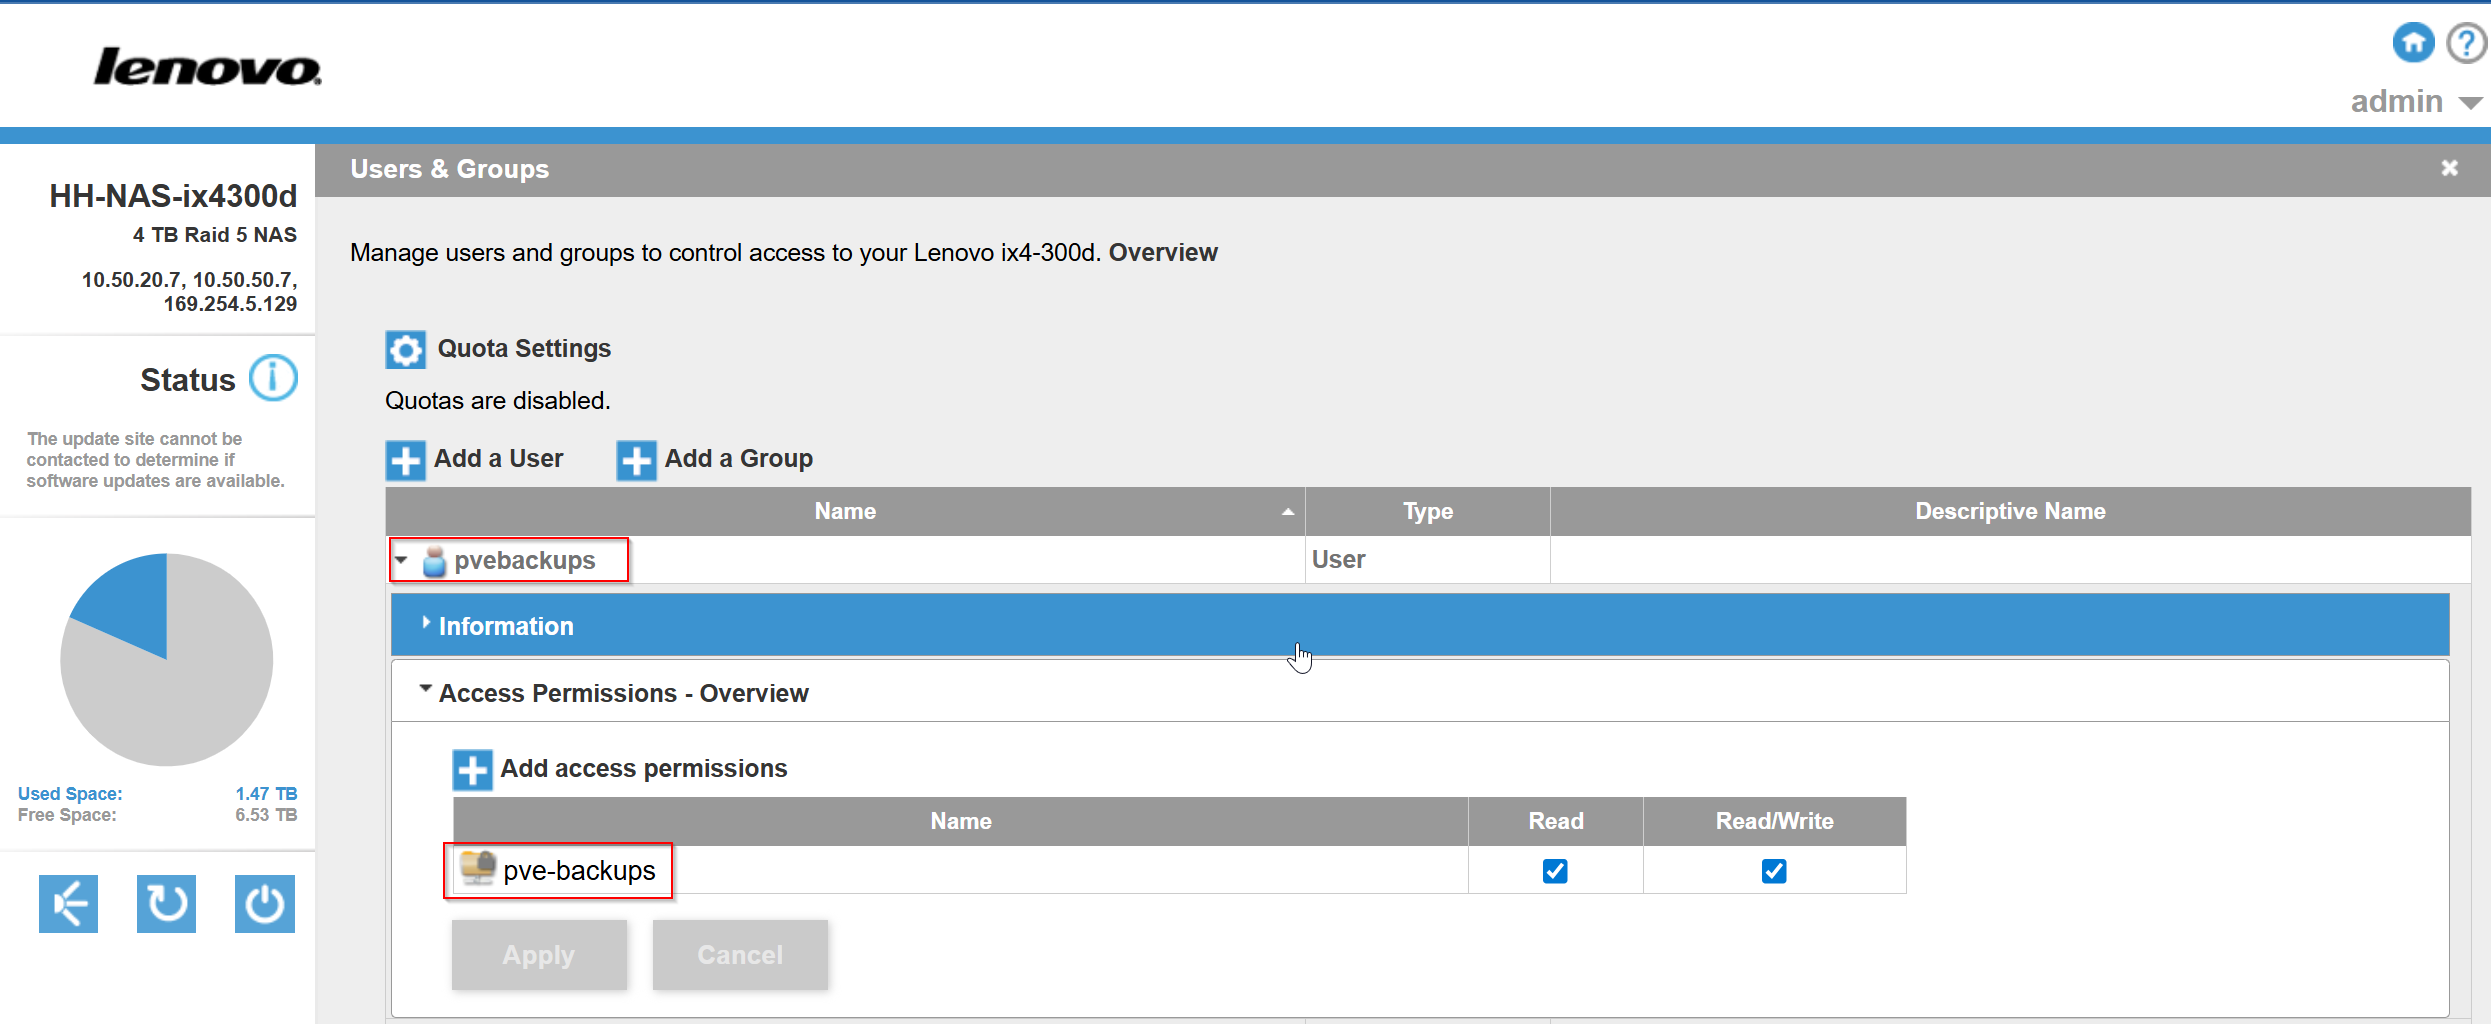
I created an NFS share on my NAS called pve-backups. Then I created a user account called “pvebackups” and granted this user read/write permissions to the share:
Next, I need to allow Proxmox permission to mount this NFS share:
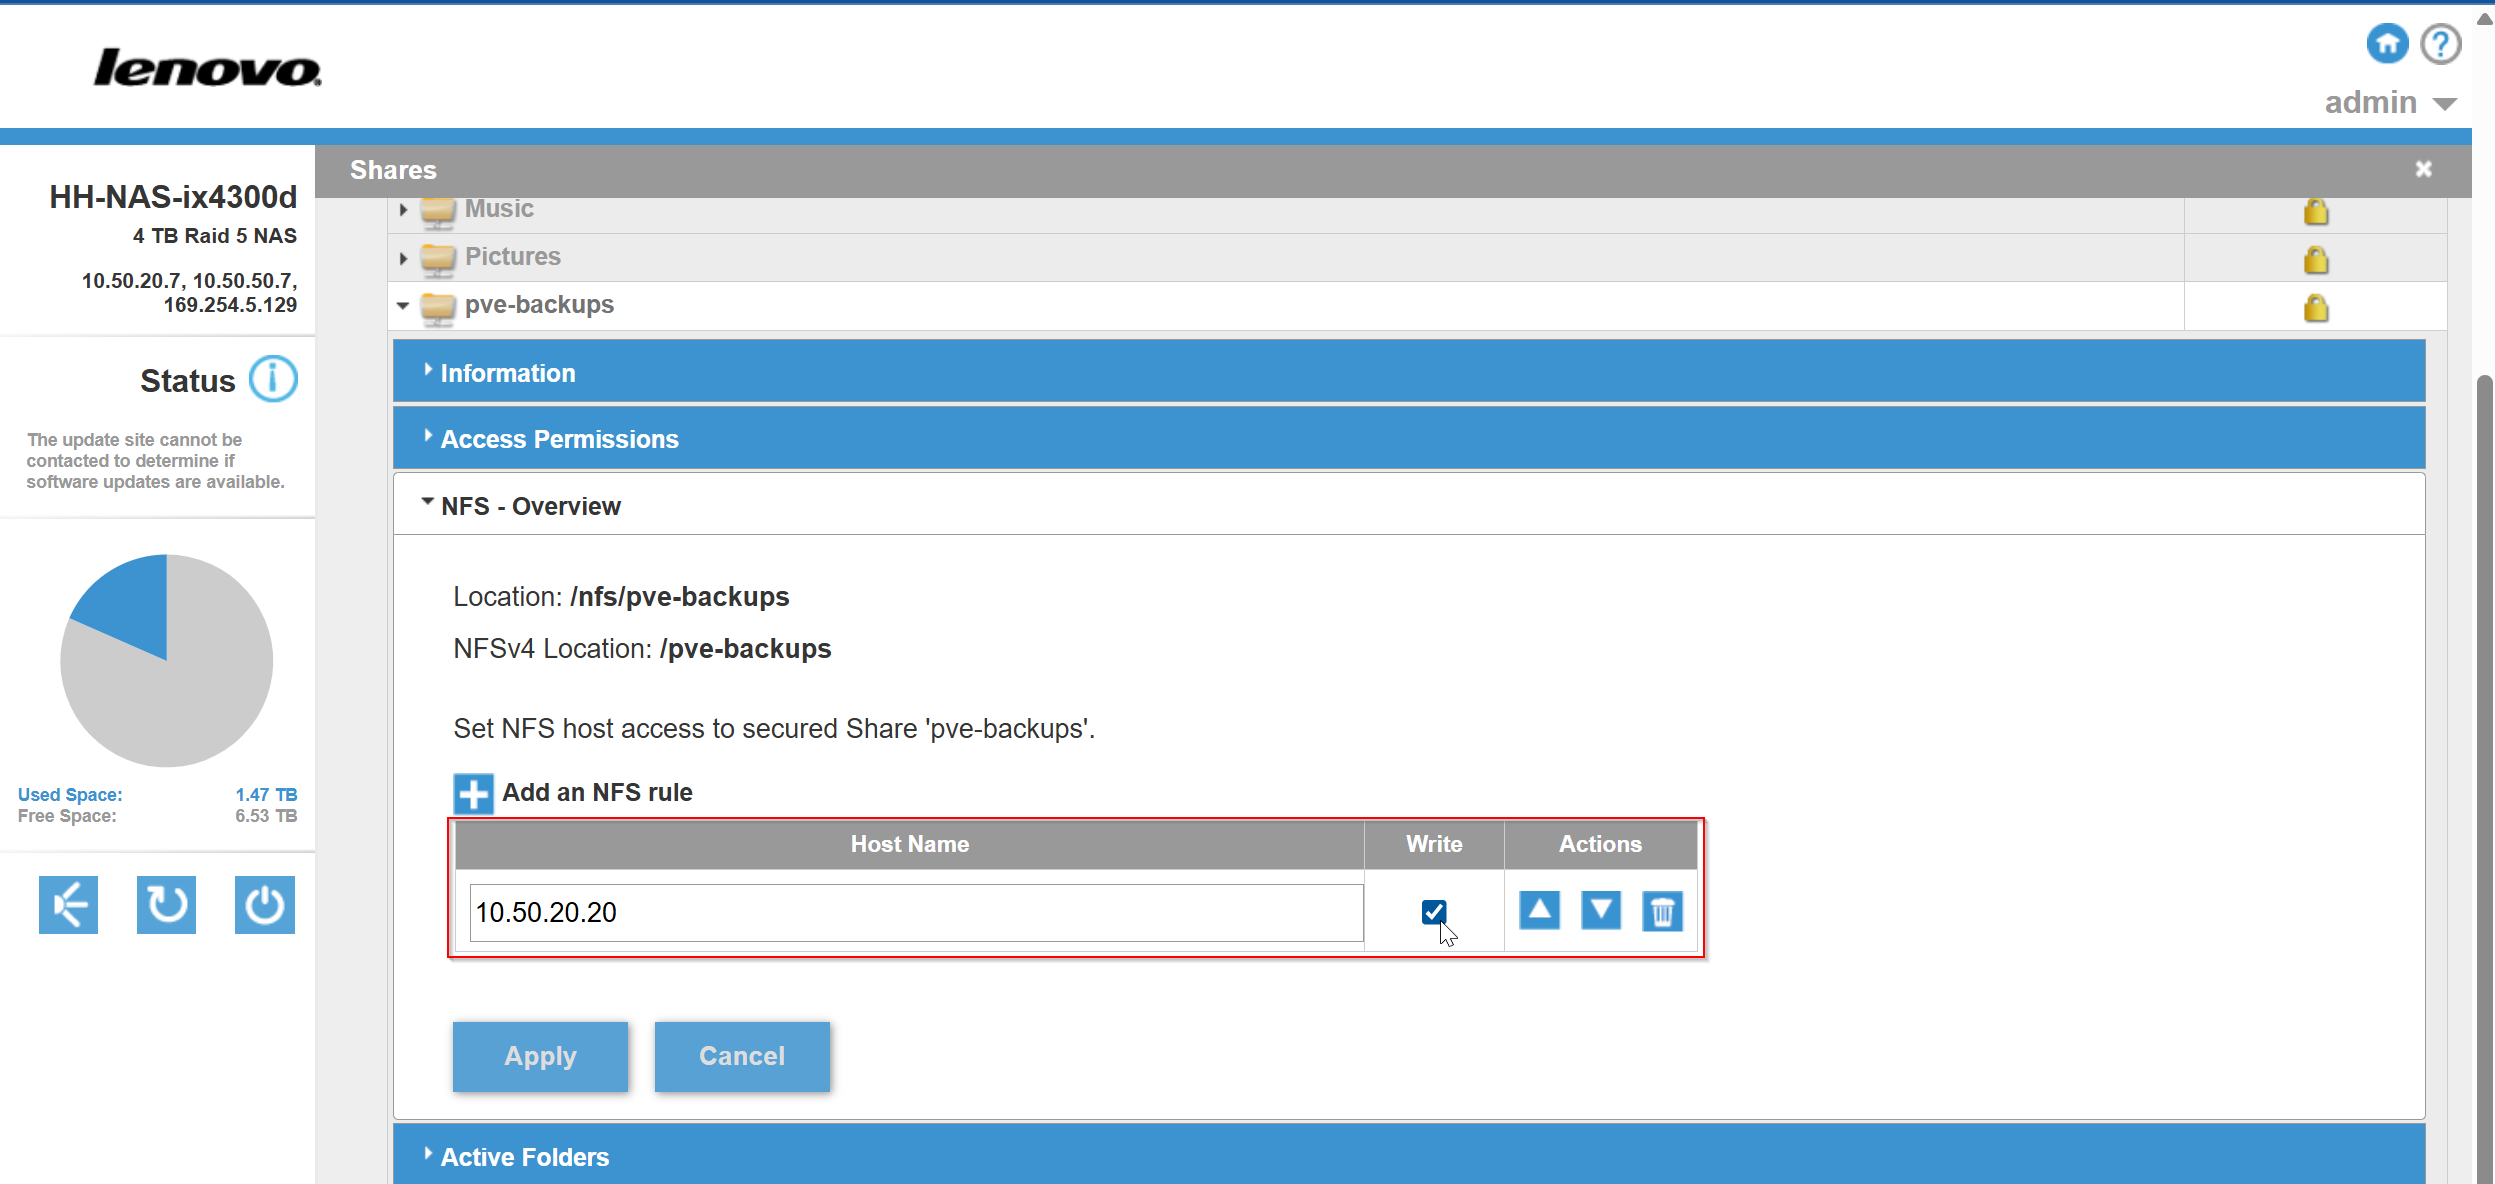
On this NFS config screen are two important pieces of information. It says “NFSv4” location. This means that NFS is using version 4, and the mount point is “/nfs/pve-backups.”
Now I need to mount the NFS share to Proxmox. I can do this in the cli by using the following command:
pvesm add nfs nfs-backups \
--server 10.50.20.7 \
--export /nfs/pve-backups \
--content images,rootdir,backup,vztmpl \
--prune-backups keep-last=3,keep-daily=7,keep-weekly=4,keep-monthly=2

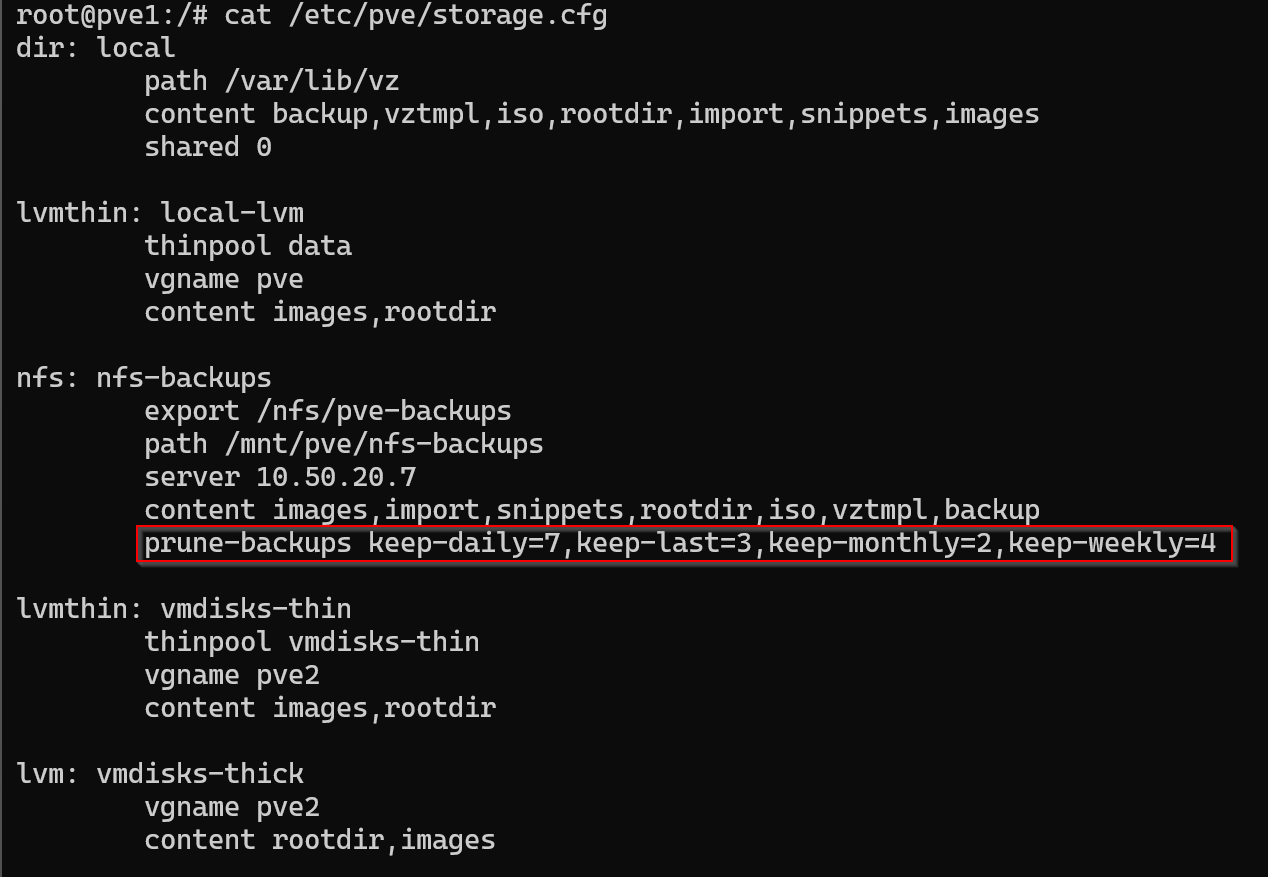
This command adds a new NFS storage to Proxmox called nfs-backups. It connects to the NFS server at 10.50.20.7 and mounts the shared folder /nfs/pve-backups.
The –content option tells Proxmox what kinds of data can be stored there—VM images, root directories, backups, and container templates.
The –prune-backups setting sets up automatic cleanup rules to keep things tidy: it keeps the last 3 backups, plus 7 daily, 4 weekly, and 2 monthly ones.
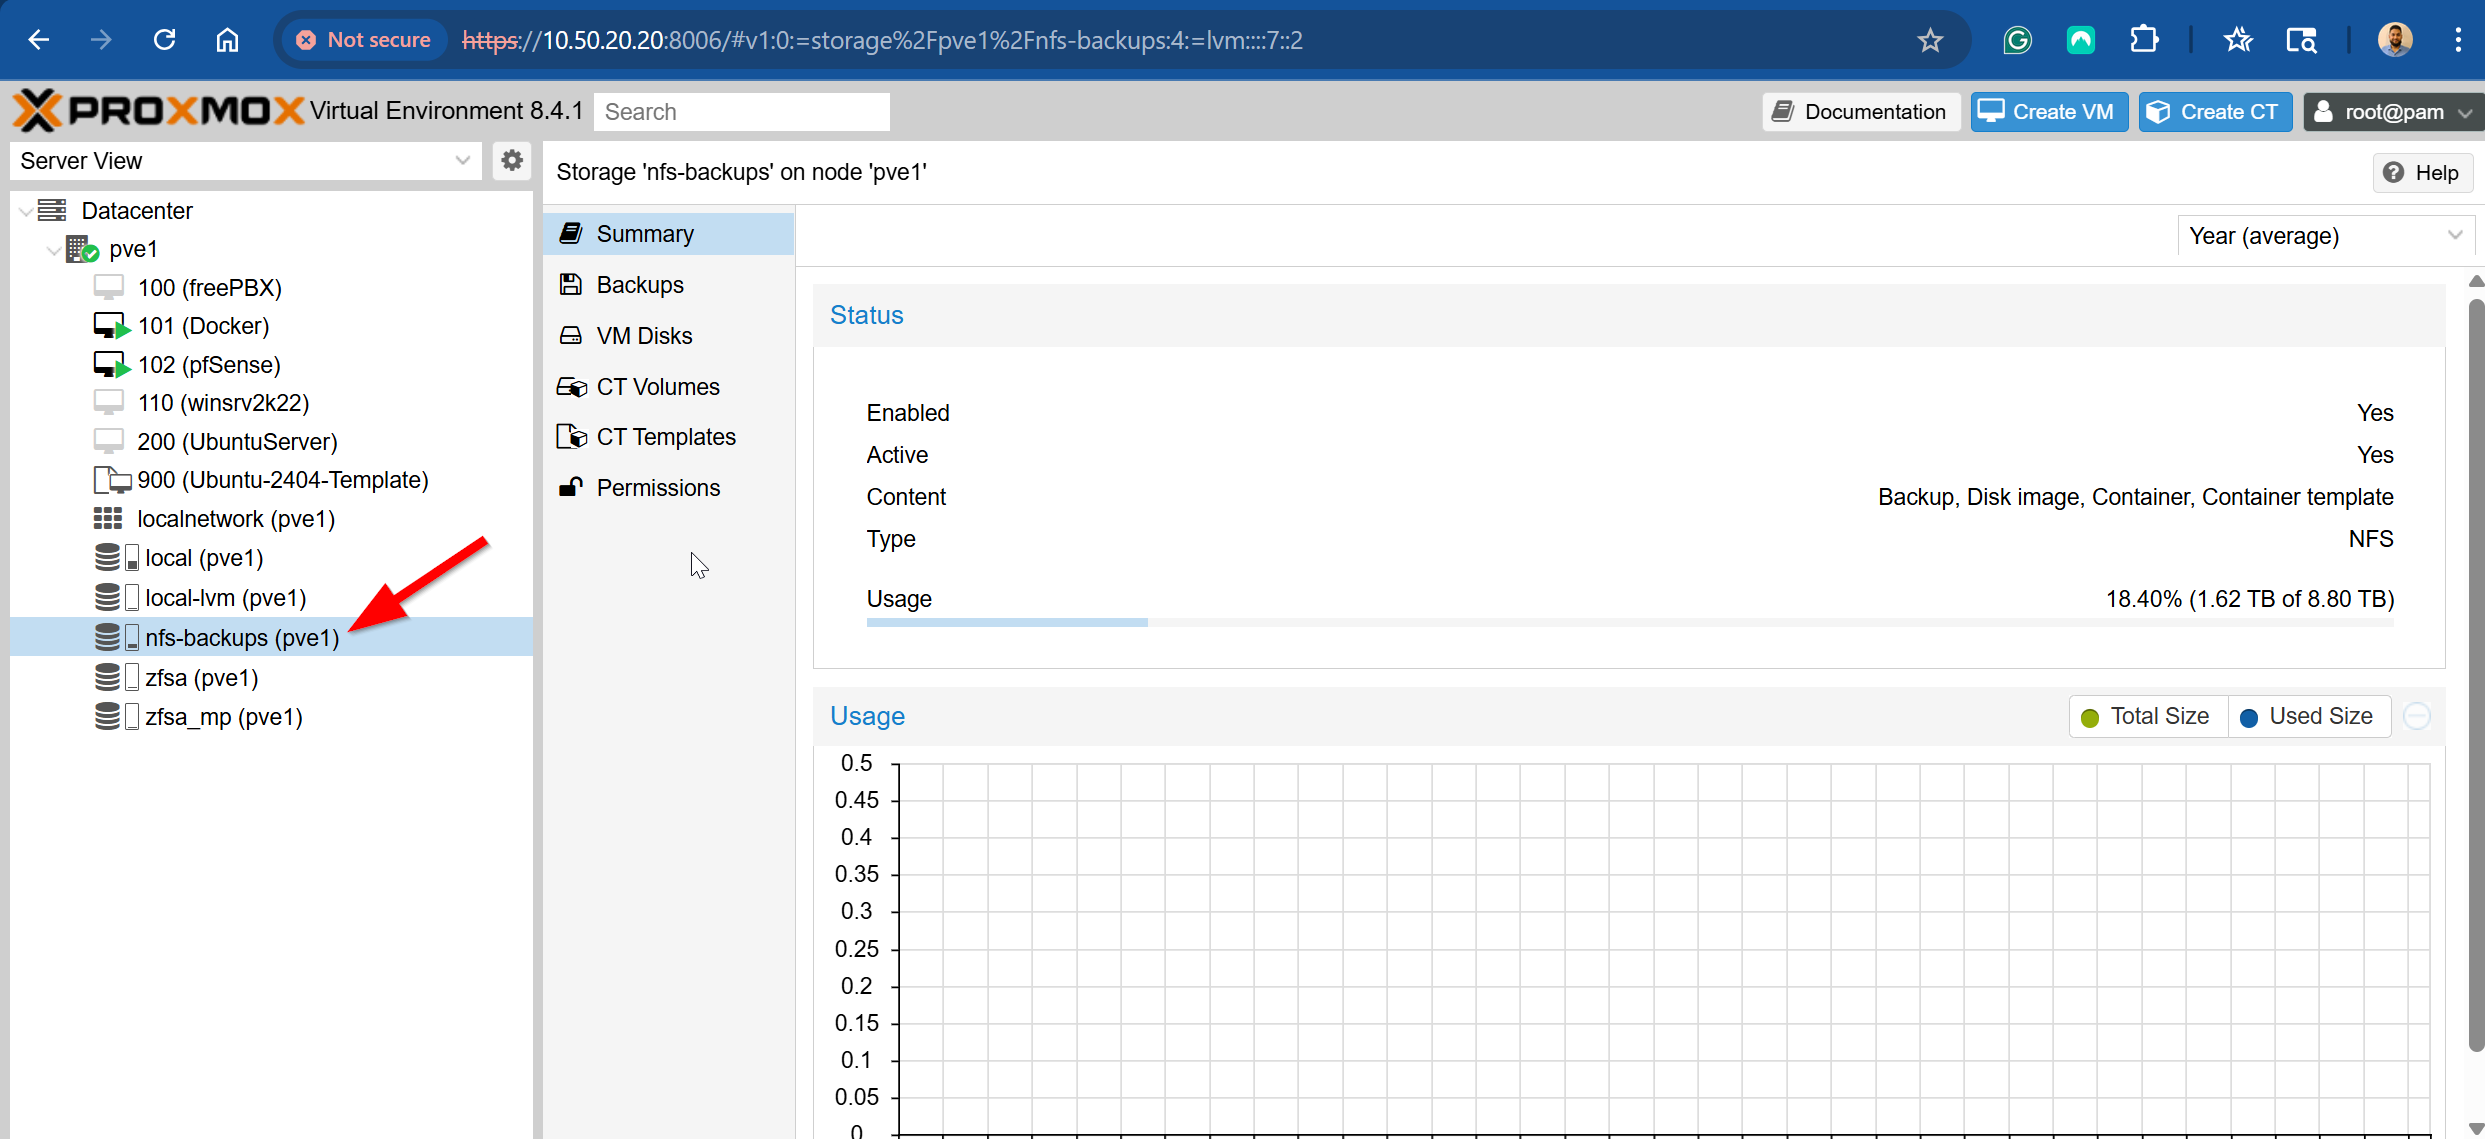
After a few seconds, I can see the NFS storage mounted in the Proxmox GUI:
I can also confirm in the cli using the following command:
pvesm status

Step 4: Migrating and Verifying VMs After Storage Changes
This stage of the project will be broken up into a few different parts:
- Testing the process on a non-critical VM
- Migrating existing VMs to the boot drive
- Releasing ZFS ARC Memory
- Reconfiguring ZFS pool to Ext4 + LVM
- Migrating VMs to the new storage
Testing the process on a non-critical VM
I deployed an Ubuntu Server VM from a template and stored its virtual disk on the zfsa_mp storage using the .qcow2 format. This VM configuration mirrors the vdisk configuration of my existing VMs.
To move the VM disk, I used the following command:
qm move-disk 200 scsi0 local-lvm

Above is a sample of the output – this command clones the existing drive and transfers that clone to the target storage. I powered on the VM and confirmed that it is not broken and is working just fine.
Migrating existing VMs to the boot drive
In this phase, I created a Bash script to automate migrating existing VM disks to the Proxmox boot drive (local-lvm). The script loops through all active VMIDs using qm list, then inspects each VM’s configuration with qm config to extract attached disks.
To keep the focus on data disks, I filtered the list to include only scsi and virtio devices, excluding system-specific disk types like efidisk and tpmstate up front using grep. For each disk, the script uses awk to extract the disk name and its current storage location.
Disks already on local-lvm are skipped. If a disk is on a different storage (e.g., ZFS), the script constructs a qm move-disk command to migrate it.
I added a –dry-run flag for safety, allowing me to preview all intended move operations before actually running them. This script gave me a repeatable and safe way to migrate multiple VMs with minimal risk of manual error.
#!/bin/bash

# Exit on errors, unset vars, or pipe failures (safe Bash scripting practice)
set -euo pipefail

# Set dry-run default to false
DRY_RUN=false

# Parse command-line arguments
# If --dry-run is passed, toggle DRY_RUN to true
for arg in "$@"; do
    if [[ "$arg" == "--dry-run" ]]; then
        DRY_RUN=true
    fi
done

# Get a list of all VMIDs (ignores header row)
VMID=$(qm list | awk 'NR>1 {print $1}')

# Loop through each VM
for vmid in $VMID; do
    # Get disk configuration lines (scsi, virtio)
    qm config "$vmid" | grep -E '^(scsi|virtio)[0-9]+:' |
    while read -r line; do

        # Extract the disk name (e.g., scsi0) using awk
        disk_name=$(echo "$line" | awk -F '[:,]' '{print $1}')

        # Extract the storage name (e.g., zfsa_mp) using awk + xargs to trim whitespace
        storage_name=$(echo "$line" | awk -F '[:,]' '{print $2}' | xargs)

        # Display the current disk and storage info
        echo "VM $vmid | Disk: $disk_name | Storage: $storage_name"
        echo "===================================================="

        # Skip disks already on local-lvm
        if [[ "$storage_name" != "local-lvm" ]]; then
            # Build the qm move-disk command
            cmd="qm move-disk $vmid $disk_name local-lvm"

            # If dry run is enabled, print the command instead of executing it
            if $DRY_RUN; then
                echo "[Dry Run] $cmd"
            else
                echo "[Running] $cmd"
                $cmd
            fi
        fi
    done
done
To test the migration without making changes, I ran:
./move-vms.sh --dry-run
Once I verified everything looked good, I removed the flag to run the actual migration.
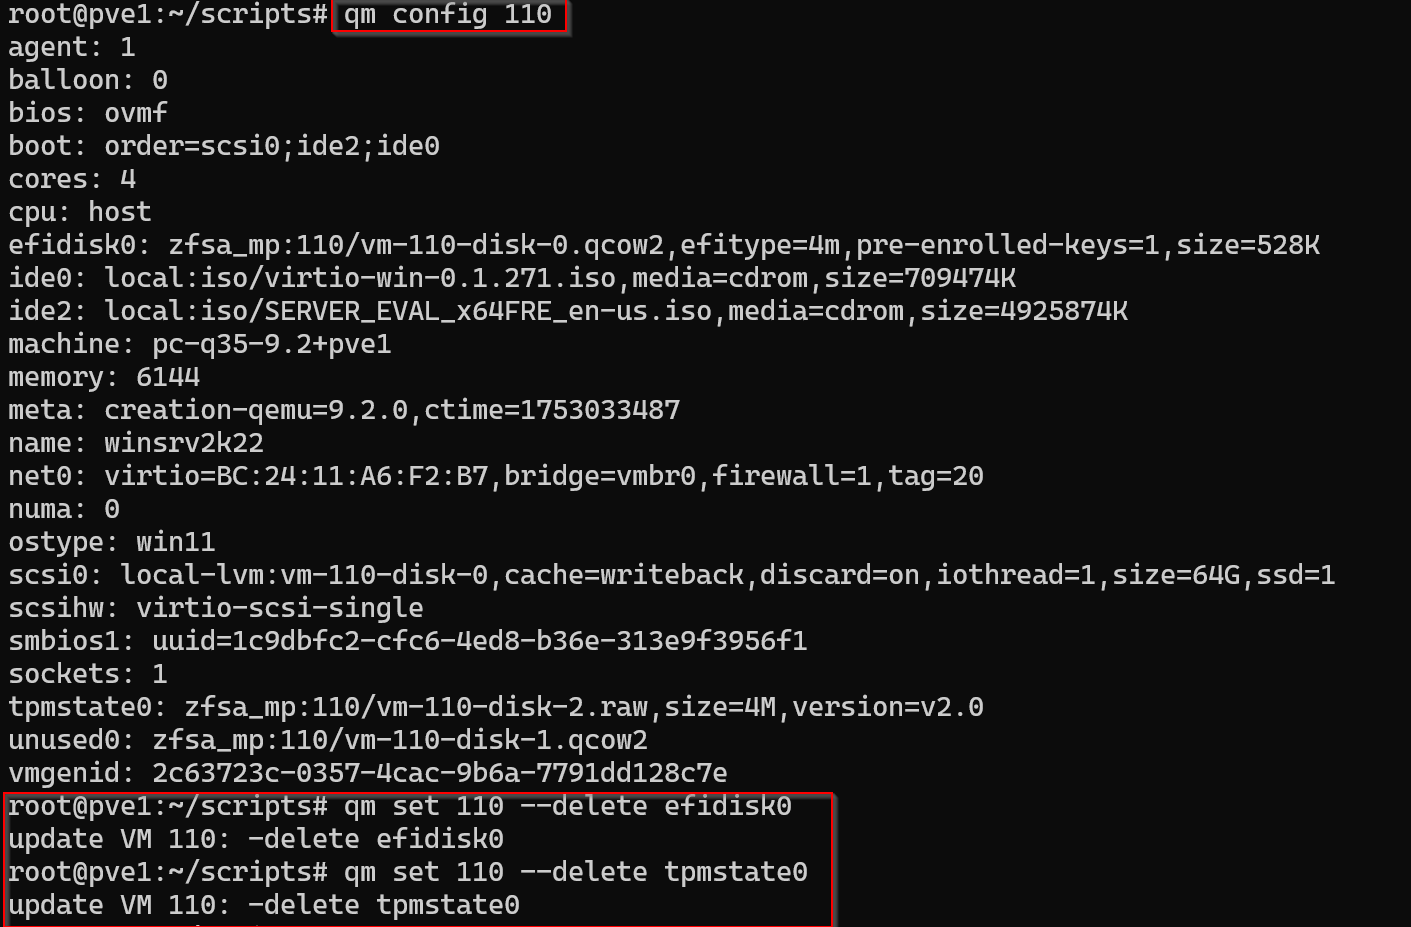
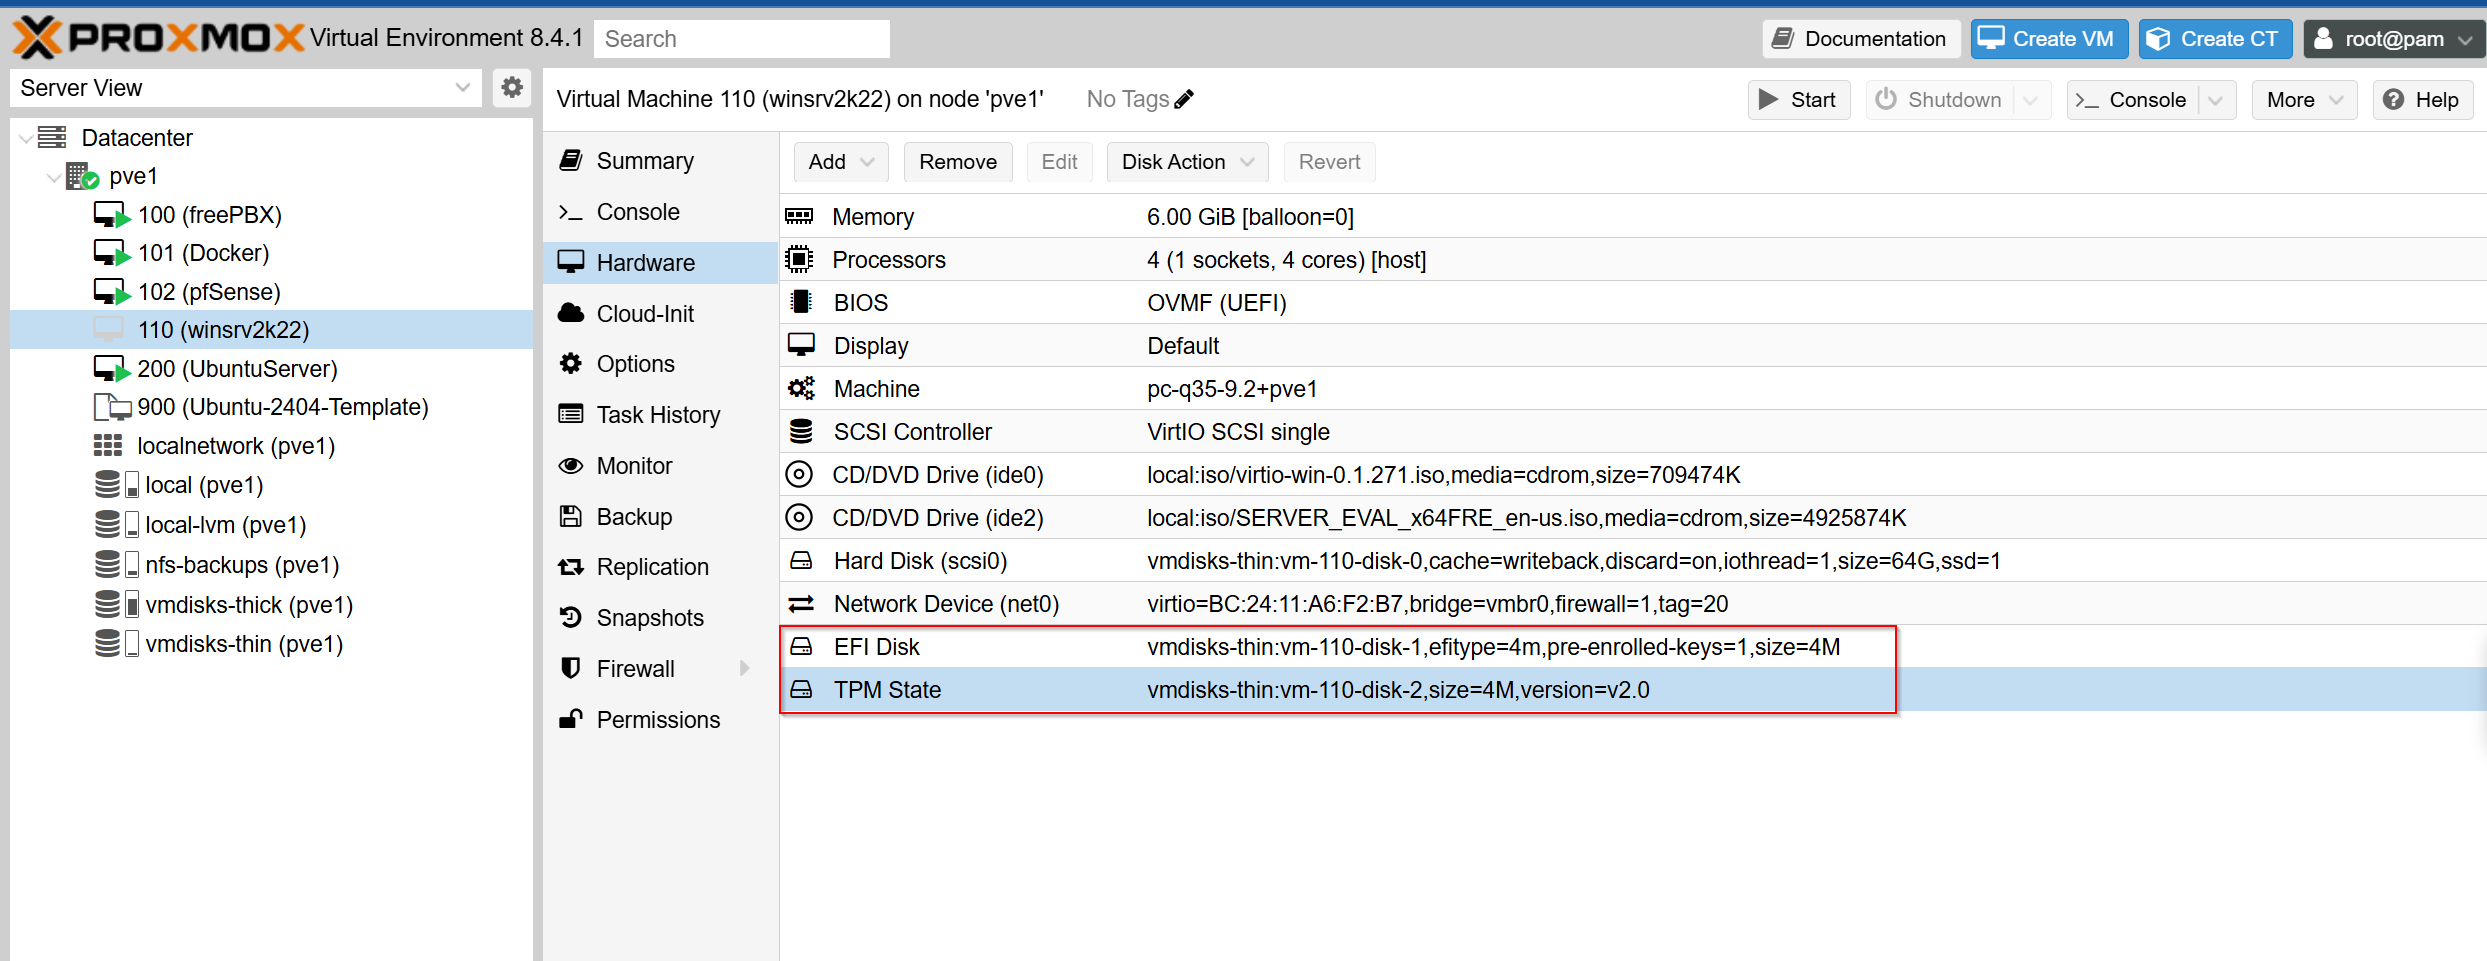
Before reconfiguring the storage I needed to delete all the VM disks. VM 110 is a windows server VM and it has an EFI disk and a TPM disk. For now I will delete them and recreate them later on the new storage.
qm config 110
qm set 110 –delete efidisk0
qm set 110 –delete tpmstate0
Then I did:
pvesm remove zfsa_mp
pvesm remove zfsa
Deleting the zfs pool and dataset did not delete the unused VMs so I went into the GUI and deleted them manually in each of the VM settings.
Releasing ZFS ARC Memory
After deleting the ZFS pool and datasets, RAM usage stayed high due to ZFS’s Adaptive Replacement Cache (ARC). To fully release memory, I had to unload the ZFS kernel module.
To confirm that the ZFS module was loaded, I used the following command:
lsmod | grep zfs

ZFS is listed in the output, confirming that ZFS is in use and consuming RAM.
To begin, I first unmounted and destroyed the pool:
zfs unmount -a
zpool destroy zfsa
Then I disabled all ZFS-related services except for the .device units representing physical drives. I used a quick script to automate the cleanup:
#!/bin/bash
# Skipped the first two lines out the output for systemctl list-units

ZFS_SERVICES=$(systemctl list-units | grep zfs | awk 'NR>2 {print $1}')

for svc in $ZFS_SERVICES; do
     systemctl disable --now $svc
done

#Print list of zfs system units to confirm
systemctl list-units | grep zfs
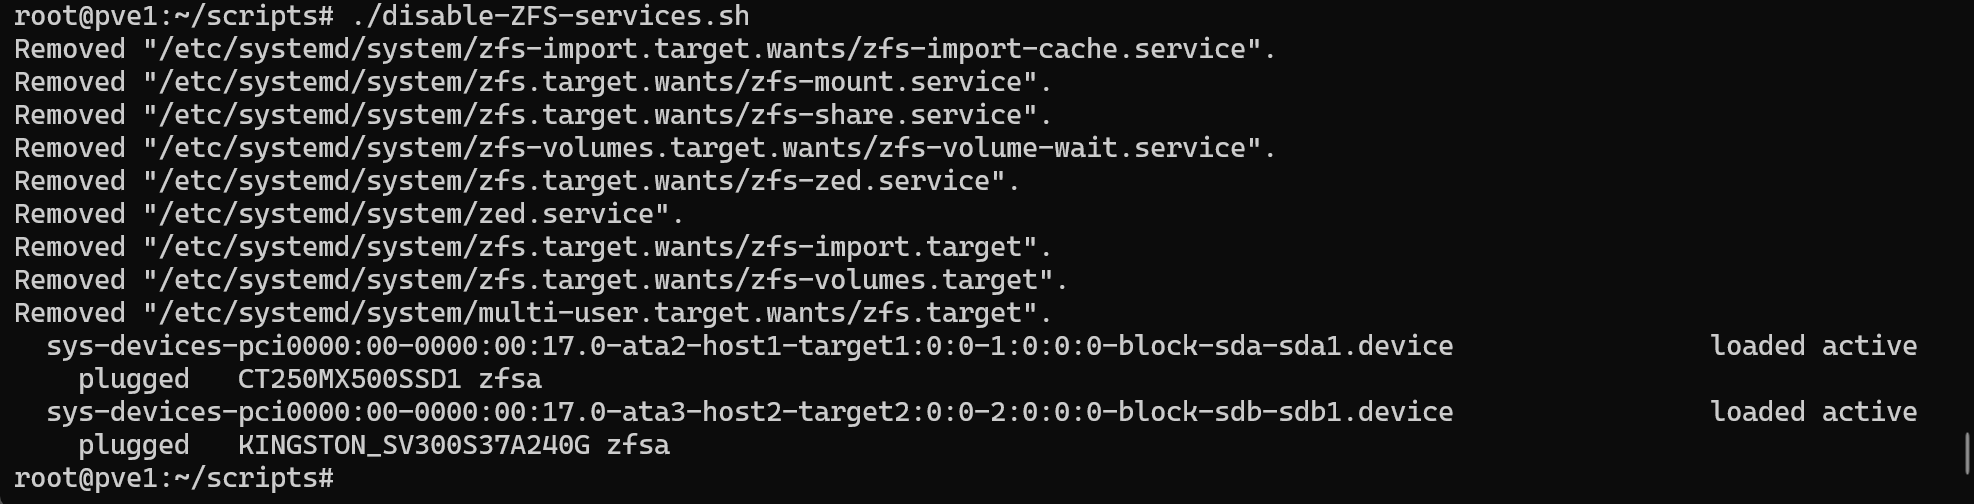
The script was successful — it disabled everything I intended and skipped the drive entries.
Finally, I unloaded the ZFS module from the kernel and checked to see if lsmod prints ZFS to the output:
modprobe -r zfs
lsmod | grep zfs

Reconfigure ZFS Pool to ext4 + LVM
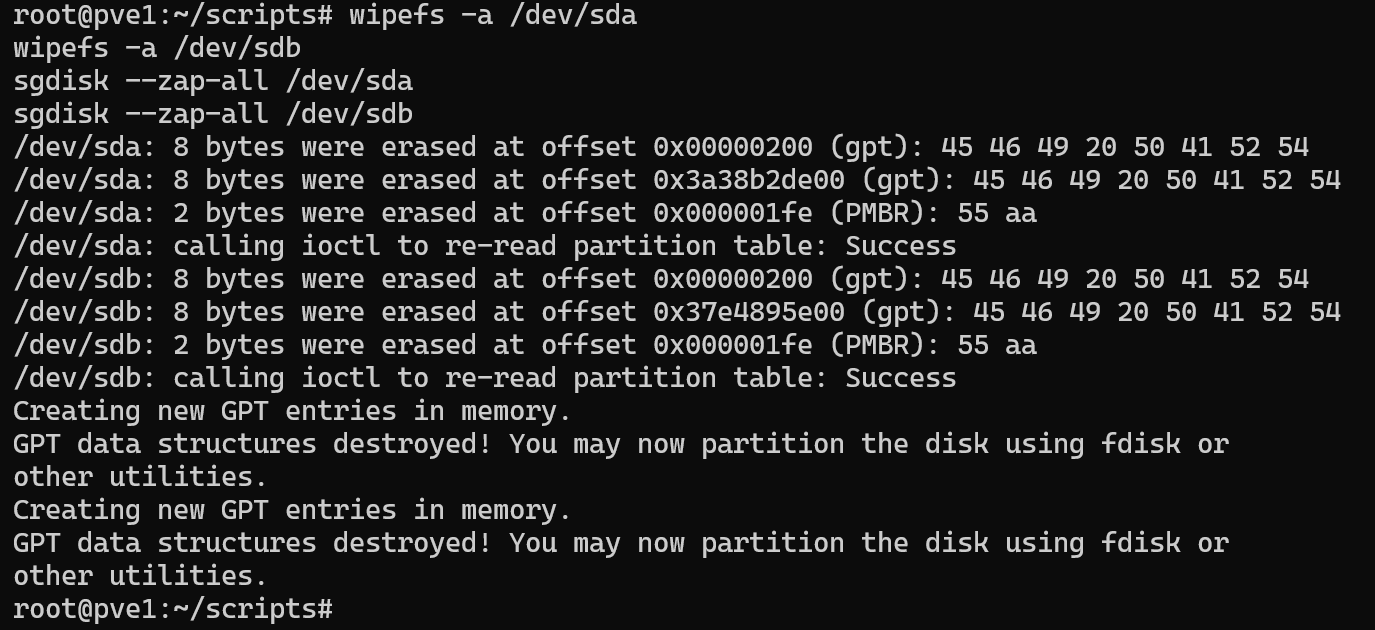
Before reconfiguring the two SSDs, it’s necessary to completely wipe any existing ZFS labels and file system metadata. This ensures that no residual ZFS data or partitioning information interferes with the new setup.
To accomplish this I executed the following commands:
# Wipe file system signatures
wipefs -a /dev/sda
wipefs -a /dev/sdb
# Erase GPT/MBR partition tables and all metadata
sgdisk –zap-all /dev/sda
sgdisk –zap-all /dev/sdb
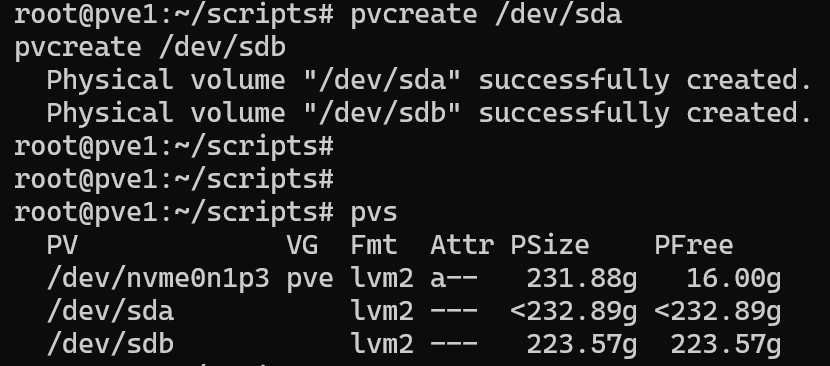
Once wiped, I initialized both drives as LVM physical volumes:
pvcreate /dev/sda
pvcreate /dev/sdb
pvs
Then I added them to a new volume group called pve2:
vgcreate pve2 /dev/sda /dev/sdb
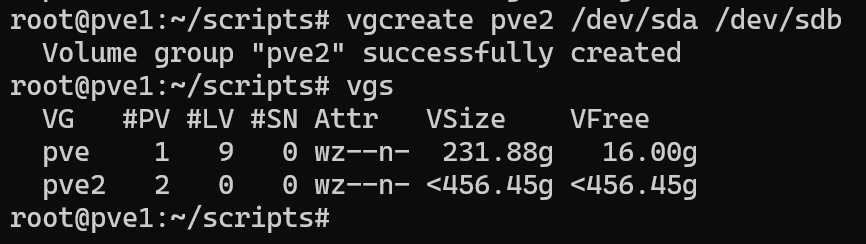
This volume group will support both thick and thin provisioning.
I wanted to reserve a portion of the volume group specifically for dynamically allocated storage. To do this, I created a thin pool using 286GB of the available space:
lvcreate --size 286G --type thin-pool --name vmdisks-thin pve2
The remaining space in the volume group will be used for thick-provisioned VM disks. I intentionally left some space unallocated in case I need to expand later.
To make this usable in the Proxmox GUI, I registered both the thick and thin storage types:
pvesm add lvm vmdisks-thick \
  --vgname pve2 \
  --content images,rootdir


pvesm add lvmthin vmdisks-thin \
  --vgname pve2 \
  --thinpool vmdisks-thin \
  --content images,rootdir
Then I confirmed the storage was properly registered with pvesm status:

One thing I learned while testing: only lvmthin storage supports GUI-managed snapshots in Proxmox. While it’s technically possible to create LVM snapshots manually for thick-provisioned disks, these are not visible or managed through the GUI.
So, if snapshot support is important for a particular VM, I now place its disk on the lvmthin pool instead of the thick LVM storage.
Migrate Critical VMs to New Storage (Thick Provisioned)
I moved the pfSense VM and the Ubuntu Server VM running docker with the following commands:
qm shutdown 101
qm shutdown 102
qm move-disk 101 scsi0 vmdisks-thick
qm move-disk 102 virtio0 vmdisk-thick
qm start 101
qm start 102
After starting the VMs I confirmed that each one booted into the OS and then I deleted the unused vdisks in the GUI.
Next I migrated the rest of my VMs:
qm move-disk 100 scsi0 vmdisks-thin –delete
qm move-disk 200 scsi0 vmdisks-thin –delete
qm move-disk 900 scsi0 vmdisks-thin –delete
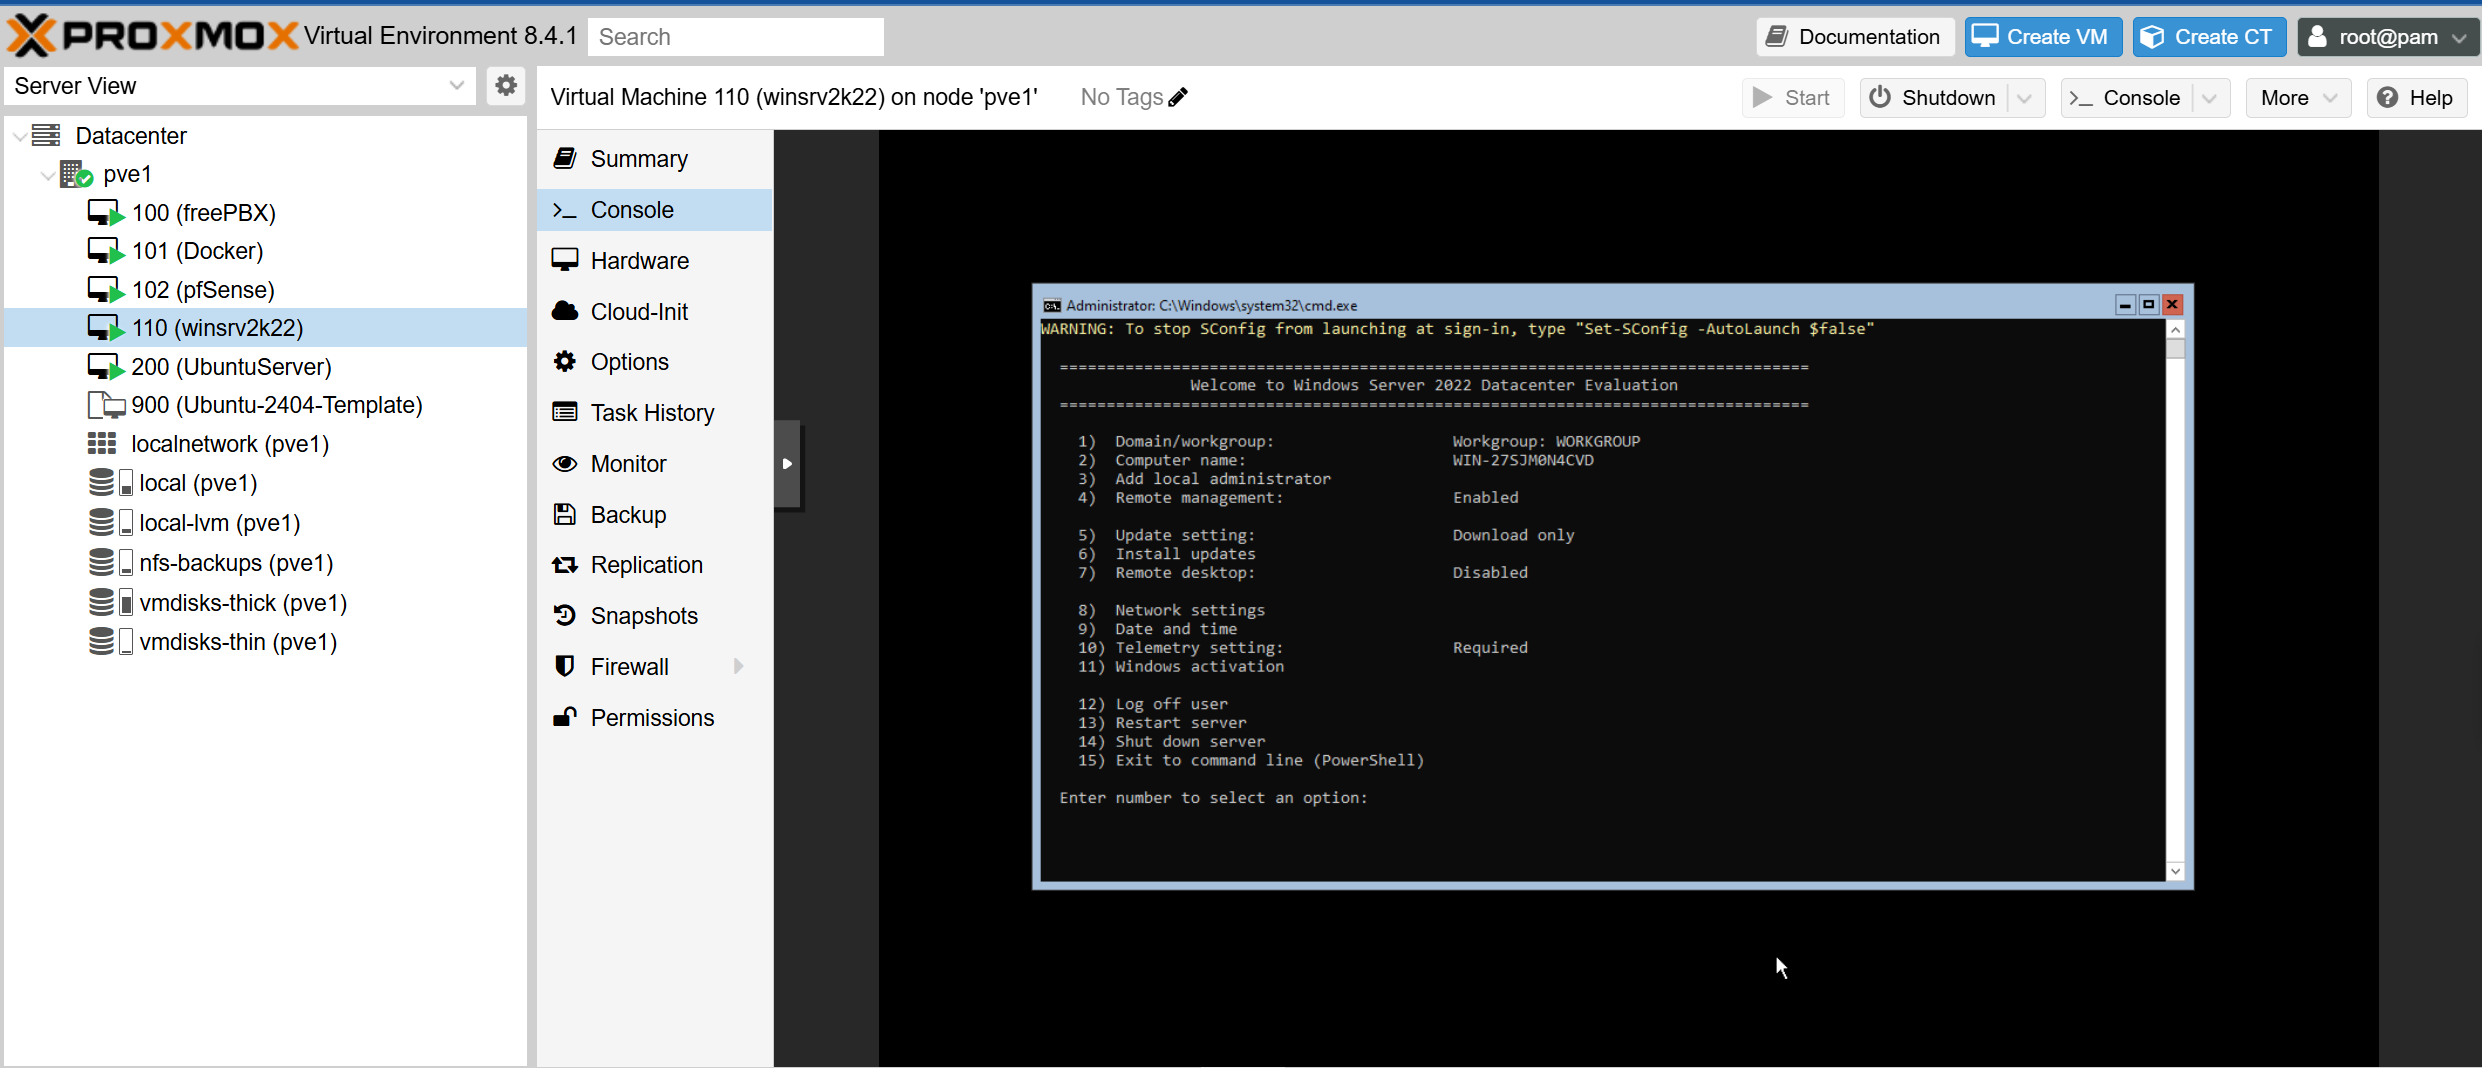
I then recreated the EFI and TPM disks that I deleted earlier for VM 110. I did this in the GUI and then I powered on the VM to make sure that I can boot into the OS:
Step 5: Automating Backups with Proxmox’s Built-In Scheduler
When I began this project, I assumed I would need to write a custom Bash script to manage VM backups and LVM snapshots, complete with manual pruning logic and cron scheduling. My initial plan was to run vzdump against specific VMs, then rotate and store the backups on my NAS. I also expected I’d have to manage snapshot creation and cleanup myself.
As I explored Proxmox more deeply, I realized this level of scripting wasn’t necessary. Proxmox already provides robust native tools for managing backup jobs and retention — both through the GUI and the CLI via the pvesh command, which interfaces directly with Proxmox’s REST API.
One challenge I encountered was figuring out the correct parameters to use with pvesh. Unlike other Proxmox tools like qm or pvesm, the pvesh CLI doesn’t have built-in help for endpoint-specific options. After a bit of trial and error, I found that the best way to confirm valid parameters was through the Proxmox API Browser
Here’s the command I used to create the nightly backup job:
pvesh create /cluster/backup \
    --id nightly-vm-backup \
    --vmid 101,102 \
    --storage nfs-backups \
    --mode snapshot \
    --compress zstd \
    --schedule "00:00"
This job backs up VM 101 (pfSense) and VM 102 (my Docker host) every night at midnight. It uses snapshot mode to ensure the VMs remain online during the process, and compresses the backups using zstd for space efficiency. The backups are sent to the NFS share I configured earlier, which includes a built-in retention policy.
When I set up the NFS storage, I defined a prune-backups rule that keeps:
- 7 daily backups
- 4 weekly backups
- 2 monthly backups
- and always retains the 3 most recent backups
This retention policy ensures that my NAS won’t fill up with old backups and aligns perfectly with the backup job’s daily schedule. There’s no need for custom pruning scripts — Proxmox handles it all automatically.
Step 6: Verifying and Testing the Backup Process
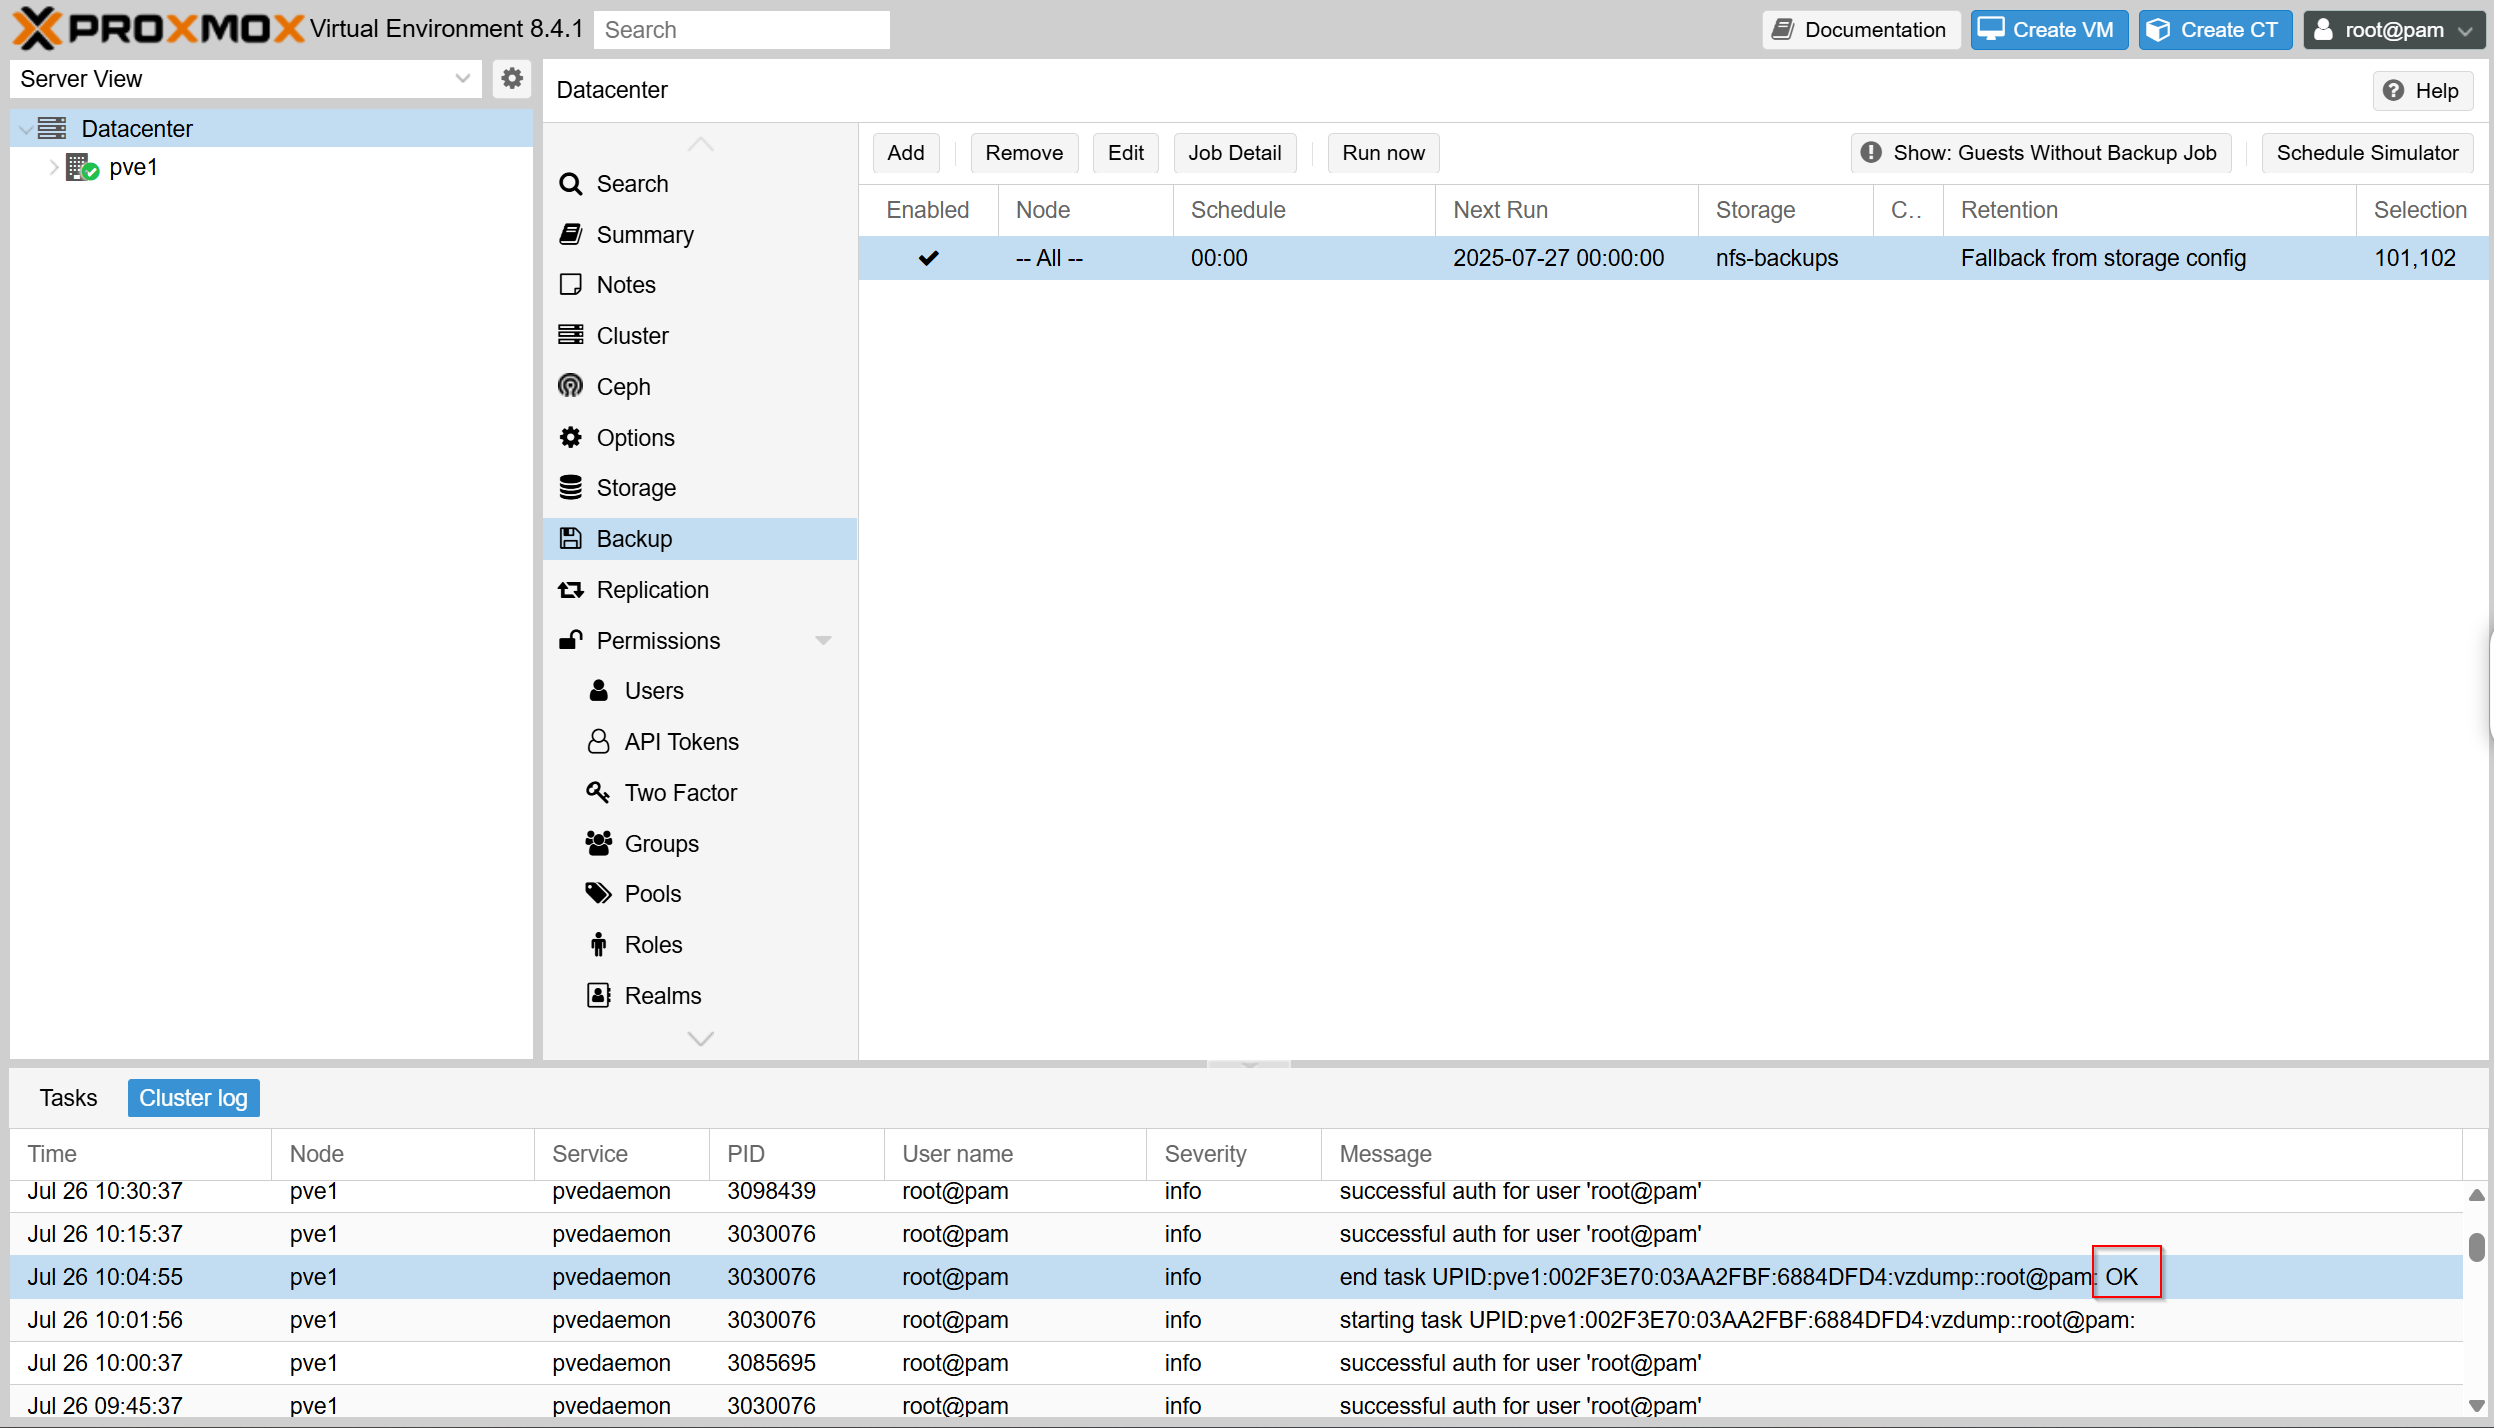
I manually ran the backup job from the GUI:
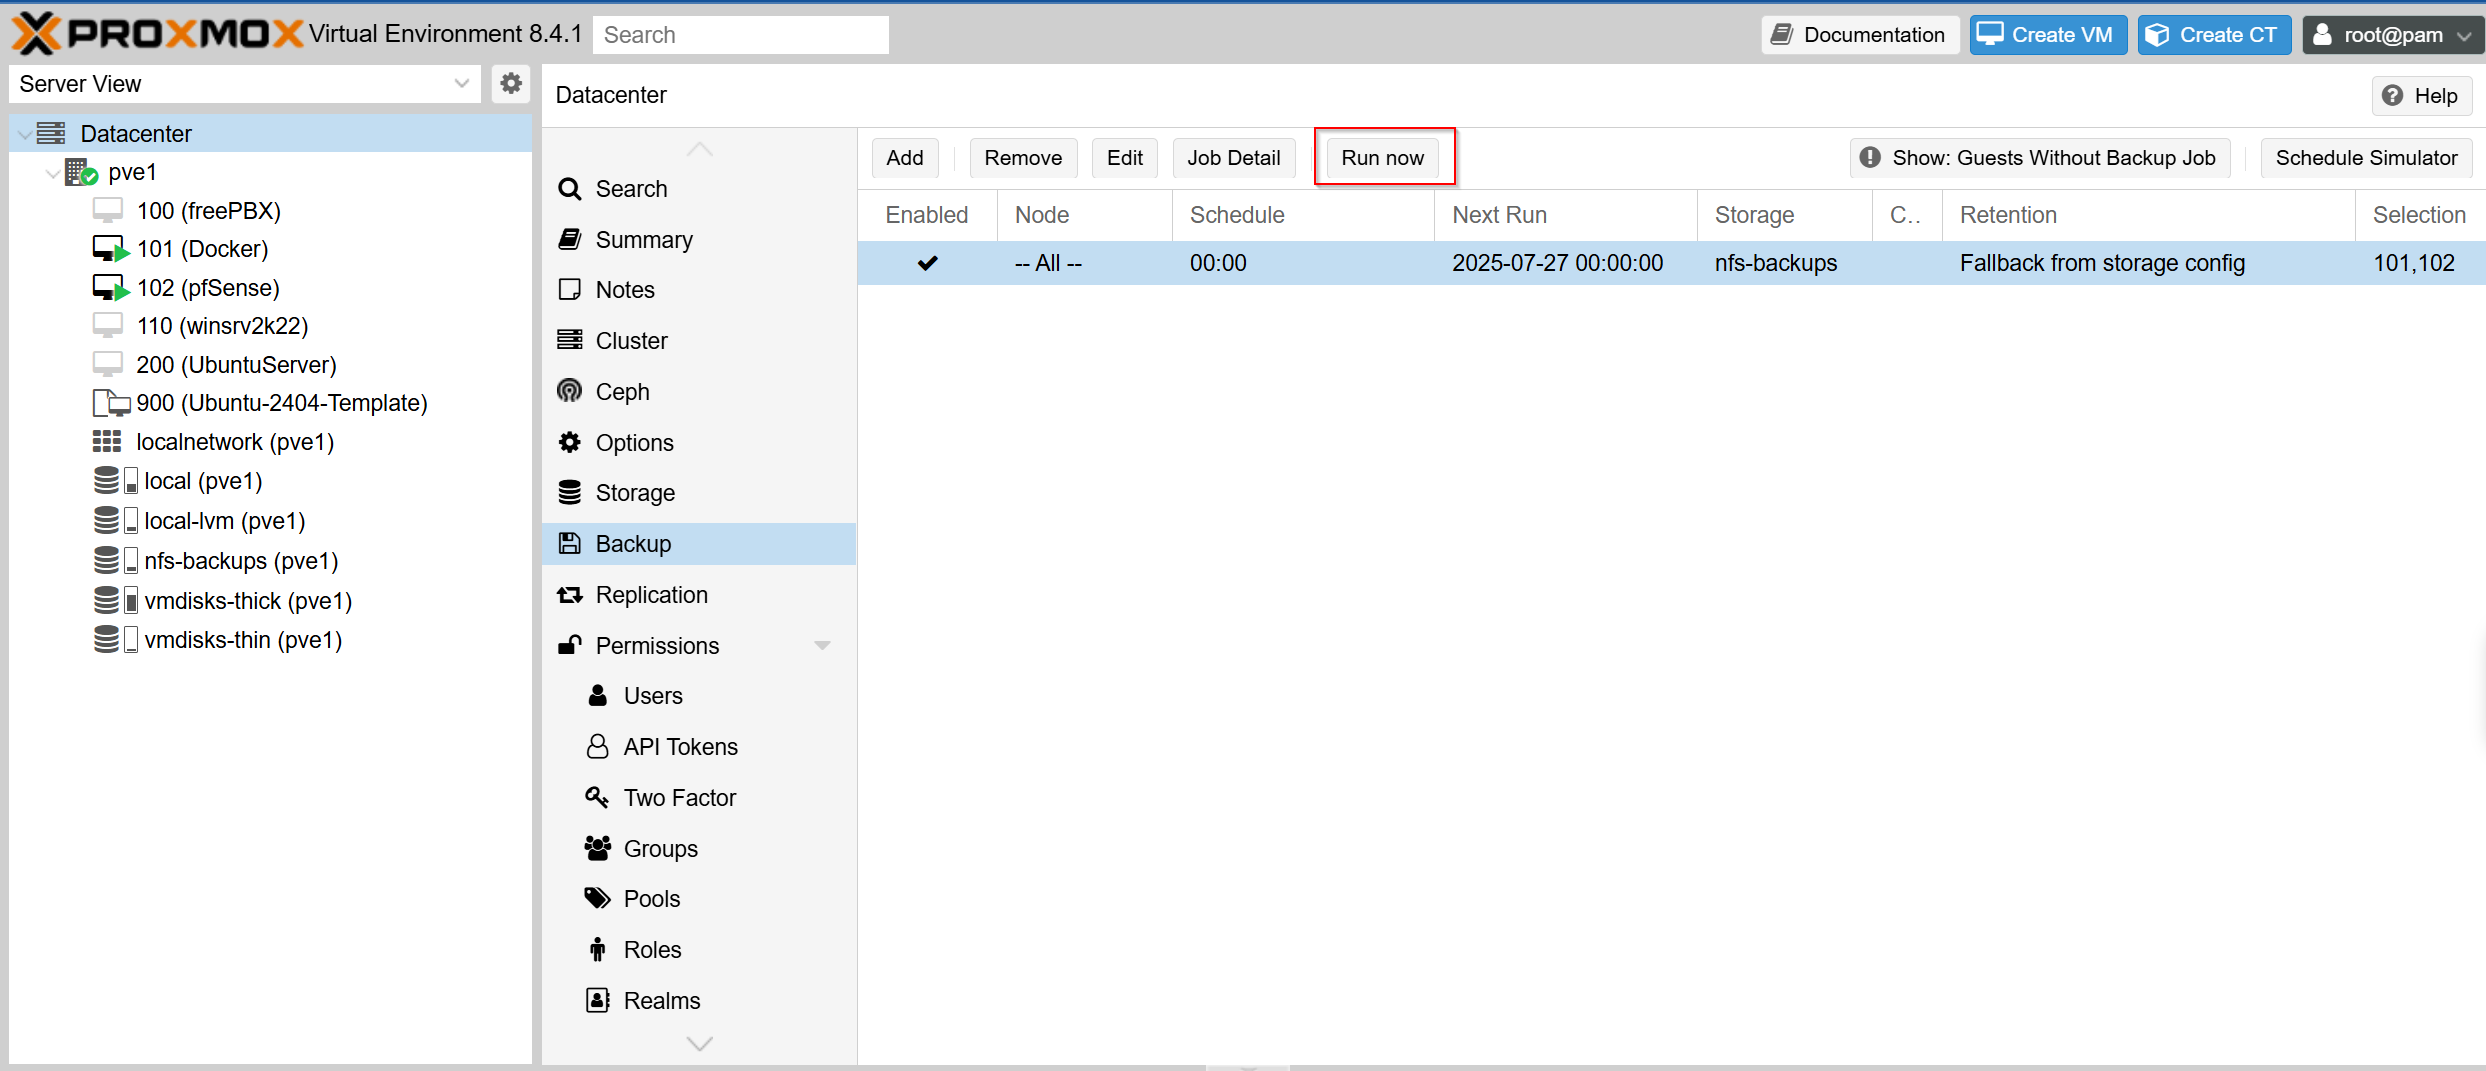
On that same page I can look at the cluster logs at the bottom and I can see that the backup was successful indicated by OK
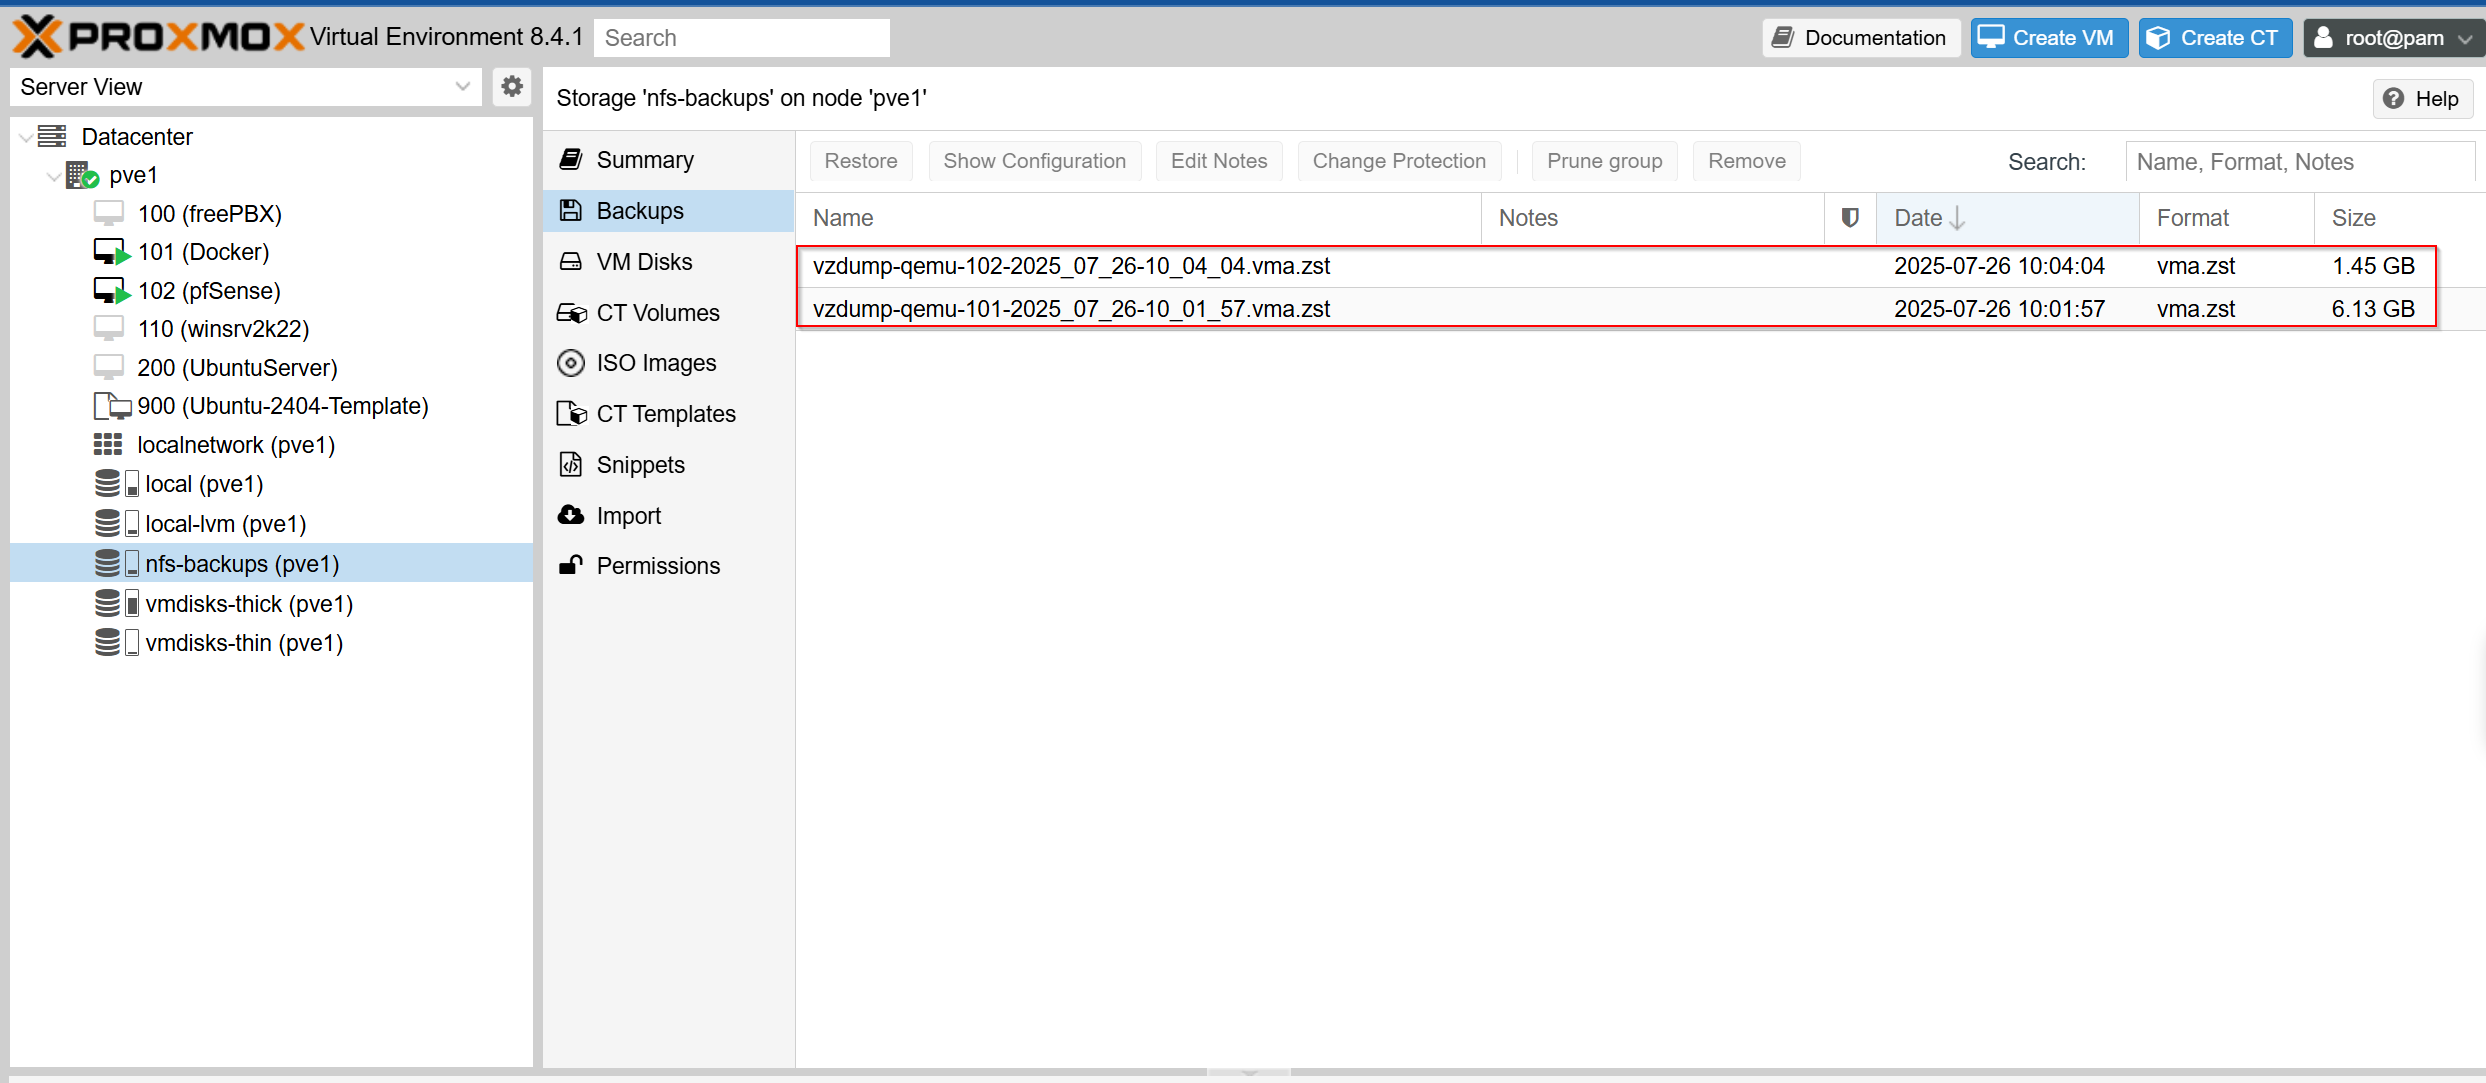
I also checked the NFS storage and see that the two backups are there:
Final Thoughts and Lessons Learned
This blog post is entirely too long — but that’s because this project took me deep into areas I hadn’t explored before. What started as a simple goal to rebuild my Proxmox storage and backup strategy turned into a deep dive into how Proxmox handles storage, automation, and backup logic under the hood. I planned to write custom Bash scripts for vzdump and snapshot pruning, but along the way I discovered that Proxmox already offers native tools that are better integrated and easier to maintain.
I learned how to:
- Replace a ZFS-based setup with a more modular and efficient LVM-based storage layout
- Use LVM thin provisioning for space-efficient VM storage, while preserving the option for thick provisioning when needed
- Configure off-host NFS backup storage with automatic pruning using prune-backups
- Create scheduled, snapshot-based backup jobs from the CLI using pvesh, and validate the correct API parameters through the Proxmox API Viewer
- Distinguish between the use cases for LVM snapshots vs. Proxmox vzdump backups, and why Proxmox backups are better suited for long-term retention and disaster recovery
This has been such a fun and valuable project, and it gave me an excuse to better understand how Proxmox works as a powerful KVM/QEMU orchestration tool. I’m especially proud that I used the built-in tools rather than overcomplicating things with shell scripts — that decision alone simplified my backup and restore workflows significantly.
Going forward, the next step I want to take is integrating Zabbix so I can monitor the backup pipeline. I want to know if backups fail — and eventually, I’d like to build error detection and alerting for my drives so I can respond proactively. That will probably be a separate blog post, and I’m looking forward to documenting that journey as well.
For now, I’ve rebuilt my home lab’s Proxmox storage and backup foundation with clarity, automation, and resilience in mind — and I walked away understanding more than just the “how” — I understand the “why” behind my choices.


