Exploring Powershell Fundamentals: 8 Key Takeaways
As a system administrator of predominantly Windows environments, my role and the technical challenges I encounter encourage me to use Powershell. It is probably more accurate to say I want to become an IT wizard and I believe that in this season of my IT career knowing the fundamentals of Powershell will help me get one step closer to that goal.
I am using two books to guide me on my Powershell journey:
Learn Powershell In A Month of Lunches (4th Edition)
Powershell For Sysadmins: Workflow Automation Made Easy
These two books are such great resources. My strategy has included reading both of these books at the same time. They both have the same information but different approaches, and I like them both. While reading these books I take notes on digital flashcards with a fantastic program called Anki. It is a must-have if flash cards work for you.
In this blog post, I will synthesize my notes and create a reference of carefully crafted takeaways from my reading of these two awesome resources. I hope that this helps you in some way!
Table of Contents
1. Using The Help System
The help system is robust and you can use it in a few different ways. Before they are useful to you, make sure that your help files are updated. You can update help by using this cmdlet:
PS C:\>Update-Help -Force -Verbose -ErrorAction SilentlyContinue
The -Force parameter will ensure that all the help files will be updated as it will overwrite the currently installed ones.
The -Verbose parameter gives you some detailed output in the shell while the help files are updating. While updating the help files you may receive an error possibly because at least one help file can’t be updated for some reason or another but it is ok.
If you use the -ErrorAction parameter with the SilentlyContinue argument, PowerShell will just continue updating help and not give you an error when it detects any errors when updating the help files.
There is so much documentation available quickly from the shell however before learning about how awesome the help system is, I always just Googled the command I needed to find out more information on. Another cool thing you can do is use Get-Help to open up the command reference directly in your browser! I use this one all the time:
PS C:\>Get-Help <command> -Online
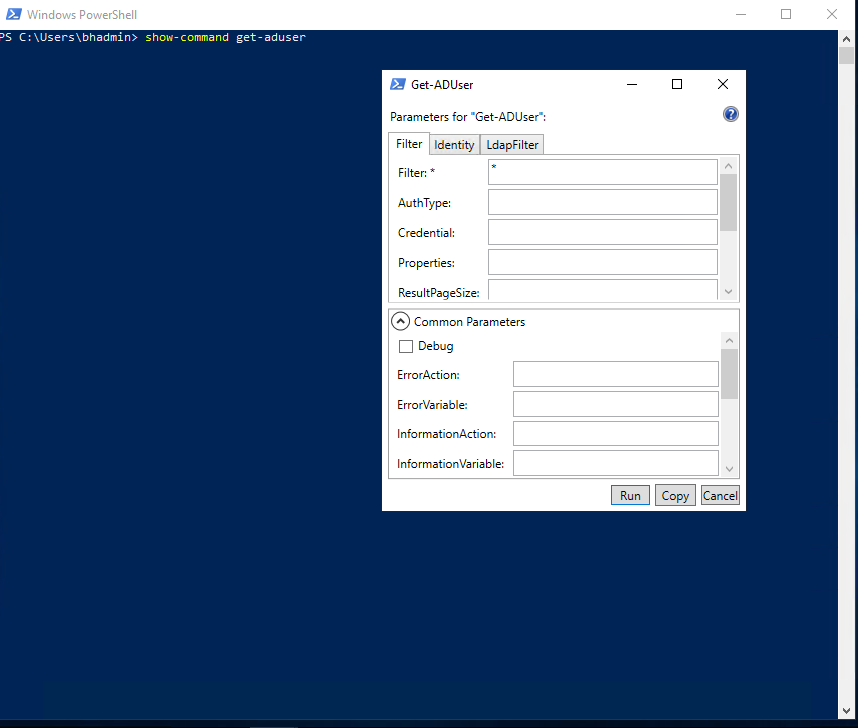
Something else I found that is super helpful to me is the Show-Command. This command launched a form that you can build out the command with all the parameters available to fill out. So cool! You can use show-command and see all the available parameters for a command at a glance:
2. Powershell can execute cmdlets, functions, & aliases
Cmdlets
Cmdlets are native PowerShell commands collected into modules and loaded on demand in the shell. Cmdlets have a distinct naming convention: Verb-noun. The verb declares the action that is to be taken and the noun identifies the resource the cmdlet will act against. For example, let’s take a look at a cmdlet I use all the time at work:
PS C:>Get-MailboxFolderPermission
In this cmdlet, the verb is “Get-” which does exactly what it sounds like and retrieves some information. The noun is “-MailboxFolderPermission” This cmdlet retrieves the permissions that are set for a specified folder in a user’s mailbox.
Aliases
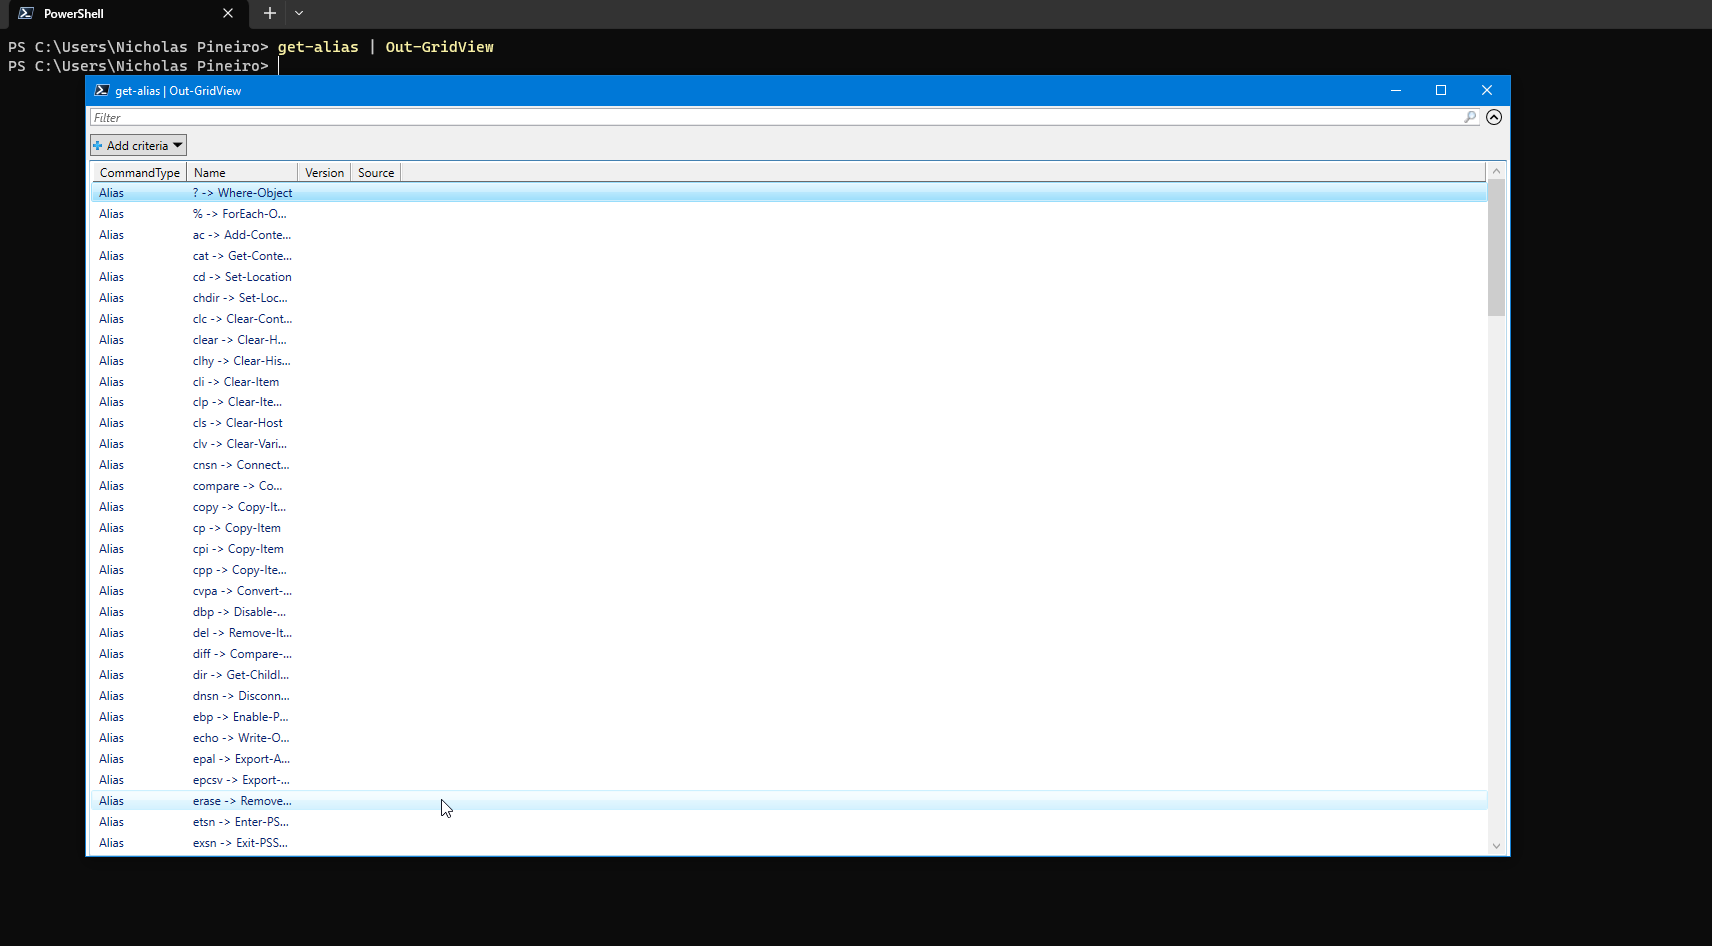
Cmdlets in Powershell can sometimes be long like Get-MailboxFolderPermission. In Powershell, there are built-in aliases or alternative names that you can call and Powershell will run that cmdlet. You can get a list of all the aliases that are available in the current session by using this cmdlet:
PS C:>Get-Alias
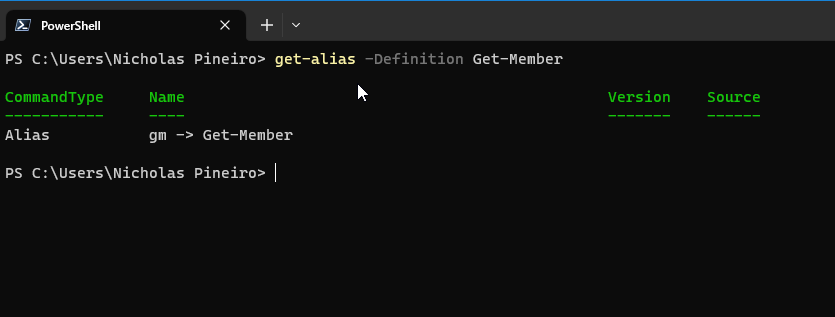
If you want to get the alias of a specific command in Powershell you can use the -Definition parameter:
Functions
Functions are very similar to cmdlets. They are used to perform a single task. The difference between a function and a cmdlet is that functions are written in the powershell scripting language and cmdlets are written in another language like C#. To get a list of all the functions that are currently loaded in the PowerShell session you can use this command:
PS C:>Get-Command -CommandType Function
You can even take a peek inside the source code to see that the functions built into Powershell are indeed written in the Powershell scripting language! I found this StackOverflow page that helped me figure that out:

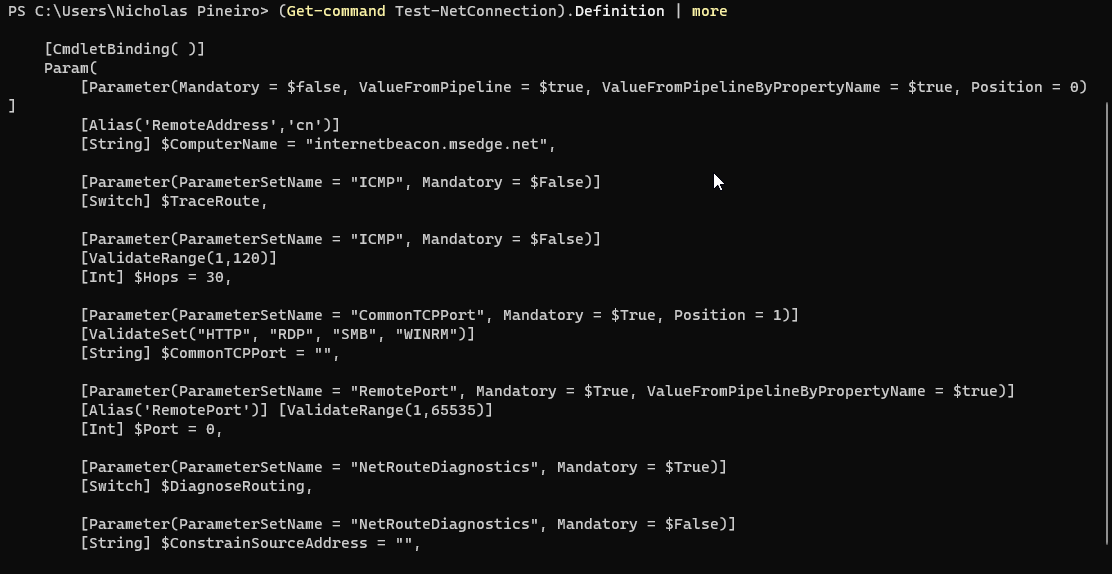
What I did was get the command “Test-NetConnection” and confirm that it is a function. Test-NetConnection is the equivalent of “ping” in Windows Command Prompt. Then I called the definition property of get-command to see the source code of Test-NetConnection. Cool!
You can also write your own functions. As best practice, you should always use the verb-noun syntax and also use the approved verbs. You can see a list of approved verbs by using this command:
PS C:>Get-Verb | select-object -Property Verb, Group
The basic syntax of a function in Powershell is the following:
 Function <Descriptive Name> {
# A script block you would like to run
}
When writing a function you can expand its usefulness by creating parameters and making the function compatible with the pipeline ( | ). Here is an example of an advanced function called “Install-Software”:
 function Install-Software {
param(
[Parameter(Mandatory)]
[ValidateSet('1', '2')]
[string]$Version,

[Parameter(Mandatory, ValueFromPipeline)]
[string]$ComputerName
)
process {
Write-Host "I installed software version $Version on $ComputerName. Yippee!"
}
}

$computers = @("SRV1", "SRV2", "SRV3")
$computers | Install-Software -Version 2
This function can accept an array of strings (computer names) and iterate over each object in the array. When this happens a simple message is written to the console saying what software version is installed on the computer.
In this function, two parameters are specified in the parameter block – Version & ComputerName. The parameters are declared in the parameter block with the keyword “param.” Pipeline compatibility is configured by assigning the attribute “ValueFromPipeline” to the “ComputerName” parameter.
3. Formatting Tips
In Powershell, it is useful to know the ways you can manipulate the output to the console so that you can get the information you need in an easily readable format. Here are some of my takeaways from doing this in Powershell:
Many objects have the Name property. An easy way to make sure that you see this property when you run a cmdlet is to use the format-wide command. Let’s say you only want to get the names of processes running on a computer. You can use the pipeline to send the objects of Get-Process to Format-Wide:
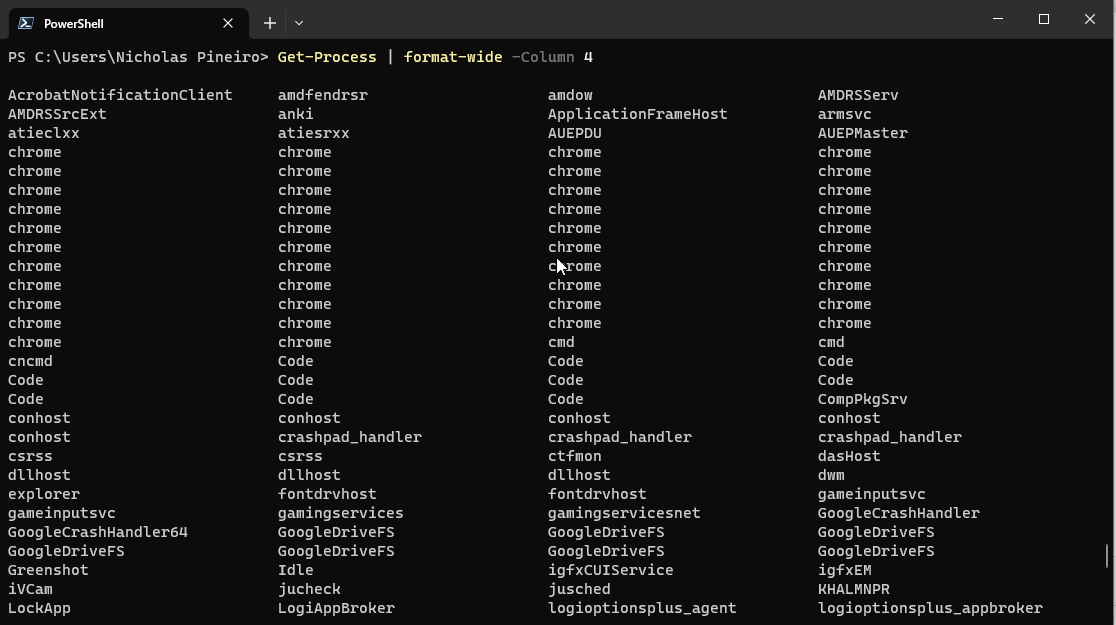
By default Get-Process | format-wide will output two columns by default. In this example, I used the -Column parameter to specify that I want there to be 4 columns in the output.
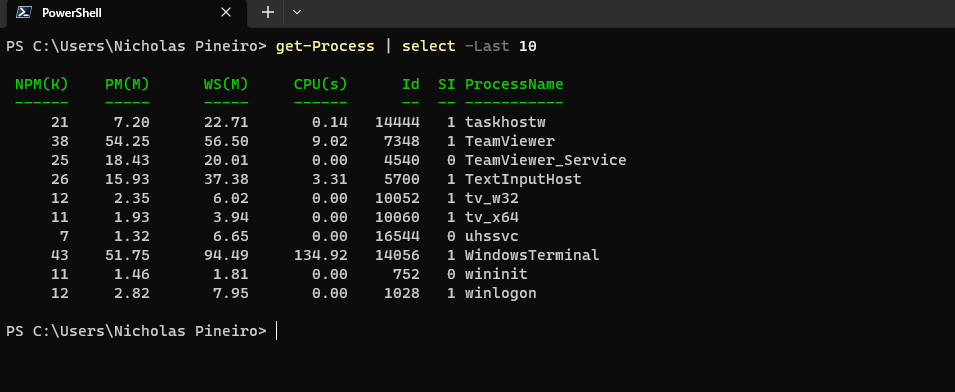
If the output is too long and you are only interested in the last 10 objects, you can pipe those objects to select-object and use the parameter -Last:
By default, Powershell does not show you all the properties of an object when you run a cmdlet. If you want to see all the properties, pipe the objects to the Format-Table command and use the -Property * parameter:

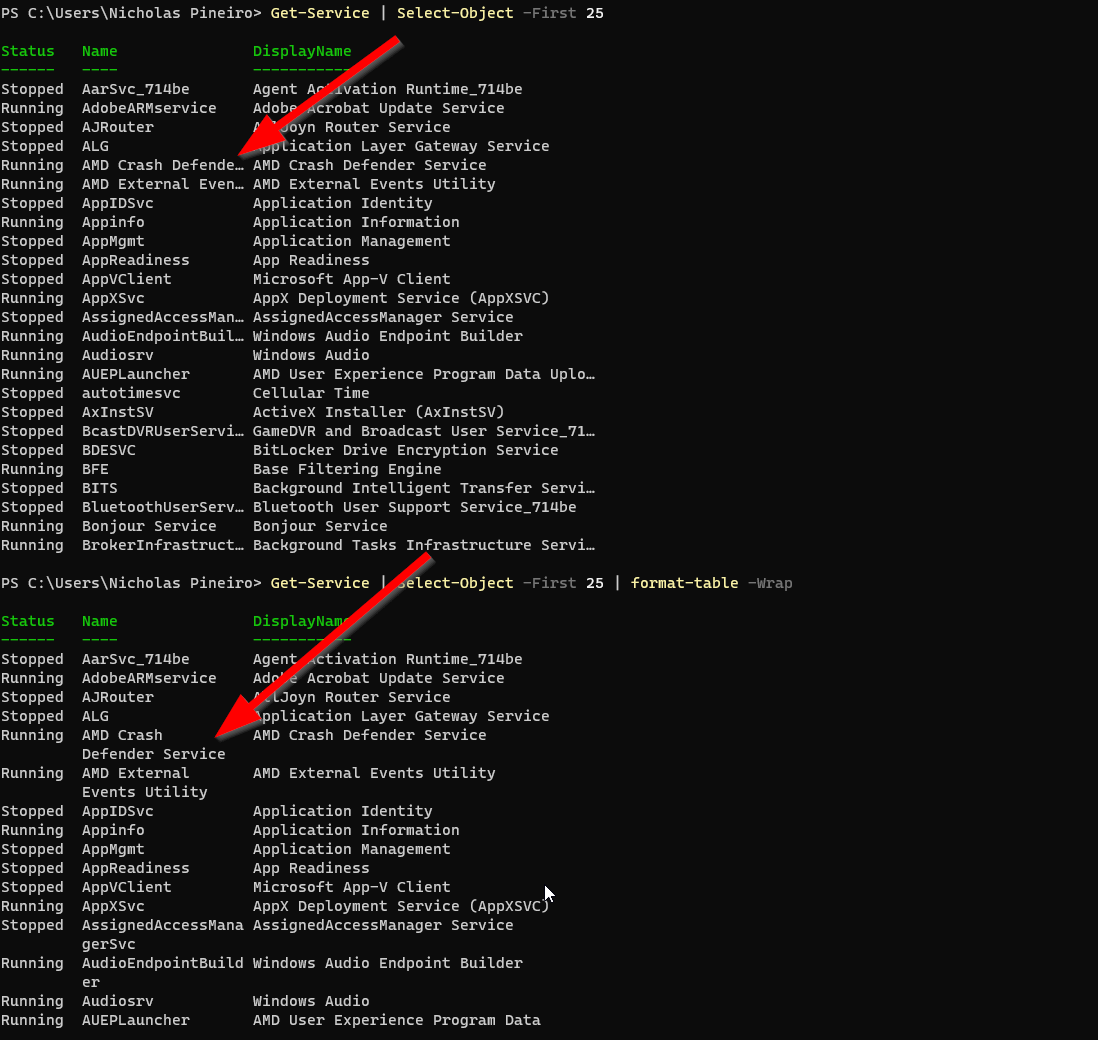
Sometimes information is truncated in the table output because there is too much information. You can preserve the information in the shell so you don’t see the ellipses by piping the objects to the format-table cmdlet and using the -Wrap parameter:
If you want to display output in the console one page at a time, you can pipe the output to Out-Host and use the -Paging parameter. You can also simply use the alias “more:”
PS C:>Get-Process | more
PS C:>Get-Process | Out-Host -Paging
You can also send the output to an interactive window with the Out-Gridview cmdlet:
4. Everything is an Object
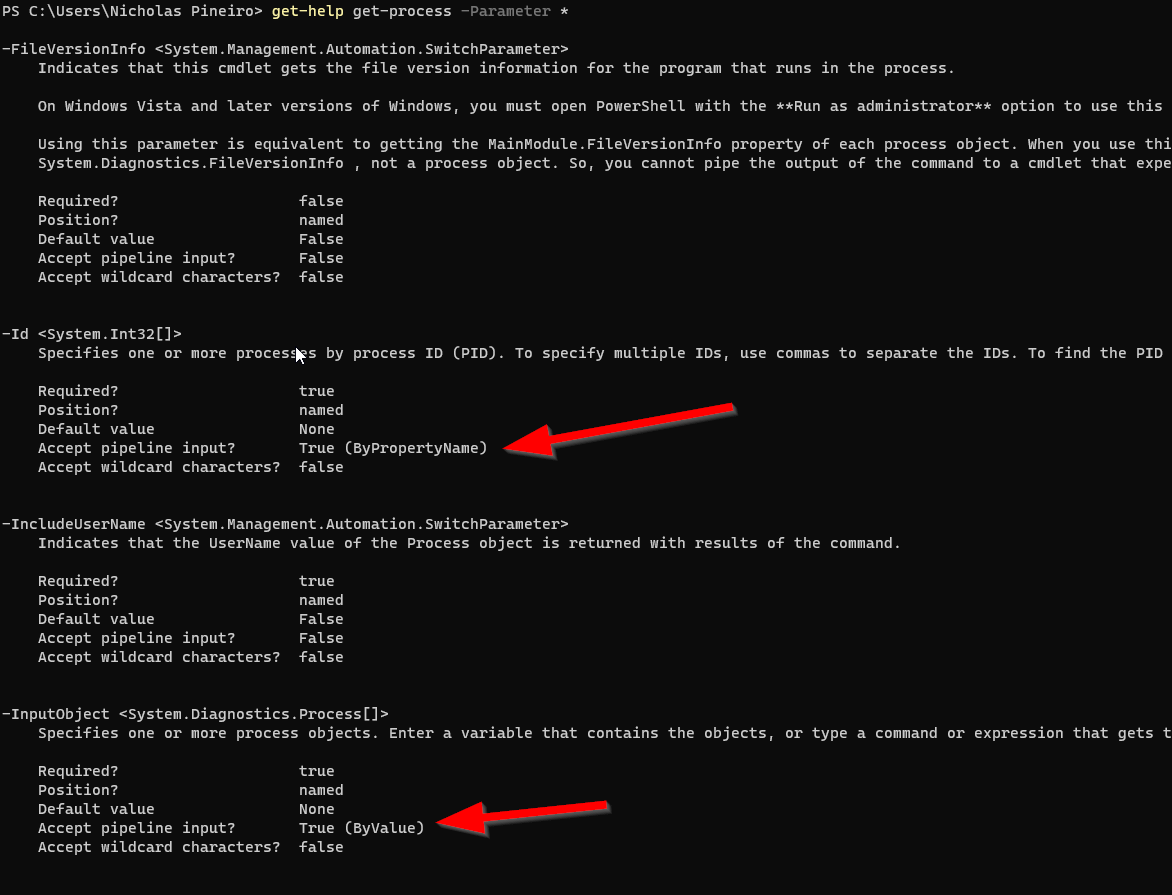
What makes Powershell unique is its ability to pass objects across the pipeline and not just simple strings like other scripting languages. Everything in Powershell is an object. An object represents a single thing like a service, a drive, or anything really.
When you run a cmdlet and use the pipe symbol ( | ), objects that are generated from the cmdlet on the left are used as input for the cmdlet to the right of the pipeline. The parameters on the right side of the pipeline must accept pipeline input. The two ways in which Powershell matches pipeline input to parameters are ByValue (entire object) or ByPropertyName (single object property). You can confirm if parameters accept pipeline input by reviewing the help document of a cmdlet:
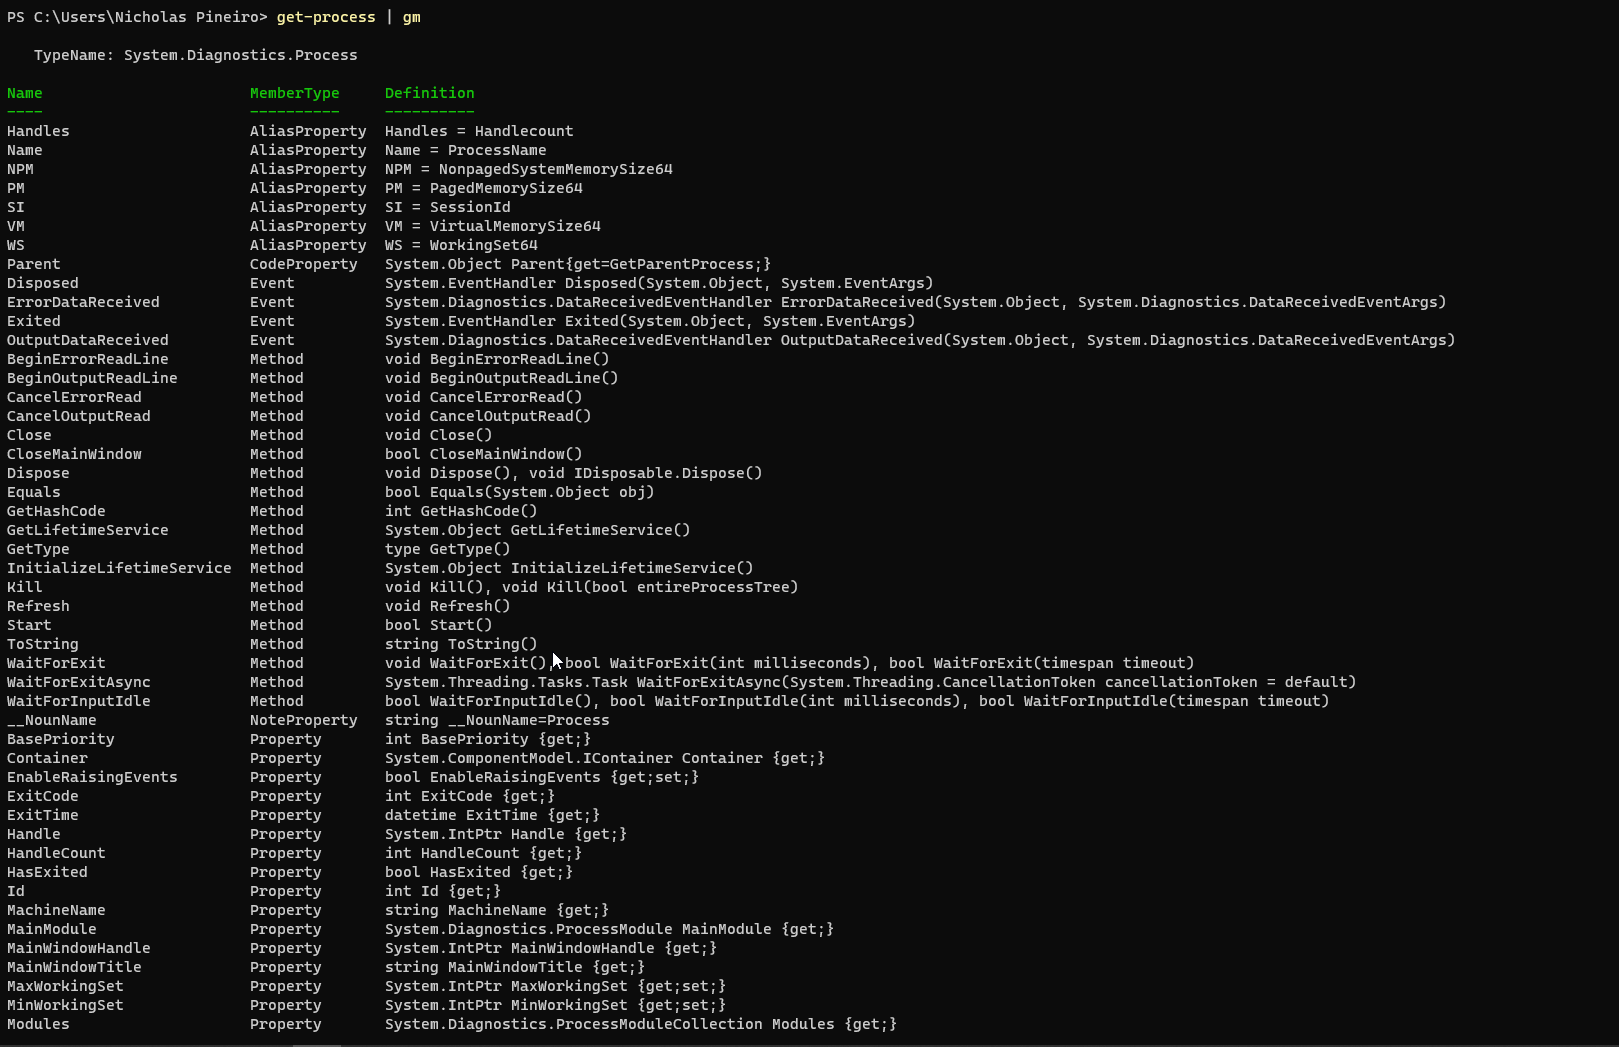
An object has properties and methods. The properties of an object describe the object and the method is the action that the object can take. You can discover the properties and methods of an object by piping to Get-Member (Or with the alias “gm”):
PS C:>Get-Process | Get-Member
5. Splatting
When creating a script and using a lot of parameters, you can make your code cleaner and more readable if you use the splatting method. One way to implement the splatting method is to specify a hashtable and list all the parameters and their values in the hashtable. Finally, you can call the hashtable with the ‘@’ sign and pass it to your cmdlet.
The following code is a simple script that creates active directory user accounts. I declare a few variables and then I use the Import-Csv cmdlet to pipe the objects into a for loop. In the script block that follows are the New-ADUser cmdlet and a bunch of parameters:
$Password = Read-Host "Enter a Temporary Password" -AsSecureString
$Company = "BeaconHill"
$City = "Yonkers"
$OfficePhone = "914-555-5656"
Import-Csv -Path C:\Users\bhadmin\UserAd.csv | ForEach-Object {New-ADUser -Name $_.name -GivenName $_."First Name" -Surname $_."Last Name" -DisplayName $_.name -SamAccountName $_.sam -UserPrincipalName $_.UPN -Company $Company -City $City -OfficePhone $OfficePhone -Department $_.dept -Title $_."Job Title" -OtherAttributes  @{'proxyAddresses' = $_.PrimarySMTP; 'mail' = $_.email} -Path $_.ou -AccountPassword $Password -Enabled $true -ChangePasswordAtLogon $true}
This code works however it is not easy on the eyes. Let’s try using the splatting technique:
$Password = Read-Host "Enter a Temporary Password" -AsSecureString
$Company = "BeaconHill"
$City = "Yonkers"
$OfficePhone = "914-555-5656"

Import-Csv -Path C:\Users\bhadmin\UserAd.csv | ForEach-Object {
    $NewADuserParams = @{
        Name = $_.name
        GivenName = $_."First Name"
        Surname = $_."Last Name"
        DisplayName = $_.name
        SamAccountName = $_.sam
        UserPrincipalName = $_.UPN
        Company = $Company
        City = $City
        OfficePhone = $OfficePhone
        Department = $_.dept
        Title = $_."JobTitle"
        OtherAttributes = @{'proxyAddresses' = $_.PrimarySMTP; 'mail' = $_.email}
        Path = $_.ou
        AccountPassword = $Password
        Enabled = $true
        ChangePasswordAtLogon = $true
    }
New-ADUser @NewADuserParams
}
In the new script, I created a variable called $NewADUserParams in the for loop to store the hashtable with all the parameters and arguments. Then I use the New-ADUser cmdlet and call the hashtable with an ‘@’ sign.
6. Flow Control
While Loops
Powershell has a few different types of loops. One of them is a ‘while’ loop. Here is an example of a simple while loop from the Powerhell for Sysadmins book:
$counter = 0
while ($counter -lt 11) {
    $counter
    $counter++
}
The first line declares the variable $counter with a starting value of ‘0.’ The second line is the start of the while loop. The condition in the parentheses is evaluated first. If the condition is true then the loop keeps iterating over $counter. If the condition is false, then the loop stops. Since the starting value of $counter is 0 and 0 is less than 11, the condition evaluates to true and executes the code in the script block.
In the $scriptblock the $counter variable is invoked and displayed in the shell and following that, the value of $counter is increased by 1 on the 4th line. Since the condition is still true that the $counter is less than zero, the loop continues until the condition is false:
PS C:\WINDOWS\system32> $counter = 0
while ($counter -lt 11) {
    $counter
    $counter++
}
0
1
2
3
4
5
6
7
8
9
10

PS C:\WINDOWS\system32>
7. Error Handling
Try / Catch / Finally Blocks
When writing scripts, it is helpful to think of multiple situations that your script might run into. To keep your script flexible, including a way to manage errors will help.
There are two types of errors: Terminating Errors and Non-Terminating errors. Terminating errors are errors that occur that will halt a script. A non-Terminating error will throw a warning message but the script will still run.
One way you can add error handling to your script is by using a Try / Catch / Finally block:
try {
     #initial code
} catch {
     #code that runs if terminating error is found
} finally {
     #code that runs at the end
The try block is where you put your code and if the code produces an error, it will get transferred to the catch block and the code in that block will run. The ‘finally’ block is optional and the code in this block will run whether or not the code in the try block throws an error or not. Usually, the finally block is used for cleanup or logging or other tasks that need to run despite any errors that may occur.
Here is an example of a simple script with error handling using a Try / Catch / Finally block:
try {
    $result = 10 / 0
    Write-Host "Yay! No Error!."
} catch {
    Write-Host "An exception occurred: $($_.Exception.Message)"
} finally {
    Write-Host "Finally block executed."
}
This code produces this output:
An exception occurred: Attempted to divide by zero.
Finally block executed.
In the try block the variable $result is assigned a mathematical expression that will throw a terminating error. This will trigger the catch block and the code inside there will execute. In the output, we can see that the code in the catch block ran as well as the code in the finally block.
If the code in the try block did not throw an error the code in the finally block will still run:
PS C:\WINDOWS\system32> try {
    $result = 10 / 10
    Write-Host "Yay! No Errors!."
} catch {
    Write-Host "An exception occurred: $($_.Exception.Message)"
} finally {
    Write-Host "Finally block executed."
}
Yay! No Errors!.
Finally block executed.
Throw Statements
Any error from a cmdlet that throws a non-terminating error can be turned into a terminating error by using the common parameter -ErrorAction and the “Stop” Argument:
PS C:\WINDOWS\system32> try {
    $content = Get-Content NonExistentFile.txt -ErrorAction Stop
    Write-Host "File content: $content"
} catch {
    Write-Host "An error occurred: $($_.Exception.Message)"
}
An error occurred: Cannot find path 'C:\WINDOWS\system32\NonExistentFile.txt' because it does not exist.
By default, the catch block is not triggered by non-terminating errors which is why the -ErrorAction parameter with the Stop argument is needed so the code in the catch block is triggered. If not the output would look something like this:
PS C:\WINDOWS\system32> try {
    $content = Get-Content NonExistentFile.txt
    Write-Host "File content: $content"
} catch {
    Write-Host "An error occurred: $($_.Exception.Message)"
}
Get-Content : Cannot find path 'C:\WINDOWS\system32\NonExistentFile.txt' because it does not exist.
At line:2 char:16
+     $content = Get-Content NonExistentFile.txt
+                ~~~~~~~~~~~~~~~~~~~~~~~~~~~~~~~
    + CategoryInfo          : ObjectNotFound: (C:\WINDOWS\system32\NonExistentFile.txt:String) [Get-Content], ItemNotFoundException
    + FullyQualifiedErrorId : PathNotFound,Microsoft.PowerShell.Commands.GetContentCommand

File content:
As you can see the script actually continues. The second line in the try blocks runs and displays the message in the output.
You can also use a throw statement to make any non-terminating error from a cmdlet into a terminating error. The benefit of using the throw statement as opposed to the -ErrorAction parameter is that you can fully customize the error message. This can be useful for debugging and providing more meaningful information in addition to the exception that is thrown. Here is an example of a simple script with a throw statement inside a catch block:
try {
    $content = Get-Content NonExistentFile.txt
    if (-not $content) {
    throw "The file aint here bro"
    Write-Host "File content: $content"
    }
} catch {
    Write-Host "An error occurred: $($_.Exception.Message)"
}
The $content variable is assigned a value that does not exist. Get-Content will throw a non-terminating error. However, if we add an if statement and specify in the scriptblock for a custom throw message to be thrown if the statement is true then the script will terminate and the next line in the try block will not be run. Check out the output:
Get-Content : Cannot find path 'C:\WINDOWS\system32\NonExistentFile.txt' because it does not exist.
At line:2 char:16
+     $content = Get-Content NonExistentFile.txt
+                ~~~~~~~~~~~~~~~~~~~~~~~~~~~~~~~
    + CategoryInfo          : ObjectNotFound: (C:\WINDOWS\system32\NonExistentFile.txt:String) [Get-Content], ItemNotFoundException
    + FullyQualifiedErrorId : PathNotFound,Microsoft.PowerShell.Commands.GetContentCommand

An error occurred: The file aint here bro
8. Testing Scripts or Functions
One way you can test your script or function is by adding -WhatIf functionality. There are common parameters that every cmdlet has and the -WhatIf parameter is one of those parameters that a lot of cmdlets have. The -WhatIf parameter will output a description of the target item and what operation will be taken against the target item without actually making any changes.
Here is an example of a basic function called Add-Integers:
function Add-Integers {
    $counter = 0
    while ($counter -lt 10) {
        $counter
        $counter++
    }
    $counter
}

# Call the function
Add-Integers
This function increases the value of $counter by 1 if the condition in the while loop is true. Here is the same function but with -WhatIf functionality:
PS C:\WINDOWS\system32> function Add-Integers {
    [CmdletBinding(SupportsShouldProcess)]
    param()

    $counter = 0
    while ($counter -lt 10) {
        $ActionDescription = "Increment counter by 1 (Current count: $counter)"
        if ($PSCmdlet.ShouldProcess("Counter: $counter", $ActionDescription)) {
            $counter
            $counter++
        } else {
            break
        }
    }
    $counter
}

# Call the function with -WhatIf
Add-Integers -WhatIf
In order to use common parameters like WhatIf you need to use advanced functions. To do this you need to add the [CmdletBinding] attribute and then the parameter block – param(). The parameter block is empty because this function has no custom parameters.
An If statement is also used inside the while loop that checks if the WhatIf parameter is used when $PSCmdlets.ShouldProcess is called. If the WhatIf parameter is used, a message will display that includes the target item and the operation that will be taken against the target.
$PSCmdlet is a built-in variable that represents the script or function that is currently running. Following that is the ShouldProcess() property in which accepts arguments in a very specific way. By default if you only specify one argument the ShouldProcess method accepts the value as the target:
The example in Microsoft’s documentation is a great way to understand this piece:
function Test-ShouldProcess {
    [CmdletBinding(SupportsShouldProcess)]
    param()

    if($PSCmdlet.ShouldProcess('TARGET')){
        # ...
    }
}
This function generates this output:
What if: Performing the operation "Test-ShouldProcess" on target "TARGET".
By default, the operation label is the name of the current function ($PSCmdlet.)
Passing two arguments to ShouldProcess means that I can customize what operation is displayed in the WhatIf message:
## $PSCmdlet.ShouldProcess('TARGET','OPERATION')
What if: Performing the operation "OPERATION" on target "TARGET".
Here is the output of my function:
What if: Performing the operation "Increment counter by 1 (Current count: 0)" on target "Counter: 0".
0
The WhatIf parameter successfully outputs information about the operation that will be taken against the target.
Summary of Commands:
Get-Help -Force -Verbose -ErrorAction SilentlyContinue
Get-Help <command> -Examples
Get-Help <command> -Online
Show-Command <command>
Get-Command -Verb
Get-Command -Noun
Get-Command *<insert string>
Get-Command -CommandType Function
Get-Command -Name <insert cmdlet>
(Get-Command <insert cmdlet>).Definition | more
Get-Verb | Select-Object -Property Verb, Group
Get-Alias
Get-Alias -Definition Get-Member