The ways in which computers work in order to communicate across a network is truly amazing. There are so many individual parts that make up network communication and when understood how they all work together, can be appreciated. Two big protocols that have a huge role in ensuring that computers are able to communicate across a network is DNS and DHCP.
What is DNS?
The Domain Name System or DNS is a hierarchy of servers that store IP addresses which map to human readable names that we can remember. Resources that we access on the internet – like web pages, web applications, file servers, etc – they all have an IP address however when we want to access those resources from our computer at home, we don’t type in the IP address of those servers in our web browser when we want to access them. When we open a web browser and type in “www.google.com” , our computer will need to request the IP address of “www.google.com” from a DNS server (assuming our computer has never accessed google.com). Once our computer fetches the IP address of a resource on the internet, it stores the mapping in its cache so that if the computer needs to access “www.google.com” again, the computer can retrieve the IP address from memory and not have to make a request to a DNS server again to access “www.google.com“.
DNS is crucial to network communications and without it, would make using the internet a less then an amazing experience especially if we had to remember all those IP addresses! As a matter of fact you can just imagine how difficult it would be for one server to store all IP address mappings to every internet resource in the world. The spoiler here is that its impossible. That is why there is a hierarchy of DNS servers that work together in a system to accomplish the work of providing end hosts the IP addresses of internet resources.
The hierarchy of DNS servers works very similar to the file system of a computer. When you look at the file path of a file in a windows filesystem you can gather some important information like what the root of the file system is. For example a text file on my desktop called “some_file.txt could have the file path: C:\Users\%USERPROFILE%\Desktop\some_file.txt. We know from this file path that “C:\” is the root and there are folders to the right of the root which eventually lead to the location of the file. DNS is exactly the opposite. www.google.com is what you would call a “fully qualified domain name” (FQDN) with the root, all the way to the far right. Instead of folders, DNS uses “Domains” which are less like folders and more like a holding space for computer names. “com” is what is called a “top-level domain” and there are several (gov, edu, org, etc). The next domain in the FQDN here is “google.” The far left of the fully qualified domain name is suppose could indicate the hostname of the end host or another sub-domain. In this FQDN, the hostname is represented as “www” which is short hand to indicate a web server.
What is DHCP?
The Dynamic Host Configuration Protocol or DHCP is responsible for ensuring that every device on a network is assigned an IP address. Usually in a network there is one DHCP server and many DHCP clients. Most network devices by default are configured as DHCP clients. When a device configured as a DHCP client is connected to a network with a DHCP server, the DHCP client initiates a request for an IP address to the DHCP server. After exchanging a few messages back and forth, the DHCP server sends the DHCP client a unique IP address and the client accepts. The DHCP server also sends the DHCP client other network information such as the subnet mask, the default gateway and the DNS server.
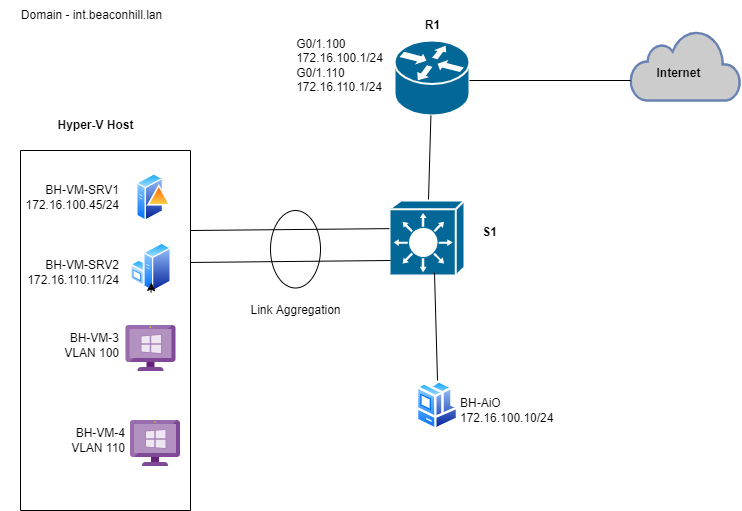
The Lab Environment
Let’s apply some of these fundamentals in a Windows environment! In this topology I have a Hyper-V host with two Windows Server 2019 VMs, two Windows 10 VMs and a physical computer running Windows 10 connected to a switch – S1. I will install the DNS Role on BH-VM-SRV1 and then configure DNS. I will also install the DHCP role on BH-VM-SRV1 so that endpoints in VLAN 100 and VLAN 110 are able to be assigned an IP address. Below is a diagram of my topology:
Installing the Active Directory Role
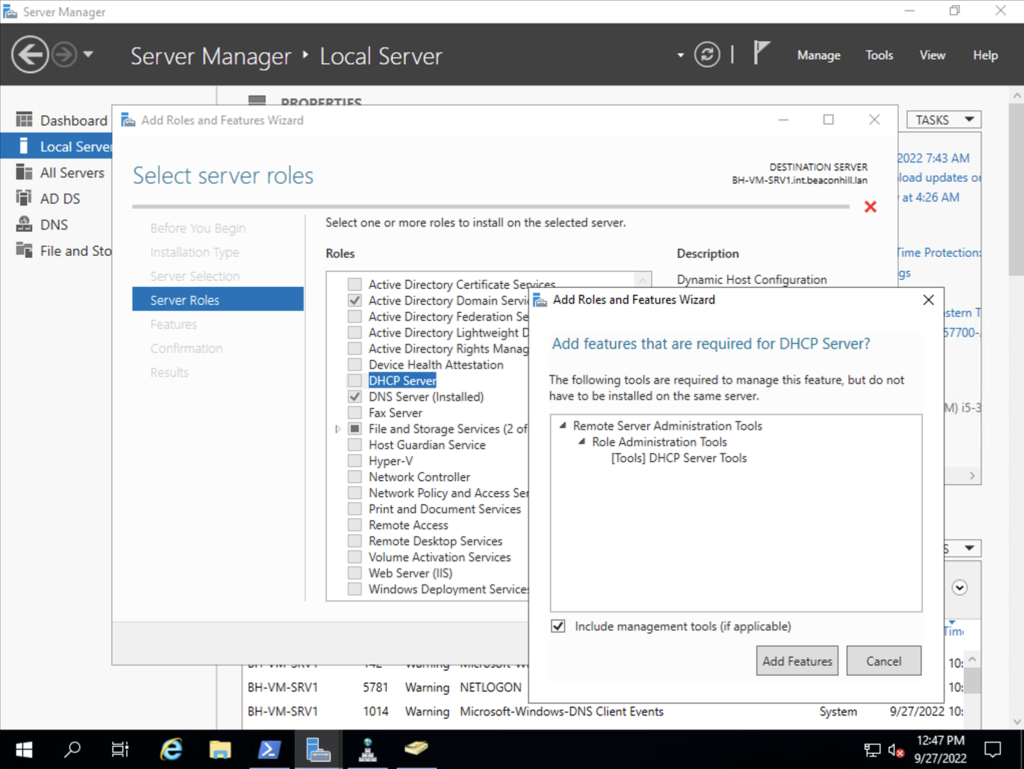
The first thing we need to do is install the Active Directory Role on BH-VM-SRV1 and promote this server to a domain controller. When the server is promoted to a domain controller the DNS role will be installed automatically since DNS is needed for Active Directory to work properly. To install the Active Directory role, in Server Manager, select Manage and then select “Add roles and features.” Then select “Role Based or feature based installation.” Select the server you would like to install the role on and then select “Active Directory Domain Services.” The DNS role is selected in figure 1-2 because I have already promoted this server to a domain controller and gave it the domain name “int.beaconhill.lan” however in the initial installation, all that is needed is for Active Directory Domain Services to be chosen.

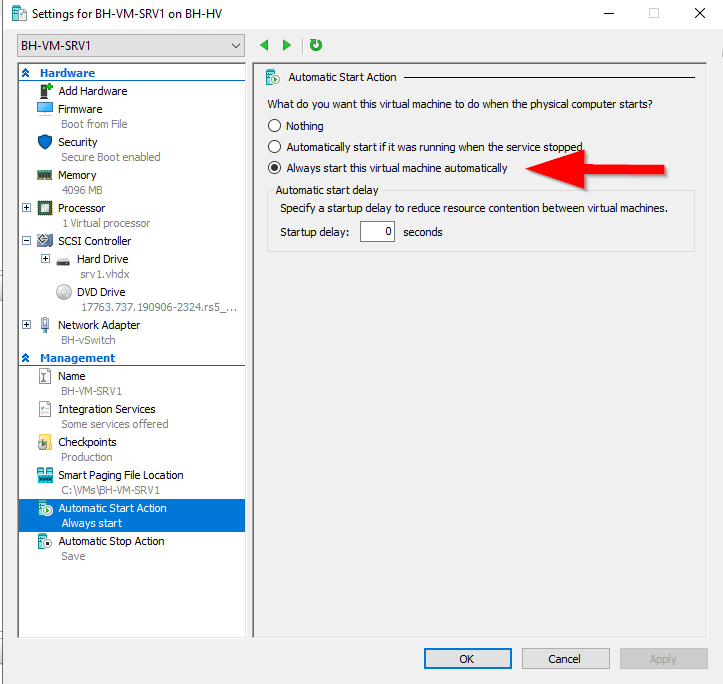
After the post configuration wizard finished, I rebooted the VM and then configured the IPv4 settings on the host to point to the new DNS server on BH-VM-SRV1. I also enabled the option for this VM to automatically turn on every time the Hyper-V host turns on so that the Hyper-V host always has access to a DNS server:
Configuring DNS: Forward and Reverse Look Up Zones
Before configuring DNS I went ahead and joined the Hyper-V host to the domain as well as my other VMs in my topology. In order to do this I configured IPv4 info statically on every NIC however some of that config will change after installing the DHCP role:

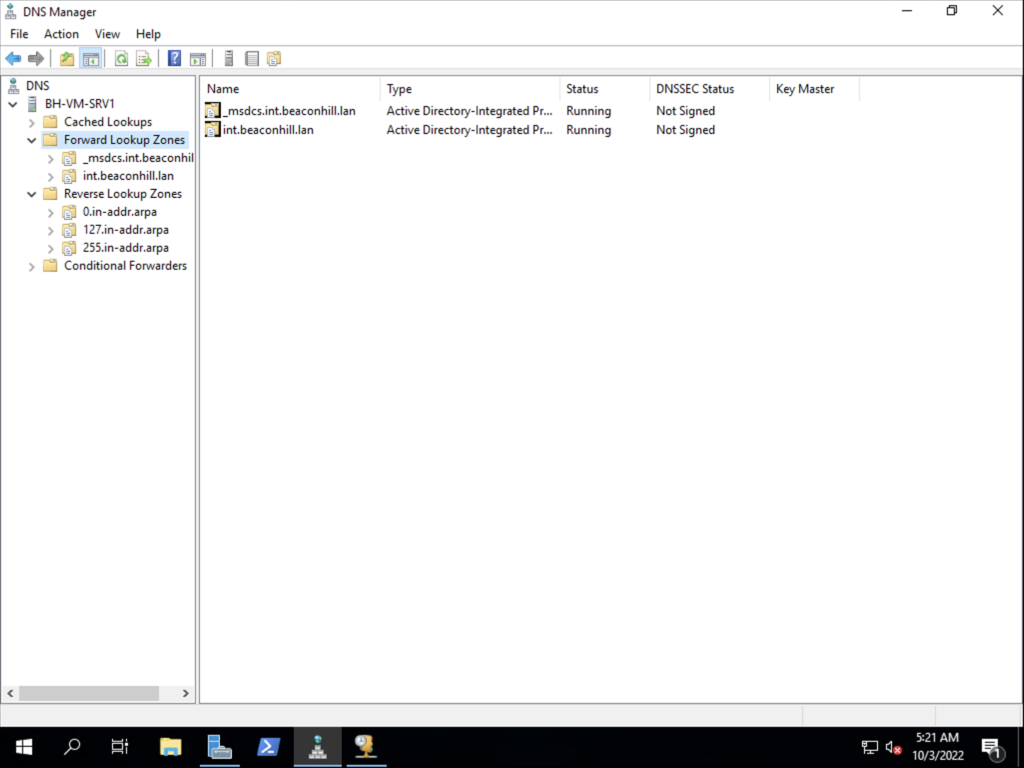
You can access the DNS Manager by opening “Server Manager.” Then select Tools, and then DNS Manager. Figure 1-4 shows the way DNS is configured be default. DNS in Windows Server can be managed in “zones.” Zones are used by DNS manager to host records that resolve to an IP address. There are two primary types of zones – a forward lookup zone and a reverse lookup zone. A forward lookup zone is what is used by the DNS server to resolve queries sent by DNS clients where the DNS client sends a hostname to the server and needs to receive an IP address in response. A reverse lookup zone is the opposite. A reverse lookup zone resolves queries where the DNS client sends an IP address to the server and needs a hostname to be sent back.
If we use the nslookup command prompt tool we can see DNS at work. If we do a nslookup search of int.beaconhill.com we will get a response back from the DNS server with the IP address if int.beaconhill.lan. However if we do an nslookup for the IP address 172.16.100.45, we will not get a response back with the hostname of 172.16.100.45. This is because we have not yet created a reverse lookup zone:


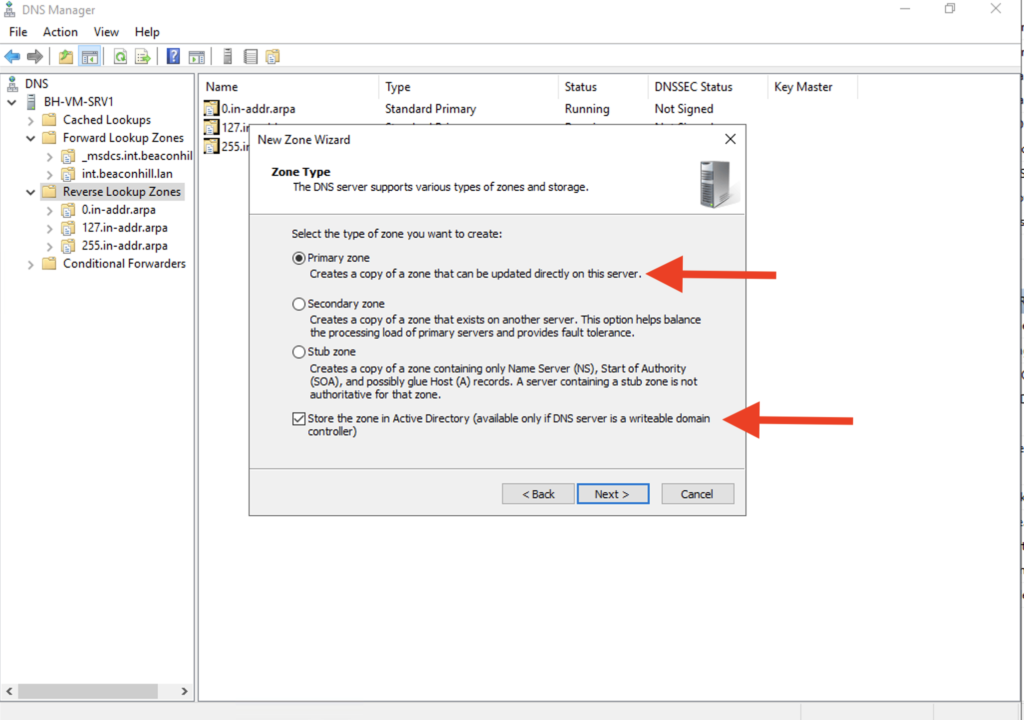
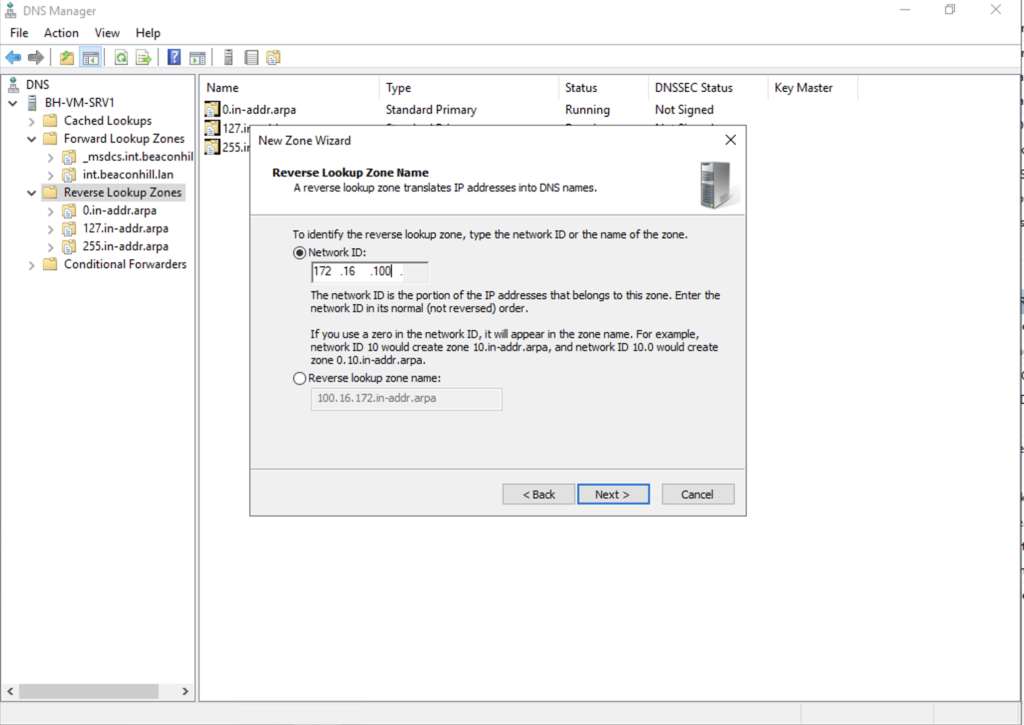
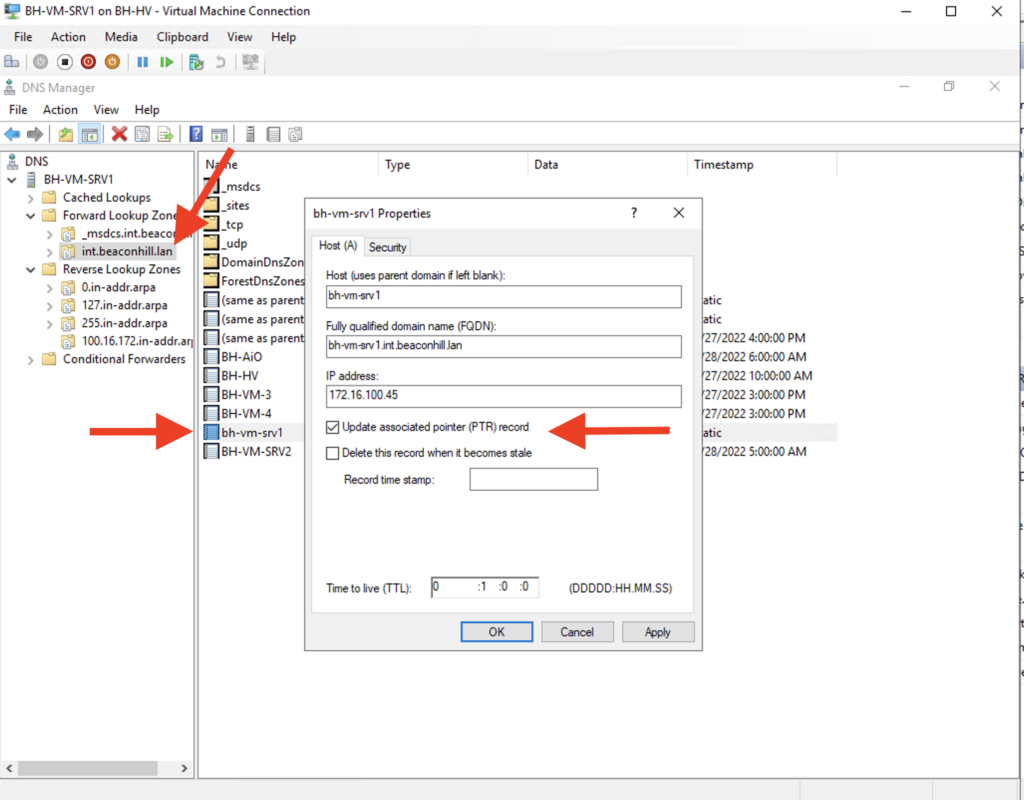
We can configure a reverse look up zone by right clicking reverse lookup zones in DNS Manager and then selecting “New Zone.” This will launch the New Zone Wizard. Select next and then you will be presented with a few zone type options (Figure 1-7a). For this we will be selecting the “primary zone” type and selecting the option on the bottom that says “Store the zone in Active Directory.” One really important reason to select that last option is to ensure changes in the DNS server are replicated painlessly across all DNS servers in a domain. When you store DNS zone data in active directory, the DNS zone data will follow the same replication procedures as AD. After selecting next, you have to select the replication scope. Since I only have one domain at the moment, for this I will select “to all dns servers running on a domain” (Figure 1-7b). After selecting next you must choose whether this zone will be an IPv4 or an IPv6 reverse lookuo zone. For this I choose IPv4 and selected next. After selecting next I need to provide the subnet of the zone which is 172.16.100.0 (Figure 1-7c). The final step in this wizard is to select the DNS Zone update type (Figure 1-7d). For this I will select Dynamic Updates which is the recommended option when DNS Zone data is stored in Active Directory. Now that the reverse lookup zone is created we now need to add a pointer record (PTR) to map the IP address 172.16.100.45 to hostname int.beaconhill.lan. We can easily do this by going to the forward lookup zone, selecting the A record of bh-vm-srv1, right clicking then selecting the properties, then selecting the option to update the PTR record (Figure 1-8a). Next is to refresh the reverse lookup zone and you can do this be right clicking the white space in the reverse lookup zone and selecting reload (Figure 1-8b). Now an nslookup with the IP address 172.16.100.45 should return a response with the hostname of that IP address (Figure 1-9).


Installing the DHCP Role
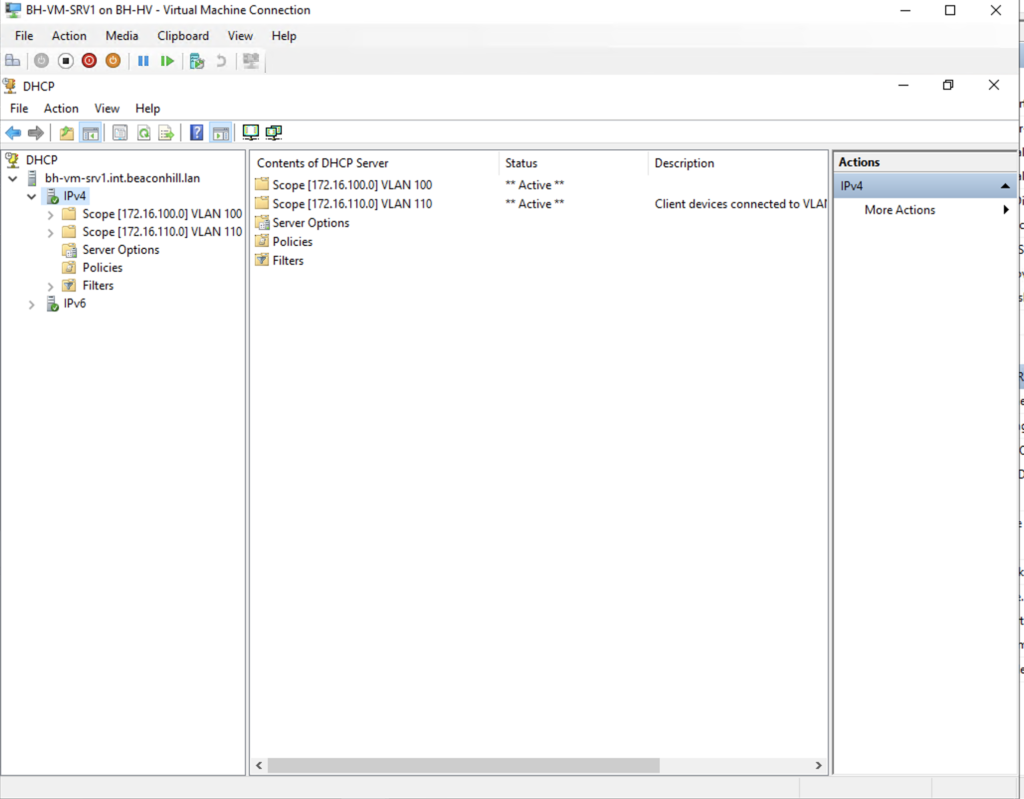
To install the DHCP role, open Server Manager, select manage and then “Add roles and features.” We follow the same steps as earlier here until arriving at the role selection screen (Figure 1-10). After selecting DHCP and following through with the install, the DHCP console should be available in the Tool menu of Server Manager. For the lab environment, I will configure two DHCP scopes – One for VLAN 100 and one for VLAN 110.
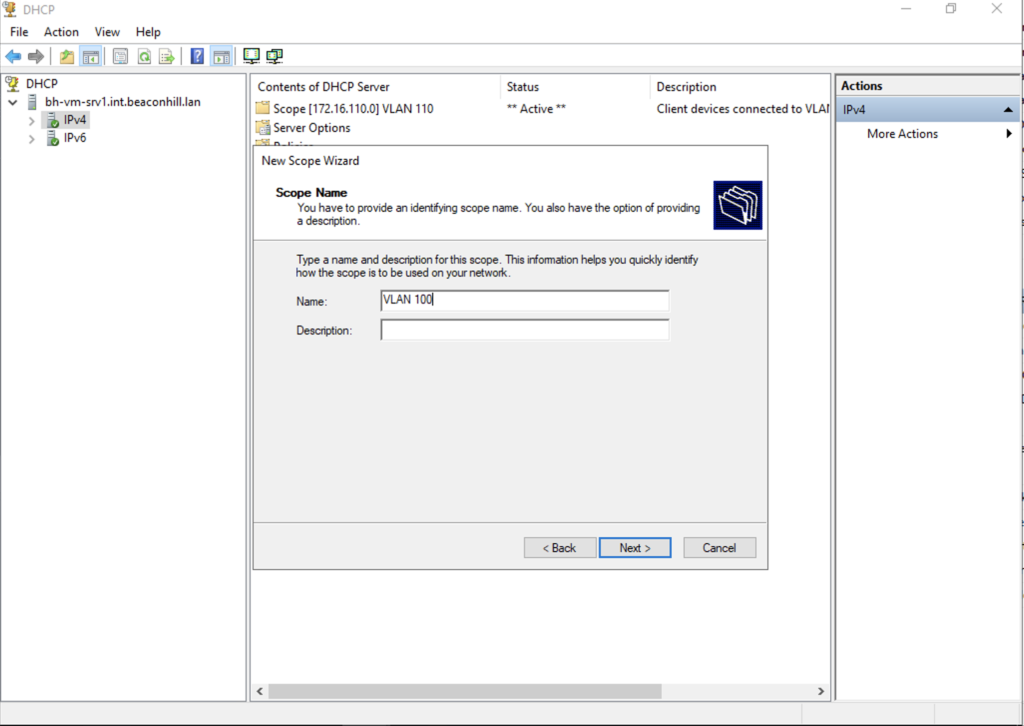
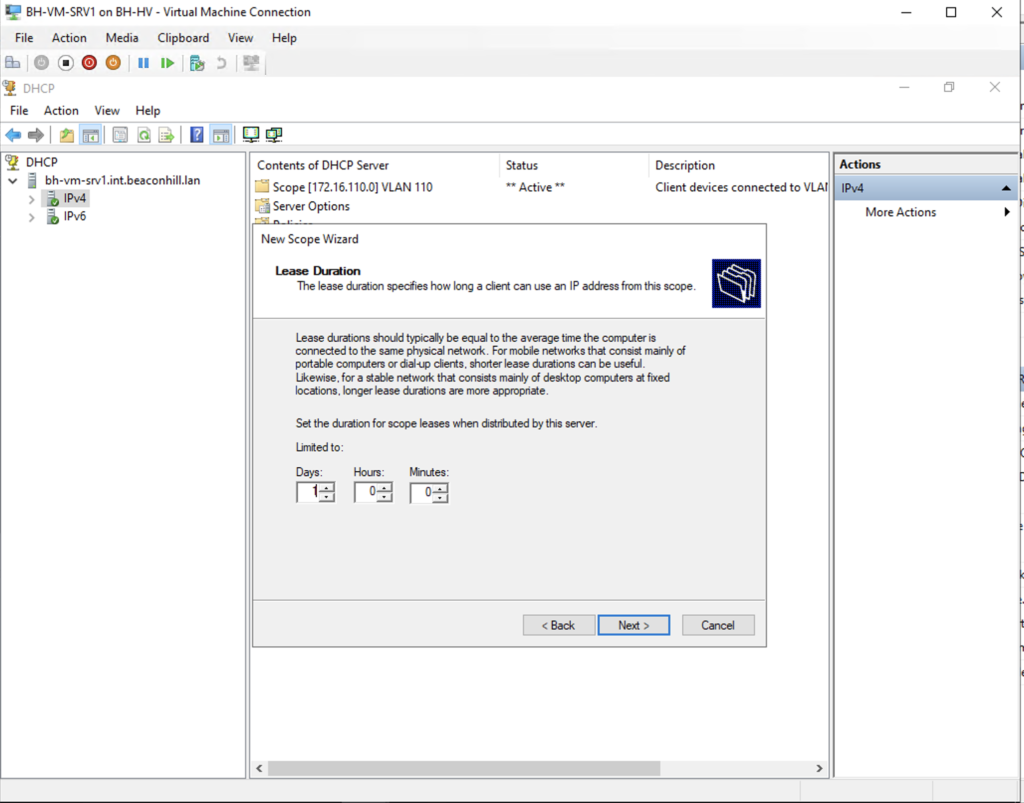
After opening the DHCP console, right click on IPv4 and select “New Scope.” which will launch the New Scope Wizard. After selecting next, you will need to name the DHCP scope. I will call this scope VLAN 100 (Figure 1-11a). Next you will need to select an IP address range and any addresses that you would excluded from this range (Figure 1-11b & 1-11c) The IP address range tells the DHCP server which addresses to dynamically assign DHCP clients on the network and the specified exclusions tell the server not to hand out those IP addresses. Next the wizard prompts you to select the lease duration and whether or not to configure DHCP options (Figure 1-11d & 1-11e) By default Windows Server specifies 8 days but I will change this to 1 day and select yes to continue configuring DHCP options. After selecting next you are then prompted to specify a default gateway and DNS server (Figure 1-11f & 1-11g) I added the default gateway for VLAN 100 and accepted the default DNS server. The following screen gives you some options to configure WINS/NetBIOS which I skipped. After this you are then able to activate the scope and my new scope for VLAN 100 now appears in the DHCP Console (Figure 1-11h). I repeated all these steps to create a DHCP scope for VLAN 110 as well.


Configuring DHCP Relay
Since this DHCP server is on the 172.16.100.0/24 subnet, it is necessary to configure a DHCP Relay (agent) so that DHCP clients in other subnets – in this case the 172.16.110.0/24 subnet- can receive DHCP messages from the DHCP server. A DHCP Relay is a host that forwards DHCP messages between clients and servers that are not on the same subnet. In my topology, this configuration must be done on R1. You can do this in Cisco IOS by issuing the ip helper-address command in interface configuration mode:

All that is left to do is check BH-VM-3 and BH-VM-4 to see if they have been assigned an ip address: