Troubleshooting Static Routing & Policies With Watchguard Firewalls
Introduction
A static route is a path to a network that you manually configure on a router, firewall or other Layer 3 devices. Using static routes can be an excellent choice for smaller networks because they are simple to configure. However, in larger networks – like the internet – static routes do not scale well because of all the manual effort to maintain them. If a static route becomes invalid for whatever reason, critical communications can grind to a halt.
I don’t have any mission-critical applications in my home lab but I did design a test environment to serve as a valuable hands-on networking experiment! I designed a test environment and set out to get two networks to communicate with each other. Along the way, I ran into some unexpected issues that turned into a great learning experience. In this blog post, I want to walk you through what my test environment is, how I implemented static routing, and the troubleshooting steps I took to resolve the issues.
Table of Contents
The Network Topology
Let’s first discuss the topology:
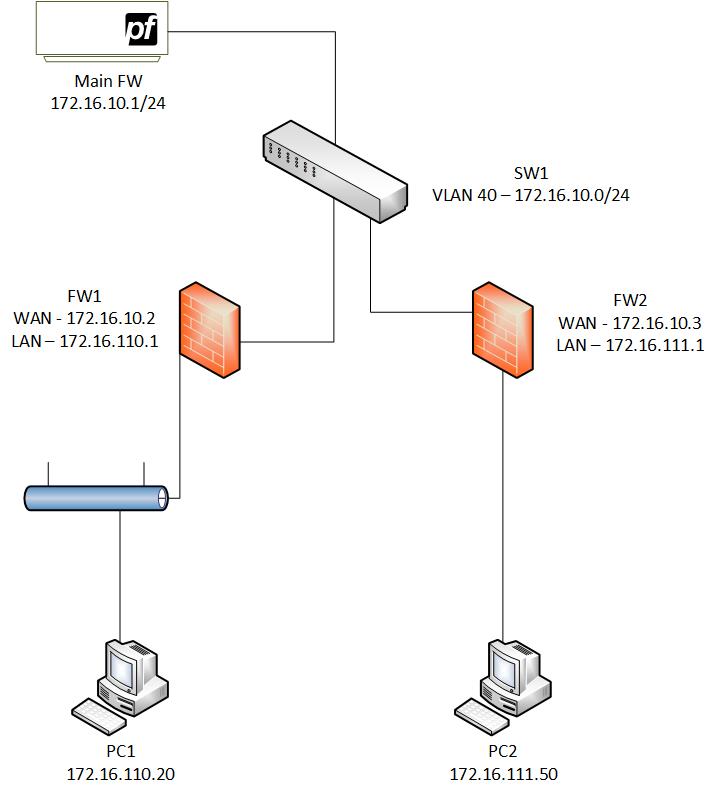
The goal of this lab is to get PC1 and PC2 to ping each other successfully. My main firewall serves as the upstream gateway for FW1 and FW2. The WAN side of both FW1 and FW2 is connected to SW1.
The main firewall also has a LAN interface connected to SW1. The ports on SW1 connecting these firewalls are all assigned to VLAN 40. The subnet for VLAN 40 is 172.16.10.0/24 – this is the WAN subnet for FW1 and FW2. The LAN side of FW1 has a subnet of 172.16.110.0/24.
In between FW1 and PC1, there are a couple of switches but they are not important to mention for this lab. PC1 is able to ping the LAN interface of FW1 successfully. The LAN side of FW2 is handing out IP addresses in the 172.16.111.0/24 network. PC2 is directly connected to the LAN interface on FW2 and is able to ping FW2 successfully.
Configuring The Static Routes In Watchguard Firewalls
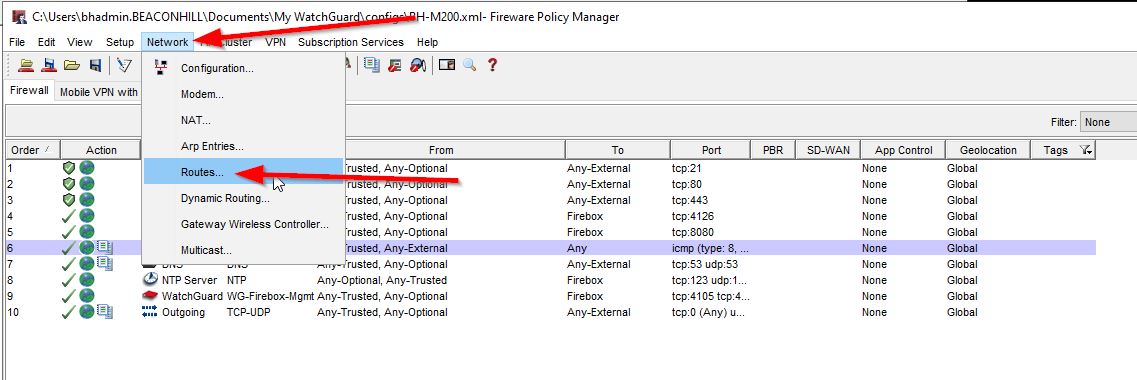
To configure a static route on Watchguard firewalls you need to access the management console. I like to use Watchguard System Manager as opposed to the web UI. I will need to configure two static routes – one on FW1 and one on FW2. Once connected to the WatchGuard with System Manager, open Policy Manager. Then select Network>Routes:
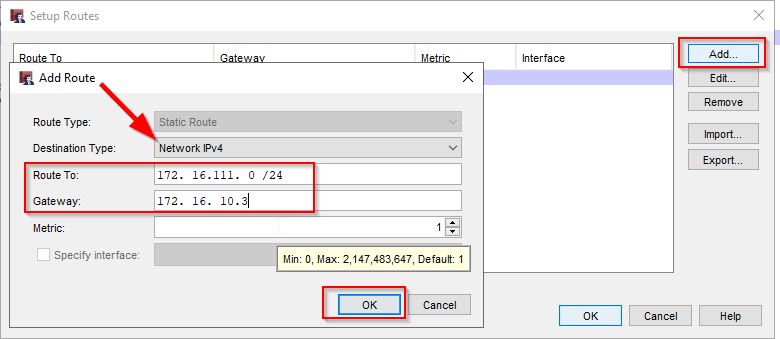
Select add then choose the network type – in my case I will select “Network IPv4.” In the “route to” field, I will add the destination network I would like to route to which is 172.16.111.0/24. Next for the “Gateway” field, I will specify the WAN IP address of FW2 which is the next hop in the routing path. Then press OK.
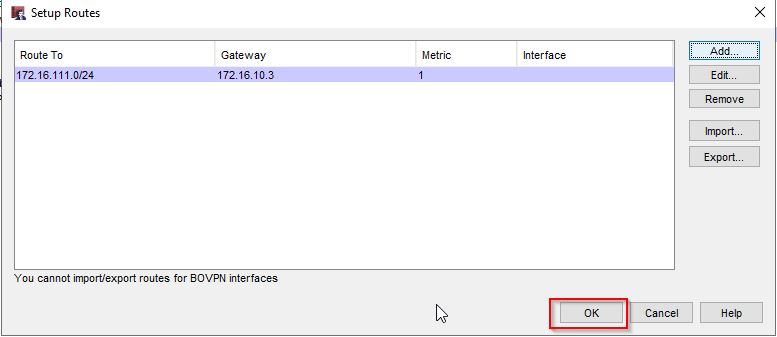
Press OK on this screen as well.
For FW2 I will do the same thing except I will create a static route to 172.16.110.0/24 and specify the WAN IP address of FW1 as the gateway.
You might be wondering “What is a metric and why didn’t I configure it?” Routers store information about their routes in their route table and my Watchguard firewall is no different. Routes have an associated cost with them – Watchguard calls this cost “a metric.” A metric of one means that the route is most preferable. Specifying a cost to a route is useful when you have multiple static routes to the same network as it allows you to control which path to use. In my case the default metric of one is fine.
After I configured the static routes I saved the changes to the WatchGuard. This is a step I sometimes forget and then I wonder why I still have an issue! Does this ever happen to you?
The Problem
So that’s it right? I should be able to send a ping from PC1 to PC2 and it should execute successfully. Well, that did not happen!
I started a continuous ping from PC1 to PC2 and from PC2 to PC1 and they both did not receive a reply.

Troubleshooting Process
Step 1: Verifying Basic Networking
The first thing I did was confirm that IP addresses on PC1 and PC2 were configured correctly. Next I made sure that PC1 was able to ping FW1 and at least one other endpoint in the 172.16.110.0/24 network. This confirmed to me that LAN-to-LAN connectivity is working. I did the same LAN-to-LAN connectivity test for the 172.16.111.0/24 network.
Step 2: Reviewing Static Routes
Next, I double-checked to make sure that I configured the static routes correctly. I confirmed that the next hop address for each static route was set correctly.
Step 3: Verifying WAN Connectivity
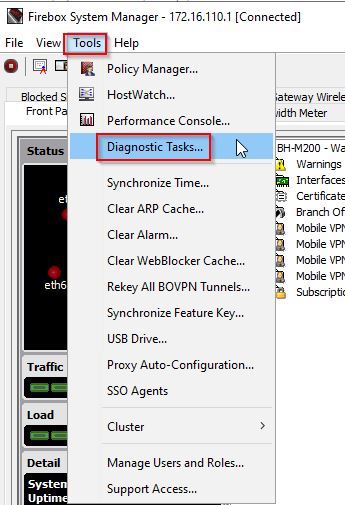
The next thing I did was try to send a ping from FW1 to FW2. If FW1 cant ping FW2 and vice versa, there is no way that my PCs can ping each other. Aha! I found that I could not ping FW2 successfully from FW1. To send a ping from a Watchguard, open Firebox System Manager>Select Tools>Diagnostic Tasks:
With the “Ping IPv4” task selected, enter an IP address and then select “Run Task:”

I did this same thing on FW2 and the results were the same. Why were the pings failing?
Step 4: Verifying ARP
Since pings were failing and all the networking basics were configured correctly I wanted to discover at what point is the communications breaking down. I checked the ARP table on FW1 to see if it had an ARP entry for FW2. You can check the ARP table in Firebox System Manager by clicking on the Status Report and searching ARP:

ARP or Address Resolution Protocol is what networking devices like switches and firewalls use to resolve MAC addresses to IP addresses.
In the ARP table of FW1, it showed that there was an ARP entry for 172.16.10.3 but the MAC address was all zeros (in the screenshot above it is not the case since I have since resolved the problem). This tells me that ARP is failing.
Step 5: Analyzing Traffic Logs
In Firebox System Manager you can find one of my favorite tools – Traffic Monitor. This tool allows you to see all the traffic passing through the firewall in real-time. When I opened up the traffic monitor and filtered for ICMP traffic, I found that the WatchGuard was dropping the traffic because of the implicit deny all traffic rule:

In the logs I see that pings from 172.16.10.3 (FW2) are denied to 172.16.10.2 (FW1). The policy specified in the log is “Unhandled External Packet.” This tells me that there is no policy (firewall rule) that matches in the policy list to allow the pings so by default the watchguard drops the traffic.
The Solution
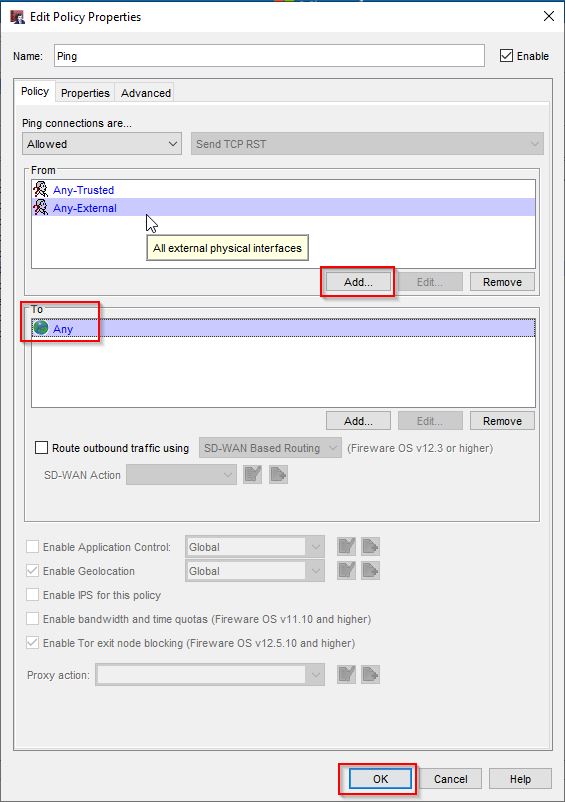
To solve this problem I need to adjust the Ping policy. Since this is my lab and my goal is proof of concept, I will allow pings from the external interface of FW1 to Any interface. In the real world, there may be specific use cases for not allowing pings from the external interface to the LAN but for my test environment, it is fine.
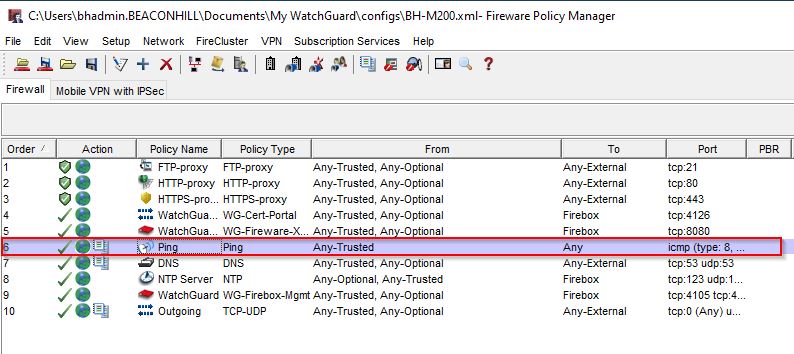
To adjust the Ping policy, open Fireware Policy Manager and double-click the Ping policy:
Add “Any-External” to the From section of the policy and then select OK.
I made the same change to the Ping policy on FW2 and then I saved the changes to the watchguard.
I retested pings from PC1 to PC2 and it was successful!

I tried to ping from PC2 to PC1 but I was unsuccessful initially. I knew why the pings failed right away though – the Windows Defender firewall on PC2 did not allow pings inbound. Once I allowed the traffic through the Windows firewall the pings were successful.
Conclusion
In summary, I set out to get two remote networks to communicate with each other by implementing static routes. Even though I configured the static routes correctly the WAN interfaces between FW1 and FW2 could not communicate with each other. Making a change to the Ping policy on both firewalls resolved this issue.
This experience highlighted for me how routing is directly impacted by firewall rules/policies and because of that, a measured and layered approach is needed for troubleshooting issues that may arise when isolated networks are trying to communicate with each other.