Layer 2 vs. Layer 3: Insights from Troubleshooting PfSense Troubleshooting
The Scenario: Blocking SSH Traffic on the LAN
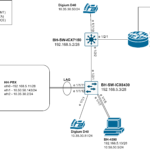
In PfSense, I have a VLAN interface named ‘LAN’ configured to pass VLAN 10 traffic. A Raspberry Pi 4 is connected to the LAN network, which uses the 10.50.50.0/24 subnet. I want to block SSH traffic going to this endpoint. The reason why I want to block SSH traffic is because I want to ensure that I only manage this endpoint from the management VLAN (VLAN 20)
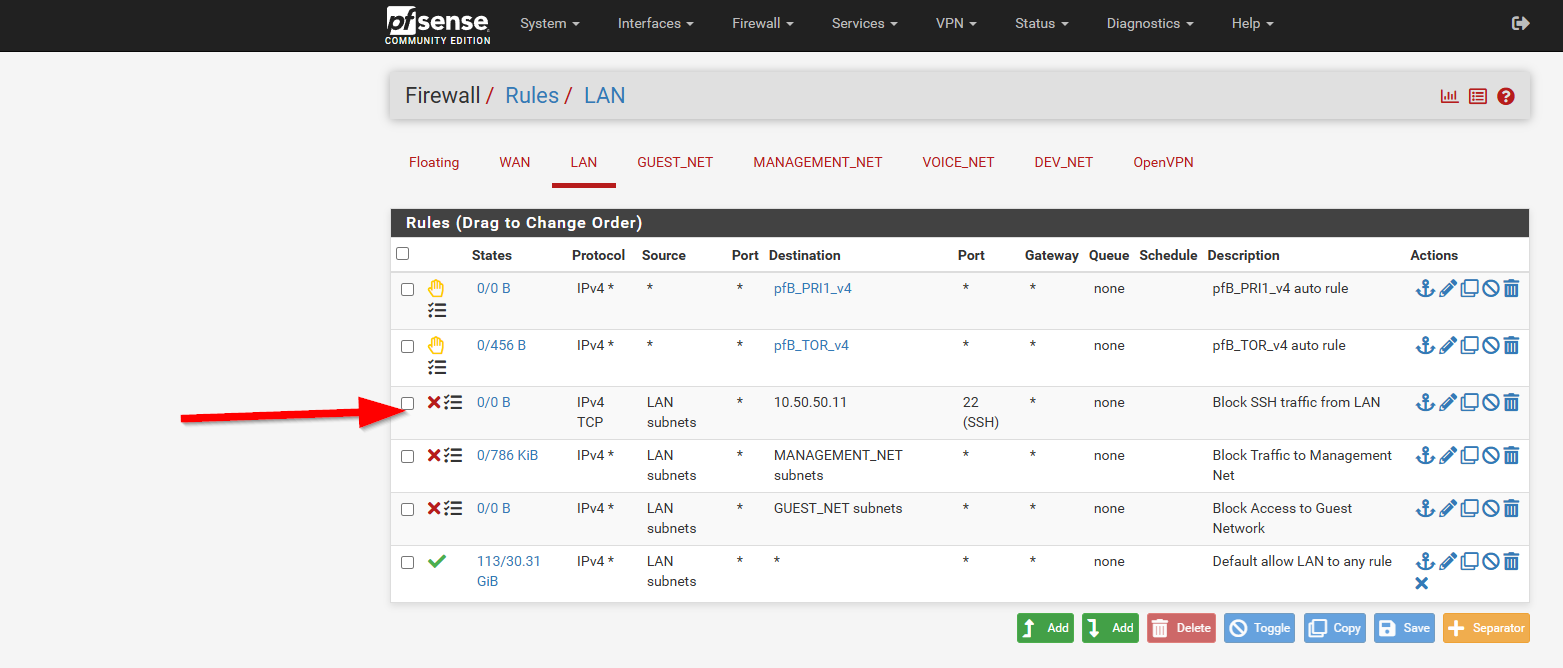
To solve this, I created a firewall rule in pfSense to block the SSH traffic:

I placed the rule just above the default “allow any” rule:
After applying the changes I tested the rule out by using a Windows laptop connected to the LAN network and tried to SSH into the Raspberry Pi. Unfortunately, I was still able to SSH into it.
In this blog post, I will walk through my troubleshooting process, share the solution, and highlight the key lessons learned along the way.
Table of Contents
Troubleshooting Steps and Observations
Step 1: Verifying the Firewall Rule Configuration
- I double-checked the rule to block SSH traffic on port 22 and it appeared to be properly configured.
- I tried a different variation of the rule. I specified the source as the IP address of the Windows laptop I was using to test. This did not work so I put the rule back to how it was prior.
Step 2: Reviewing The States Table
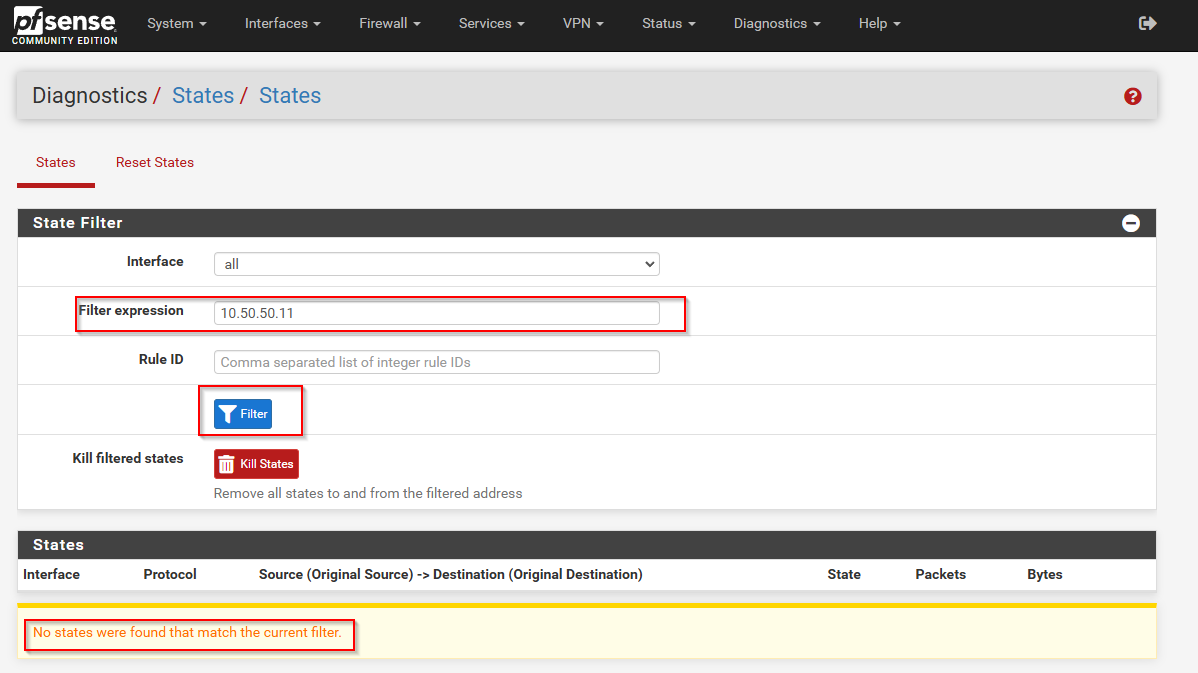
PfSense allows you to view all active connections by using a tool called “States.” Using this tool can help determine if the firewall is processing traffic. To pull this up, navigate to Diagnostics>States:

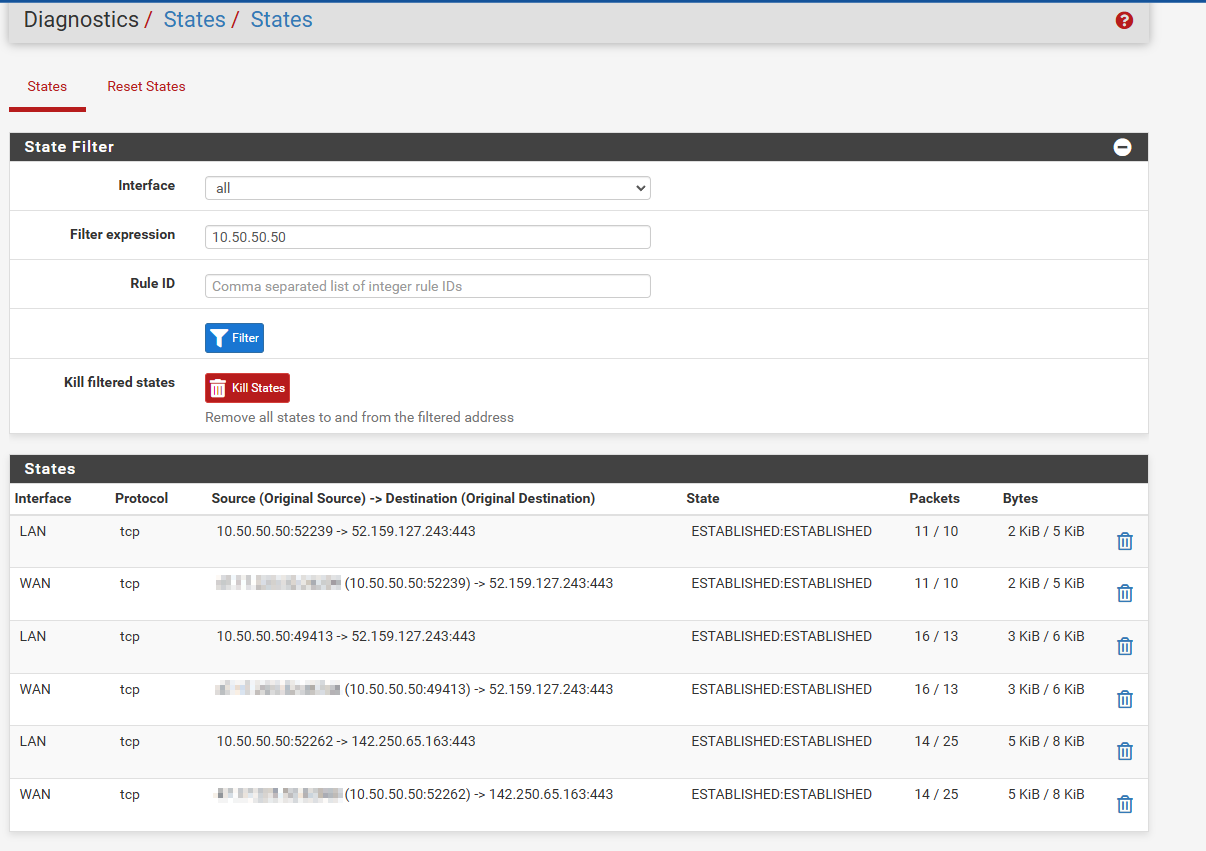
- I filtered the state table for connections to and from the Raspberry Pi but I did not find any SSH connections.

- I filtered the table again to view connections going to and from my laptop and I got the same result – there was no SSH connections.
Step 3: Testing With Multiple Devices
- For good measure, I also used a macbook connected to the LAN. I was able to SSH into the Pi which confirms the issue is not my windows laptop.
Step 4: Observing Real-time Connections With pfTop
PfTop is an amazing tool that allows you to monitor connections in real time, while also testing connectivity. To use pfTop go to Diagnostics>pfTop:

- When I initiated SSH to the Pi, I did not see any TCP connections for SSH
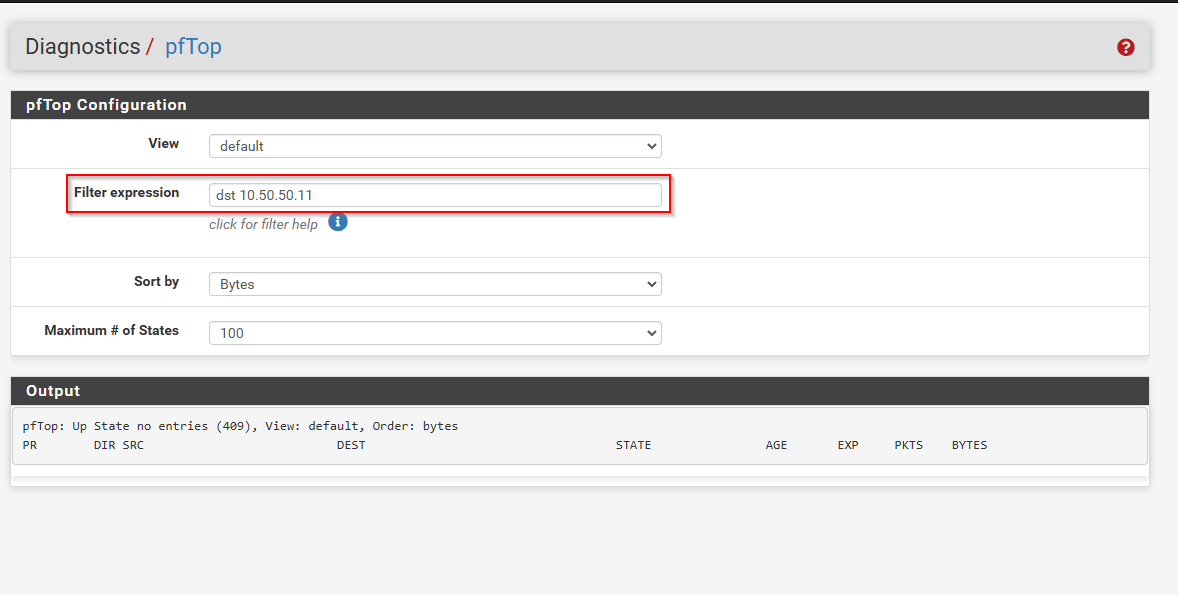
- I tried different filters to see if I would get a different result but I did not see the expected connections. Some of the filters I tried to use were the following:
dst 10.50.50.11
dst 10.50.50.11 and dst port 22
src 10.50.50.50 and dst 10.50.50.11 and dst port 22
port 22
The Key Insight: Layer 2 vs. Layer 3
What gives? Why could I not see the SSH traffic on the firewall?
The answer to that is very simple. The traffic was not traversing the firewall at Layer 3 of the OSI Model. What I was observing is consistent with networking fundamentals particularly how LAN-to-LAN traffic is handled at Layer 2.
Since the Raspberry Pi and every computer I initiated the SSH connection from were on the same network (VLAN), all the traffic was confined to Layer 2 of the OSI model.
At Layer 2, the protocol data unit (PDU) are frames. Frames include (amongst other things) a source MAC address and destination MAC address.
When my switch received the incoming frame from my computer to the Raspberry Pi, it checked it’s MAC address table and found the destination MAC address listed.
Switches learn MAC addresses by associating each address with the interface through which it was received, allowing them to forward frames to the correct destination.
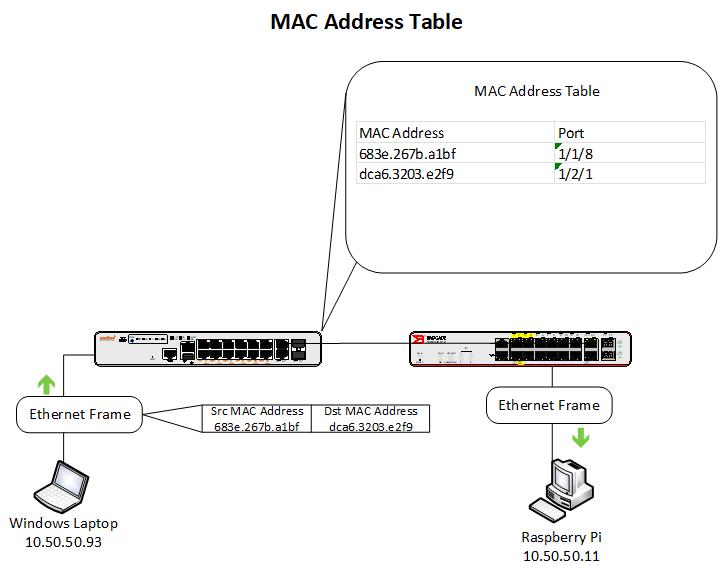
In the above example, the switch has the destination mac address in its table and forwards it out of interface 1/2/1. In my case 1/2/1 is a trunk port so the frame gets sent to the neighbor switch. That switch then looks at its MAC address table and forwards the frame through the corresponding interface. The frame never left the network (VLAN 10).
The VLAN is a boundary for Layer 2 traffic, isolating it within the broadcast domain. This means that traffic between devices on the same VLAN never needs to involve a Layer 3 device like a firewall or router:

In this example if my windows laptop pings the raspberry Pi, the windows laptop will get responses back however if that same windows laptop tries to ping my management PC, it will fail. Communication between VLAN 10 and VLAN 20 will require a router.
To better understand the contrast, let’s examine how Layer 3 traffic flows when a computer in VLAN 10 tries to ping a computer in VLAN 20 on my network:
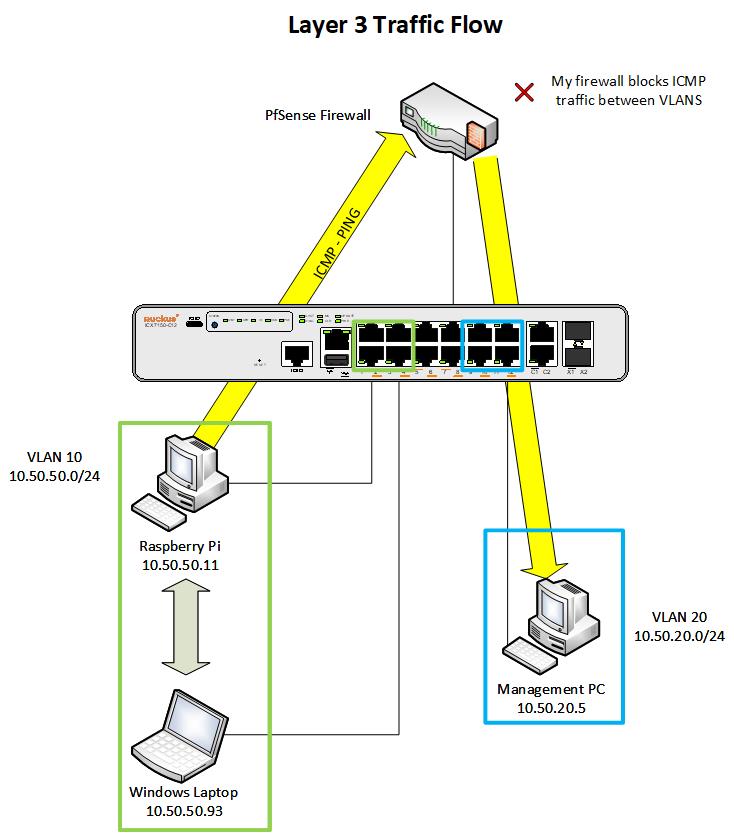
In the example above, the Raspberry Pi sends a ping to the management PC. When the switch receives the frame, it sees that the destination is not in the same subnet so the frame gets forwarded to the router (pfsense firewall).
In my case, I have a firewall rule that blocks ICMP traffic from VLAN 10 to VLAN 20 so the pings get dropped at the firewall.
However, if I didn’t have that rule, the firewall would forward the ICMP traffic to the switch and the switch would forward it to the management PC.
Layer 3 devices, such as firewalls, only handle traffic that crosses VLAN boundaries; intra-VLAN traffic remains at Layer 2 and bypasses routing entirely. This is the reason why PfSense could not intercept the traffic – it never crosses into the Layer 3 domain where the firewall operates rendering the rule I created earlier useless.
Possible Solutions
Using UFW Firewall on Raspberry Pi
One possible solution is to use UFW (Uncomplicated Firewall) on the Pi only to allow inbound SSH traffic from the management VLAN and deny SSH traffic from the LAN.
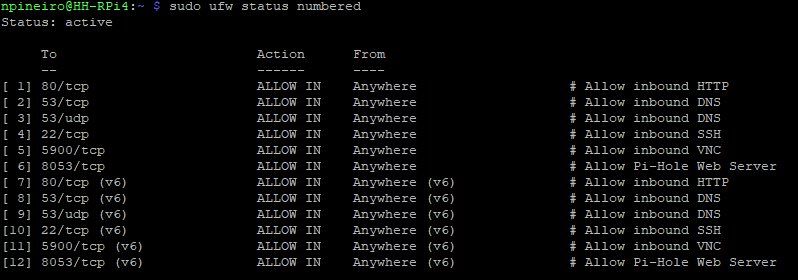
Before implementing this solution, I needed to clean up some UFW rules. At some point, I was using this Pi as a DNS sink hole so I had some open ports. To view a numbered list of ports, use this command:
user@HH-RPi4:~ $ sudo ufw status numbered
To delete rules from UFW use the following command. Replace “rule number” with the actual number of the rule:
user@HH-RPi4:~ $ sudo ufw delete <rule number>
I used this command to add the allow rule I wanted. I also added a comment so that I know what the rule is for in the future at quick glance:
user@HH-RPi4:~ $ sudo ufw allow from 10.50.20.0/24 to any port 22 proto tcp comment "Allow SSH from management VLAN"
To add the deny rule I used this command:
user@HH-RPi4:~ $ sudo ufw deny log from 10.50.50.0/24 to any port 22 proto tcp comment "Deny SSH from LAN"
In my case, I already had a rule allowing inbound SSH traffic from any network so I will need to delete that rule so that SSH gets denied from the network I want to restrict. Below is the finished rule list:

I want to make sure that the rule works so to test it out I will use the tail command to output log messages in the console while I initiate an SSH connection to the Pi:
user@HH-RPi4:~ $ sudo tail -f /var/log/ufw.log

SSH is successfully denied from the 10.50.50.0/24 network!
Applying an Access Control List on the Switch
The other way I could have accomplished denying SSH traffic from the 10.50.50.0/24 network is by using an ACL (Access Control List) on my switch. In my years of managing switches I have actually never seen an ACL applied on an interface but I thought it would be fun to see if it would work!
First I made sure that SSH works, I needed to delete my previous UFW rule and make sure SSH traffic was allowed. Below is a list of UFW rules on the Pi with a rule that allows TCP port 22 traffic from any source:

After initiating an SSH connection from a laptop I confirmed SSH works. Next I need to SSH into the switch. My switch is a Ruckus ICX 7150 12 port switch and I will need to create an extended ACL. Here are the commands I used to create the ACL:
SSH@HH-SW-7150#conf t
SSH@HH-SW-7150(config)#ip access-list extended ACL100
SSH@HH-SW1-7150(config-ext-ipacl-ACL100)#remark Denies SSH from 10.50.50.0/24 to 10.50.50.11:
SSH@HH-SW1-7150(config-ext-ipacl-ACL100)#deny tcp 10.50.50.0/24 host 10.50.50.11 eq ssh log
SSH@HH-SW1-7150(config-ext-ipacl-ACL100)#remark Permits traffic not explicitly denied by previous rules:
SSH@HH-SW1-7150(config-ext-ipacl-ACL100)#permit ip any any
This extended ACL is simple. It includes a deny rule that blocks ssh traffic from the 10.50.50.0/24 network and a catch all rule that permits all traffic that is not explicitly blocked.
Next, I need to apply this ACL to VLAN 10. To do that I used the following commands:
SSH@HH-SW1-7150(config-ext-ipacl-ACL100)#vlan 10
SSH@HH-SW1-7150(config-vlan-10)#ip access-group ACL100 in logging enable
SSH@HH-SW1-7150(config-vlan-10)#wr mem
Now to test it out! After initiating an SSH connection, I see deny messages in the switch console:

There are also a few other show commands I can use to get some more information about the ACL I created. Here are a few:
SSH@HH-SW-7150#show ip access-list bindings
This command shows what ACLs are bound to what interface and the direction the ACL is applied:

SSH@HH-SW-7150#conf t
SSH@HH-SW-7150(config)#ip access-list extended ACL100
SSH@HH-SW-7150(config-ext-ipacl-ACL100)#enable accounting
SSH@HH-SW-7150(config-ext-ipacl-ACL100)#show access-list accounting vlan 10 detail
The output for show access-list accounting is probably my favorite. I did have to enable accounting in the ACL but the information is really useful. It shows you which rules are getting hit:

Additional Takeaways and Lessons Learned
Rsyslog – In order to view logs produced by UFW, I needed to install the rsyslog package. Rsyslog is a logging utility for collecting and transforming log messages. Many linux distros usually have it pre installed but my raspberry pi did not. I installed it with the following command:
user@HH-RPi4:~ $ sudo apt install rsyslog
Further Reading and Resources
Creating and Applying an Extended IPv4 ACL – RUCKUS FastIton 08.0.95