Installing and Configuring Zabbix Proxy on Raspberry Pi
Monitoring devices across different networks can be challenging without considering how it all should be setup. I have a printer connected to my home network that I want to add as a monitored host in Zabbix. The issue is that the Zabbix server is on another network, completely isolated on another VLAN.
How do I then monitor my printer in Zabbix? Installing a Zabbix Proxy of course! In this blog I will walk you through the steps I took to set up a Zabbix Proxy on a Raspberry Pi and ensure it works perfectly within my home network.
Table of Contents
What is a Zabbix Proxy?
A Zabbix proxy collects data from devices on a network on behalf of a Zabbix server. A proxy is meant to talk directly to a server on behalf of client machines.
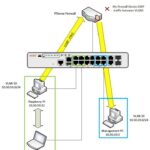
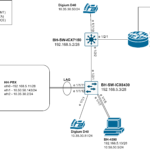
Below is a diagram of the topology to demonstrate:

My management PC talks directly to the Zabbix server because it is on the same network. However, the printer is on a different network isolated in VLAN 10. The printer will instead forward data about itself to the Zabbix proxy as if it were the server. The Zabbix Proxy will then forward the traffic to the Zabbix server which will require the traffic to traverse the firewall.
Using the Zabbix Proxy has several benefits:
- Monitoring remote locations
- Offload network activity from the Zabbix Server
- Easy implementation of centralized and distributed monitoring
Preparing The Network For The Proxy
Configuring DHCP On Raspberry Pi
The first step is to ensure that my Raspberry Pi can talk to the printer in VLAN 10. Currently, it is assigned an IP address for the subnet in VLAN 20. To do this I will configure the Pi’s interface to use DHCP by SSHing into it with PuTTY.
My Raspberry Pi 4 is running Debian 12 (bookworm) so I can use a graphical tool to configure the current IPv4 settings of the wired ethernet interface. To do that use this command:
user@hh-docker:~$ sudo nmtui

Select your interface in my case “Wired connection 1”

My interface is already set to “Automatic” so I will just select OK to save the changes and then exit out of nmtui. Also take note of the mac address listed – you will need this for later:

If changes are made to the interface you need to reboot the raspberry pi or restart the network service.
Next I need to make sure that the raspberry pi gets the desired IP address of 10.50.50.11/24. To do that I need to create a reservation on the DHCP server in pfSense. In pfSense go to Services>DHCP Server. Next choose your interface and in my case it is “LAN.”
Reserving An IP Address In PfSense
I want to make sure that the proxy has the same IP address every time the DHCP lease expires and for that, we need to create an IP a static mapping in pfsense. To do this in pfsense go to Services>DHCP Server:

Scroll to the bottom and select the “Add Static Mapping” button:

Enter the mac address from earlier in the appropriate field and give it an IP address. The IP address must be outside of the configured DHCP scope. I also went ahead and set some optional data like hostname and description.

When done select “Save” at the bottom and apply changes when the button becomes available at the top of the page:

Switch Port Configuration
Next I need to change the configuration of the switch port. I am using an ICX Ruckus 6430 12-port switch. Let’s ssh into the switch with Putty. I like console messages in my SSH session so first thing I do is enable the messages:
SSH@HH-SW2-6430#terminal monitor
Let’s confirm the current configuration of the port with the following command:
SSH@HH-SW2-6430#show interface brief
Port 1/1/8 has a primary VLAN ID of 20. This means that untagged traffic is assigned to VLAN 20:

To change the VLAN assigned to that port, we must first unassign the current VLAN and then join this port to VLAN 10. This change will make me lose connection to the Raspberry Pi briefly. To remove this port from VLAN 20 and add it to VLAN 20 use the following commands:
SSH@HH-SW2-6430#conf t
SSH@HH-SW2-6430(config)#vlan 20
SSH@HH-SW2-6430(config-vlan-20)#no untagged ethernet 1/1/8
SSH@HH-SW2-6430(config-vlan-20)#vlan 10
SSH@HH-SW2-6430(config-vlan-10)#untagged ethernet 1/1/8
As you can see the port is renegotiating STP and is automatically put back into VLAN 1:

Confirm that the changes have been made with the show interface brief command:

Don’t forget to save your config with the write memory command!
While I was working on the switch port configuration, I ran a continuous ping from a Windows laptop to 10.50.50.11 and all the pings were failing. After changing the port configuration the pings started working:

Installing Zabbix Proxy On Raspberry Pi
Installing the Proxy Package
Next I SSHd into the Raspberry Pi and installed the Zabbix Proxy. I used the official Zabbix website to generate the commands needed for this install:

Since I am running Zabbix server version 7.0.6 I need to choose 7.0 LTS on the choose your platform section. Its important to select the correct version here because the Zabbix proxy version and the Zabbix server version need to match in order for the proxy to work.
You start by adding the repository, downloading, and installing the package. You can do that by using the below commands:
user@HH-RPi4:~ $ sudo wget https://repo.zabbix.com/zabbix/7.0/raspbian/pool/main/z/zabbix-release/zabbix-release_latest_7.0+debian12_all.deb
user@HH-RPi4:~ $ sudo dpkg -i zabbix-release_latest_7.0+debian12_all.deb
user@HH-RPi4:~ $ sudo apt update
user@HH-RPi4:~ $ sudo apt install zabbix-proxy-sqlite3
Configuring The Zabbix Proxy
Next I need to configure the Zabbix proxy by editing the configuration file:
user@HH-RPi4:~ $ sudo nano /etc/zabbix/zabbix_proxy.conf
You have to set 3 values:
Server=
Hostname=
DBName=
Wanted to note here that the Zabbix proxy uses active mode by default which is ok for me. The value for server in my case I put the IP address of my Zabbix server. The hostname value is case sensitive so you must enter it how it appears exactly.

For DBName I followed SBCode’s advice here and specified the tmp folder for the path of the database so it gets cleared every time the Zabbix proxy gets rebooted:

Starting and Enabling the Proxy
Finally, restart the Zabbix Proxy service:
user@HH-RPi4:~ $ systemctl restart zabbix-proxy
user@HH-RPi4:~ $ systemctl enable zabbix-proxy
user@HH-RPi4:~ $ systemctl status zabbix-proxy
Initially, after I checked the status of the Zabbix proxy it was not working and found it in a failed status. The issue went away after I rebooted the raspberry pi.
Connecting The Zabbix Proxy To The Zabbix Server
Adding The Proxy To The Zabbix Front End
Go to Administration>Proxies. Then select “Create Proxy:”

Enter the details of the new proxy. In my case just add the proxy name (case sensitive) and the IP address:

After refreshing a couple of times I see that the state of the proxy is that it is offline which is what I expect. The proxy is on a different network than the server so that means that I need to allow the traffic to the network where the server lives:

Allowing Zabbix Proxy Traffic in Pfsense
To create a firewall rule in pfSense go to Firewall>Rules. Select the interface for which the rule should be created and select “Add:”
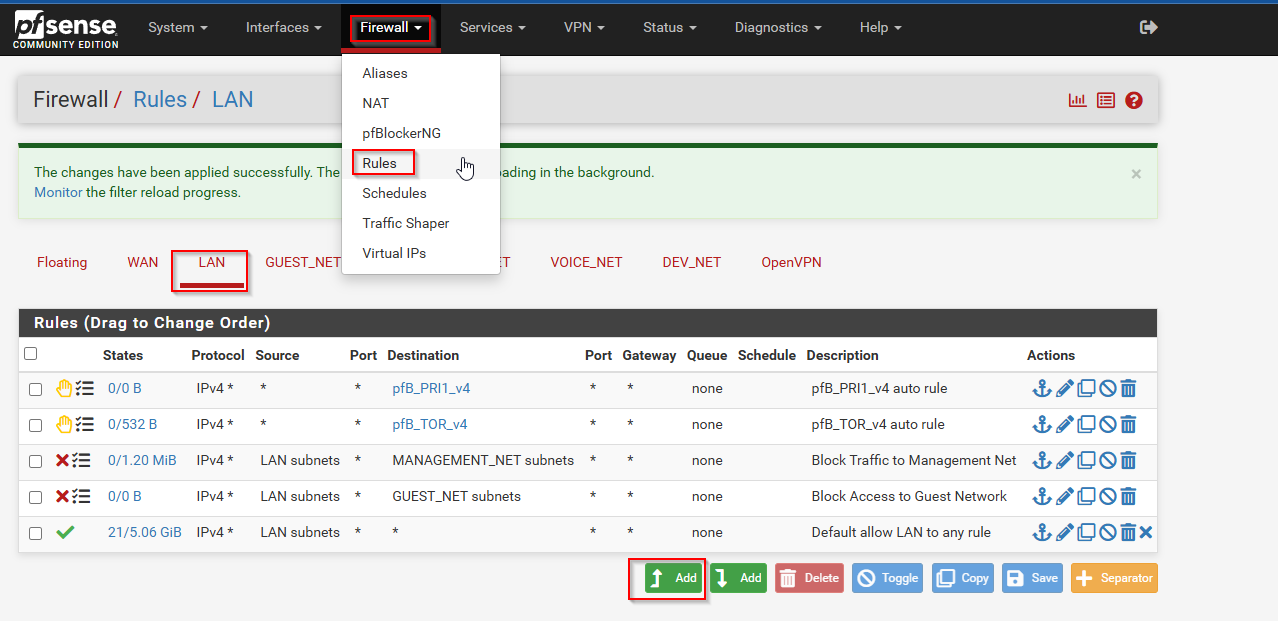
Below is the configuration of the firewall rule:

After selecting save you need to select “Apply Changes.” After I did that I re ordered the rules and moved the new rule just above the “Block Traffic to Management Net” rule:

Finally, check the state of the Zabbix proxy – it should be online now:

Installing The Zabbix Agent on the Zabbix Proxy
Similar to how the Zabbix server also has an agent installed on it, we want to do the same thing for the Zabbix proxy. Lets set up the proxy as a monitored host in the Zabbix front end.
I used the official website to generate the commands I needed. First, we need to download the package and install it:
user@HH-RPi4:~ $ sudo dpkg -i zabbix-release_latest_7.0+debian12_all.deb
user@HH-RPi4:~ $ sudo apt update
user@HH-RPi4:~ $ sudo apt install zabbix-agent2 zabbix-agent2-plugin-*
After installing the Zabbix agent you must make some changes to the configuration file. To do that use a text editor to open the config file. I will be using nano:
user@HH-RPi4:~ $ sudo nano /etc/zabbix/Zabbix_agent2.conf
The defaults are mostly fine but you just need to change the hostname value:

The value for ‘ServerActive’ and ‘Server’ point to the localhost which is what we want since the proxy is installed locally.
After you finish editing the file, save and close and then use the following commands to restart the agent and check the status – it should be running.
user@HH-RPi4:~ $ sudo systemctl restart zabbix-agent2
user@HH-RPi4:~ $ sudo systemctl enable zabbix-agent2
user@HH-RPi4:~ $ sudo systemctl status zabbix-agent2
Finally, add the Proxy to the Zabbix front end. Go to Data Collection>Hosts>Create Host. Below is the configuration for the new host. Give the agent a host name (case-sensitive), assign it a template and host group, configure the agent interface, specify the loopback address 127.0.0.1, and most importantly, choose “proxy” in the monitored by section. Select your configured proxy from earlier and select add:

After waiting a bit the agent on the Zabbix Proxy should start checking in:

Monitoring a Network Printer via SNMP
Printer Configuration
I have an HP Laserjet MFP M426fdw. In the web GUI of the printer, I navigated to Networking>SNMP. I intend to use SNMPv1 with the default community string. All I needed to do here was select the radio button “Enable SNMPv1/v2 read-only access:”

What is interesting to note here is that there are multiple fields to specify community strings. If read-write access is needed, you need to specify a community string for the “set community name” field. For read-only access, you have to specify a community name for the “get community name” field (If changing from the default).
Adding the Printer as a Monitored Host in Zabbix
Finally, I need to setup the HP Printer in the Zabbix front end. Below is the monitored host config:

After refreshing the page a few times I saw that the SNMP agent is checking in and data is getting collected:


Troubleshooting and Lessons Learned
Pfsense considerations – pfsense has a Zabbix proxy plugin available for download. I would have preferred to run the proxy at the firewall level so I can centralize the management of the proxy. At the time of this writing however, the developers have not released an update of this plugin for pfsense CE that is compatible with Zabbix 7.0. It does seem to be available in pfsense+. You can read about it here:
Add packages for Zabbix 7.0 Agent and Proxy
Changing the static mapping – When I was re-assigning an IP address to the Raspberry Pi, it failed to get the new IP address and it was because I had an existing static mapping. After I deleted it and restarted the TCP/IP stack on the pi, the new IP address was assigned.
Install the Correct version of Zabbix proxy – When I installed the Zabbix proxy initially, it appeared to be online but in an error state on the server. Its because I installed the incorrect version:

The error tells me that the proxy version is not supported on the server. This because the proxy version must be the same version as the Zabbix server for it work.
There is backwards compatibility for zabbix agents, allowing older versions of the agent to work with newer versions of Zabbix server. There is no backwards compatibility for Zabbix proxies.
I used the following commands to uninstall the Zabbix proxy:
user@HH-RPi4:~ $ sudo systemctl stop zabbix-proxy
user@HH-RPi4:~ $ sudo systemctl disable zabbix-proxy
user@HH-RPi4:~ $ sudo apt remove --purge zabbix-proxy-sqlite3 -y
user@HH-RPi4:~ $ sudo apt remove --purge zabbix-release -y
user@HH-RPi4:~ $ sudo apt autoremove -y
Community templates – Before adding the printer as a monitored host I didn’t have a template to assign it to. I didn’t really know exactly what I wanted to monitor so it would help to use a template to get an idea. What I winded up doing was importing a community template from the official github repository:
After you download the template, go to Data Collection>Templates>Import to import the template: