Deploying Zabbix With Docker-Compose And Portainer
Introduction
Zabbix is an open-source monitoring solution. You can monitor all kinds of things like routers, switches, and computers, just to name a few. Zabbix is a great way to learn about monitoring and it’s free! Docker-Compose is a tool that you can use to create multi-container applications in a streamlined way as opposed to deploying each container using long docker commands. Finally, Portainer is a graphical front-end for docker which makes managing and deploying containers simple.
My goal is to experiment with Zabbix as a solution to monitor my home network. I chose docker and portainer as the platforms to deploy Zabbix because of how quickly I would be able to create the instance and tear it down if I didn’t need it. Also, I am new to docker and portainer so through this experience I hope to learn more about the benefits of containers and docker networking.
Table of Contents
Prerequisites
To deploy Zabbix with docker-compose and portainer you need the following:
- A Linux Server – My Linux server is a virtual machine running Ubuntu 24.04 LTS in my Proxmox virtualization environment
- Docker – In my test environment, I have Docker installed on top of Ubuntu. You can refer to Docker’s official documentation for how to do this.
- Portainer – You also need Portainer installed. You can install this by following Portainer’s official documentation.
Deployment Steps
Setting Up The Docker-Compose File
Zabbix has its own official Github with many available docker-compose files that can fulfill just about any deployment requirement. Since I will be using a docker host installed on top of Ubuntu and I want to use PostgreSQL as my database of choice I reviewed that docker compose file.
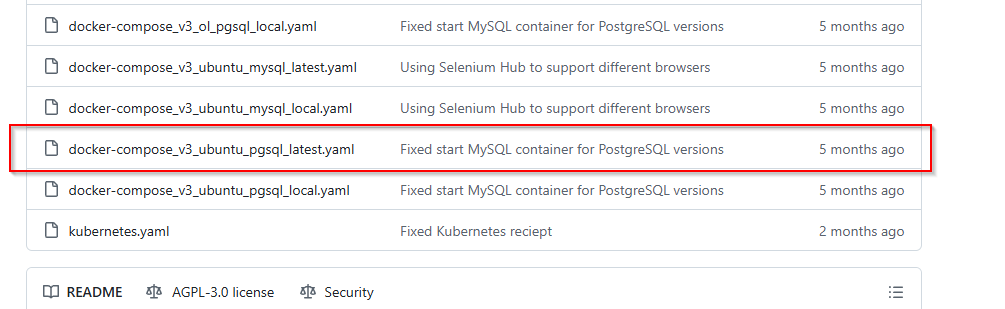
After reviewing the docker-compose file I was impressed with the code. However, the docker-compose file was dependent on a component file which meant I could not cleanly use the code in Portainer. Also, the code is highly modular which is great however it also includes all kinds of services including multiple versions of databases and web servers. Ultimately it would require me to rewrite a lot of the code and take out things I didn’t need and I wanted to start with something a lot simpler.

I searched the internet for a docker-compose file and came across this awesome write-up: Simplified Zabbix Install: Step-by-Step with Docker and Portainer. This blog provided a great and simple docker-compose file that I could use to start tinkering with. The blog provided three docker-compose files and I chose the third one, which allows the Zabbix agent access to the host’s file system.
My docker-compose file does a couple of things differently than the one I copied from the previously mentioned blog.
- I will be using Postgres version 16 instead of the latest version (at the time of this writing is version 17)
- Instead of letting Docker create a bridge network, I will use the ipvlan network mode so that each container receives a unique static IP on my home network.
- I mounted an additional volume to the Nginx web server. It is a custom nginx.conf file that changes the default listening port from 8080 to 8089. (If you want to use my docker-compose file just comment this line out. If you use it as is, Portainer will see that volume listed and say that it does not exist)
- There are additional environmental variables so that I don’t hard code things like IP addresses and the ipvlan parent interface.
services:
  postgresql-server:
    image: postgres:16
    container_name: postgresql-server
    restart: unless-stopped
    environment:
      POSTGRES_USER: ${POSTGRES_USER}
      POSTGRES_PASSWORD: ${POSTGRES_PASSWORD}
      POSTGRES_DB: ${POSTGRES_DB}
    volumes:
      - postgresql-data:/var/lib/postgresql/data
    networks:
      zabbix_net:
        ipv4_address: ${POSTGRESQL_IP}

  zabbix-server:
    image: zabbix/zabbix-server-pgsql:latest
    container_name: zabbix-server
    restart: unless-stopped
    depends_on:
      - postgresql-server
    environment:
      DB_SERVER_HOST: postgresql-server
      POSTGRES_USER: ${POSTGRES_USER}
      POSTGRES_PASSWORD: ${POSTGRES_PASSWORD}
      POSTGRES_DB: ${POSTGRES_DB}
    ports:
      - "10051:10551"
    volumes:
      - zabbix-server-data:/var/lib/zabbix
      - zabbix-snmptraps-data:/var/lib/zabbix/snmptraps
      - zabbix-export-data:/var/lib/zabbix/export
    networks:
      zabbix_net:
        ipv4_address: ${ZABBIX_SERVER_IP}

  zabbix-web-nginx-pgsql:
    image: zabbix/zabbix-web-nginx-pgsql:latest
    container_name: zabbix-web
    restart: unless-stopped
    depends_on:
      - postgresql-server
      - zabbix-server
    environment:
      DB_SERVER_HOST: postgresql-server
      POSTGRES_USER: ${POSTGRES_USER}
      POSTGRES_PASSWORD: ${POSTGRES_PASSWORD}
      POSTGRES_DB: ${POSTGRES_DB}
      ZBX_SERVER_HOST: zabbix-server
      PHP_TZ: ${PHP_TZ}
    ports:
      - "${ZABBIX_FRONTEND_PORT}:8080"
    volumes:
      - zabbix-web-data:/usr/share/zabbix
      #The volume below is a custom config file that sets the listening port to 8089
      - /var/lib/docker/volumes/zabbix_zabbix-web-data/_data/nginx.conf:/etc/nginx/http.d/nginx.conf
    networks:
      zabbix_net:
        ipv4_address: ${ZABBIX_WEB_IP}

  zabbix-agent:
    image: zabbix/zabbix-agent:latest
    container_name: zabbix-agent
    restart: unless-stopped
    depends_on:
      - zabbix-server
    environment:
      ZBX_HOSTNAME: "zabbix-server"
      ZBX_SERVER_HOST: zabbix-server
      ZBX_SERVER_PORT: '10051'
      ZBX_SERVER_ACTIVE: zabbix-server
    volumes:
      - /:/rootfs:ro
      - /var/run:/var/run
    privileged: true
    networks:
      zabbix_net:
        ipv4_address: ${ZABBIX_AGENT_IP}

volumes:
  postgresql-data:
  zabbix-server-data:
  zabbix-snmptraps-data:
  zabbix-export-data:
  zabbix-web-data:

networks:
  zabbix_net:
    driver: ipvlan
    driver_opts:
      parent: ${IPVLAN_PARENT_INTERFACE}
    ipam:
      config:
        - subnet: ${IPVLAN_SUBNET}
          gateway: ${IPVLAN_GATEWAY}
Here are my environmental variables:
POSTGRES_USER=zabbix
POSTGRES_PASSWORD=<replace this text with a strong password>
POSTGRES_DB=zabbix
POSTGRESQL_IP=10.50.20.33
ZABBIX_SERVER_IP=10.50.20.32
PHP_TZ=America/New_York
ZABBIX_FRONTEND_PORT=8080
ZABBIX_WEB_IP=10.50.20.30
ZABBIX_AGENT_IP=10.50.20.31
IPVLAN_PARENT_INTERFACE=ens18
IPVLAN_SUBNET=10.50.20.0/24
IPVLAN_GATEWAY=10.50.20.1
Deploy Zabbix With Portainer
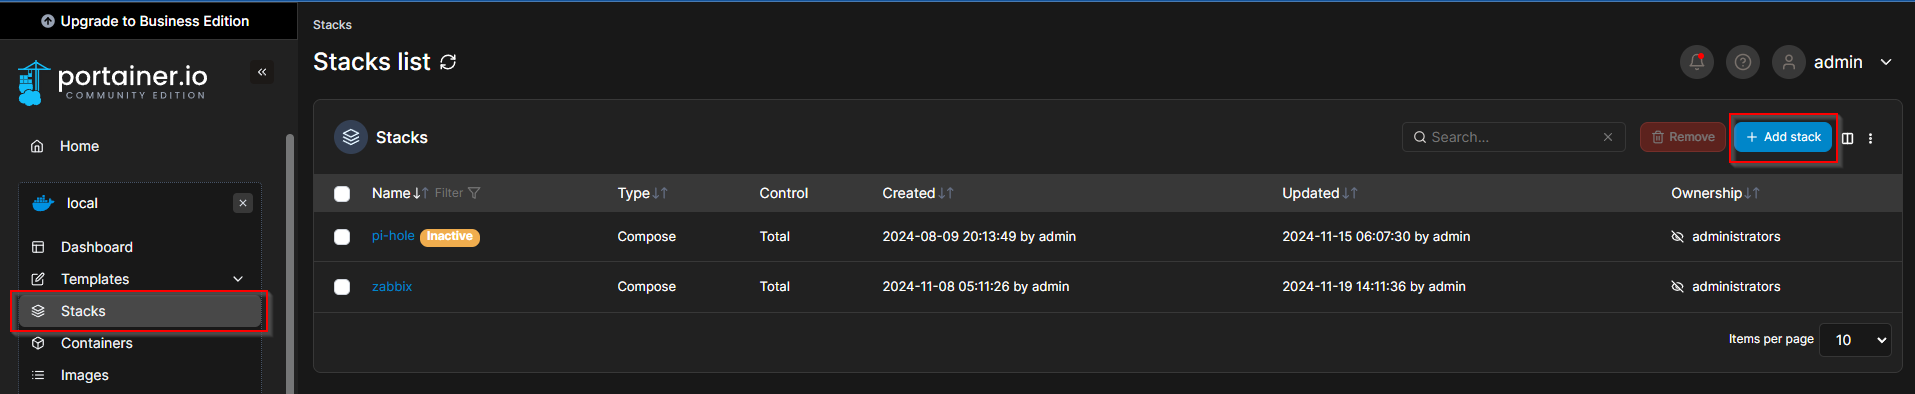
After you have finished setting up the docker-compose file now you are ready to deploy it. In Portainer, select “Stacks” and then select “Add Stack” (In my screenshot I already have it set up in Zabbix so you can disregard that)
Give your stack a name, select “Upload” and then upload your docker-compose file and environmental file. If you haven’t already make sure you save your docker-compose file and give it the name “docker-compose.yaml” and save your environmental variables file as “Zabbix.env”
Alternatively, you can use the Web Editor and copy and paste the code:

Select “Deploy the stack” at the bottom of the page and with any luck you should have a working Zabbix instance! You can reach the Zabbix web front end by going to http://<IP address of Zabbix-web>:8080.
The default credentials are:
Username:Admin
Password:zabbix
Changing The Listening Port For The Zabbix Front End
By default, the Zabbix web server listens on port 8080. If this is not a problem for you, this step can be skipped. However, if you already have something on your network listening on port 8080 you can cause a conflict in your network which will make the Zabbix web server not accessible.
To change the default listening port you need to edit the nginx configuration file and change the listening port from 8080 to whatever you would like. Be aware that if you reboot the container, then all changes you make will be lost. To make the changes persistent across reboot, you need to copy the config file from the container onto the host and list it as a mounted volume in the docker-compose file. (If you are following along, it’s the line I suggested to comment out if you wanted to skip this)
The first step to doing this is to console into the Zabbix web server container. Navigate to Containers and select the exec console button under the quick actions column. On the following screen select “Connect.”


You should see the CLI for the Zabbix web server. To see the contents of the current nginx.conf file, use the following command:
cat /etc/nginx/http.d/nginx.conf
There should be two lines in there that look like this:
server {
     listen 8080;
     listen {::}:8080;
By default, containers don’t have the nano text editor so I chose to use the “sed” command to edit the file directly and change these two lines:
sed -i 's/listen 8080;/listen 8089;/' /etc/nginx/http.d/nginx.conf
sed -i 's/listen \[::\]:8080;/listen [::]:8089;/' /etc/nginx/http.d/nginx.conf
Verify that the changes have been made to the configuration file by using the “cat” command from earlier:

Next use these commands to test the configuration file and then reload the web server:
nginx -t
nginx -s reload
If you did not get any errors you should be able to reach our Zabbix front end using the IP address and the port you specified; in my case port 8089.

For this final step, we need to make sure the changes we made to the nginx.conf file, persist when the container reboots. Access your docker host via SSH or however, you access your docker host and use these commands:
Sudo -i
docker cp zabbix-web:/etc/nginx/http.d/nginx.conf /var/lib/docker/volumes/zabbix_zabbix-web-data/_data/nginx.conf
If you have been following this guide, what you want to do at this point is uncomment that line from earlier or include the custom config as a mounted volume in the docker-compose file.
  zabbix-web-nginx-pgsql:
    image: zabbix/zabbix-web-nginx-pgsql:latest
    container_name: zabbix-web
    restart: unless-stopped
    depends_on:
      - postgresql-server
      - zabbix-server
    environment:
      DB_SERVER_HOST: postgresql-server
      POSTGRES_USER: ${POSTGRES_USER}
      POSTGRES_PASSWORD: ${POSTGRES_PASSWORD}
      POSTGRES_DB: ${POSTGRES_DB}
      ZBX_SERVER_HOST: zabbix-server
      PHP_TZ: ${PHP_TZ}
    ports:
      - "${ZABBIX_FRONTEND_PORT}:8080"
    volumes:
      - zabbix-web-data:/usr/share/zabbix
      #The volume below is a custom config file that sets the listening port to 8089
      - /var/lib/docker/volumes/zabbix_zabbix-web-data/_data/nginx.conf:/etc/nginx/http.d/nginx.conf
    networks:
      zabbix_net:
        ipv4_address: ${ZABBIX_WEB_IP}
The redeploy the stack in Portainer. Your changes should now still be there after redeploying!
Configuring The Zabbix Server
Resetting The Admin Password
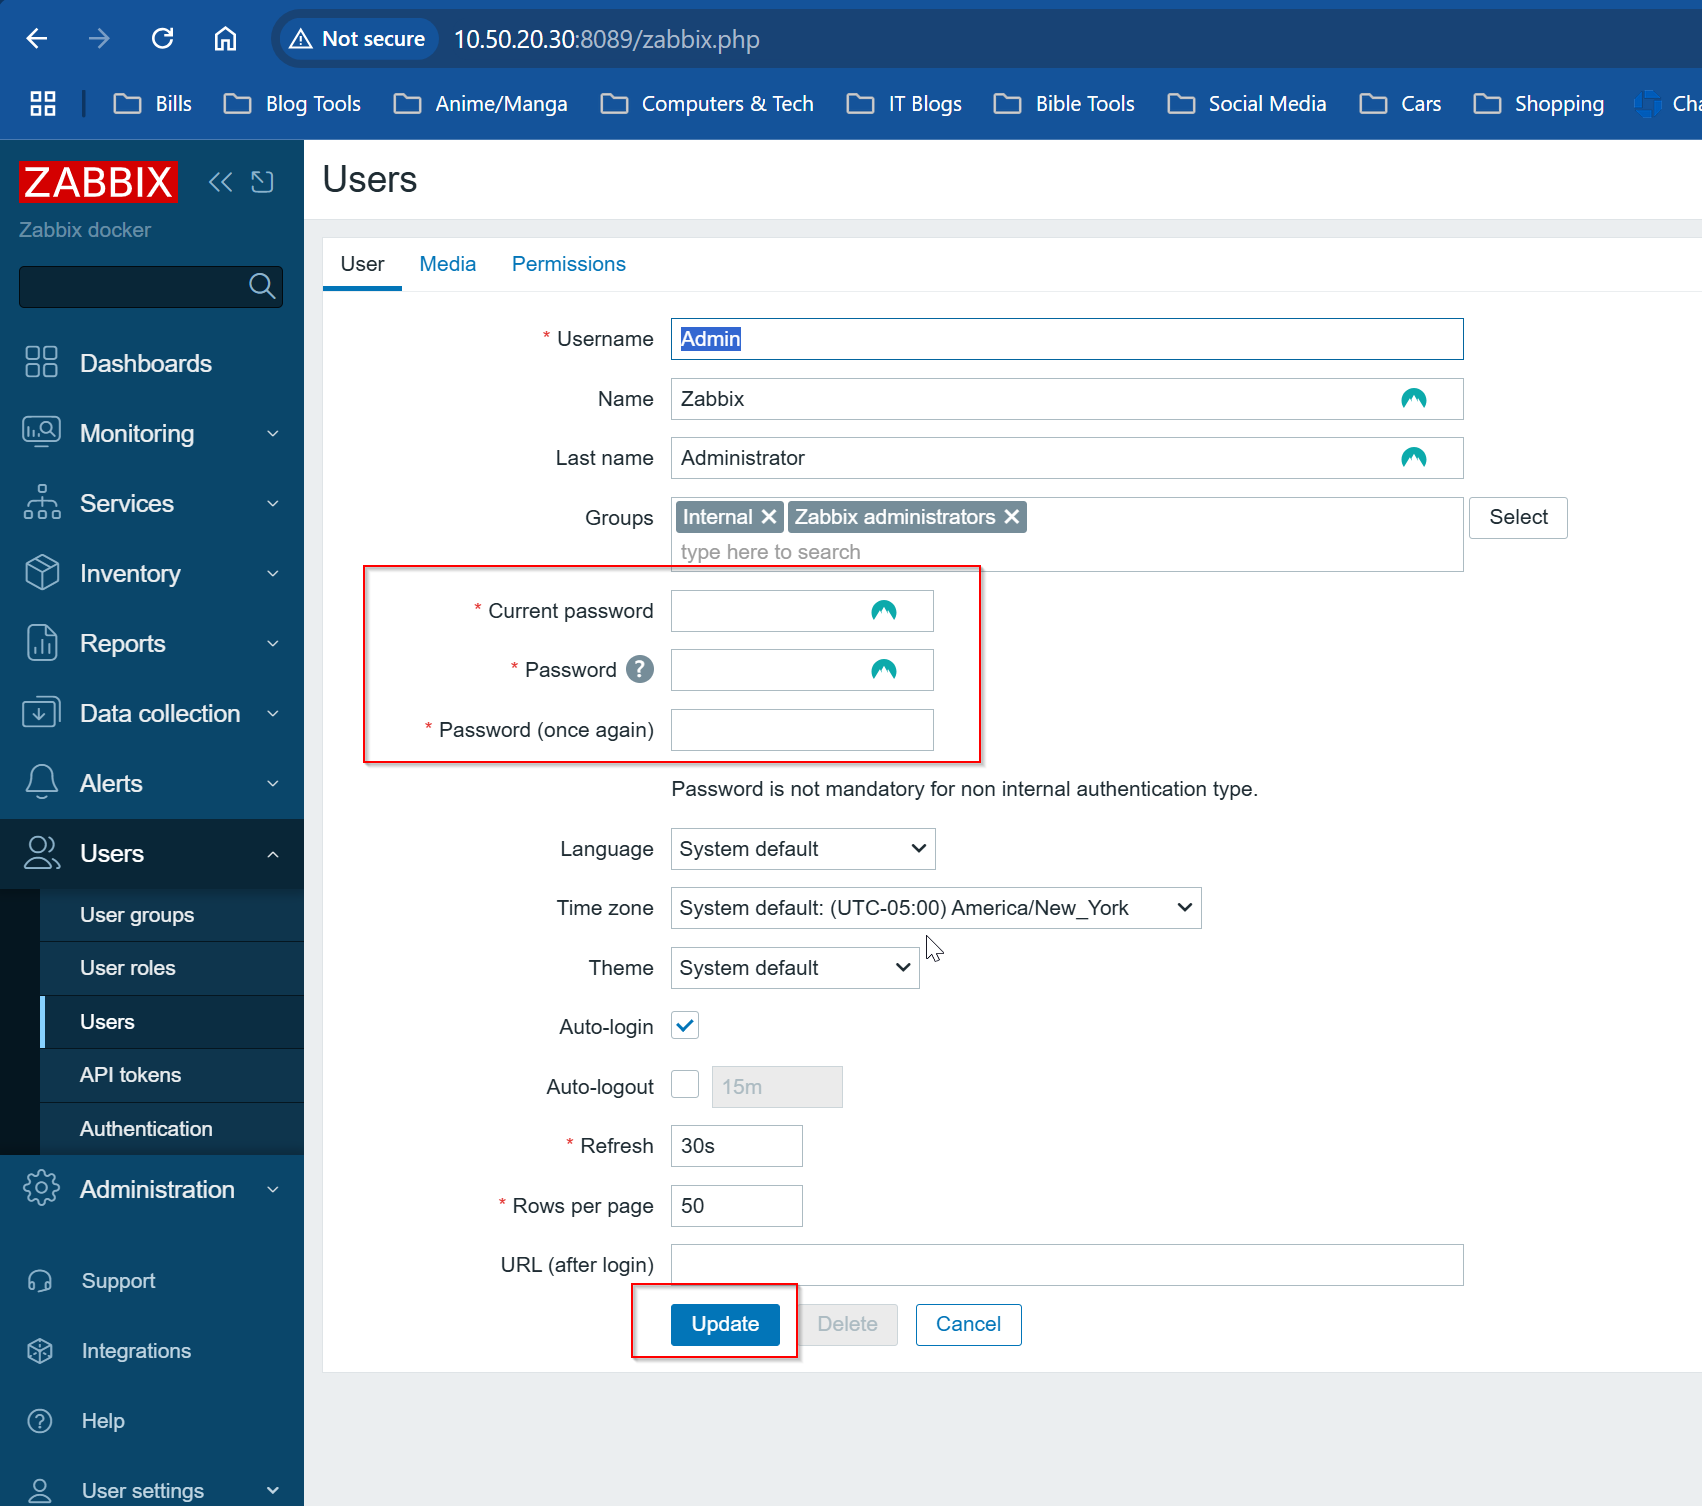
If you didn’t change the listening port for the Zabbix server, the first thing you want to do after deploying Zabbix is change the password for the Admin account. To do this select “Users” in the left navigation pane and then select “Users” again in the sub menu. Then select the Admin account:

Next, select “Change Password”

Finally enter the current password and the new password twice. Then select “Update”
Changing The Time Zone
Make sure that the time zone is set correctly depending on your location. To do this select “Administration” in the left navigation pane and then select General>GUI. Finally, change the default time zone to your time zone.

Configuring The Zabbix Server Host
By default, the Zabbix server is added to the lists of monitored hosts. For Zabbix to start collecting data on the Zabbix server you need to make one change to the host configuration. Start by navigating to “Data Collection” in the left navigation pane and then select “Hosts.” Then select “Zabbix server” in the list of hosts. (In my screenshot I have already added additional hosts; you can disregard) Take note that by default, the interface for the Zabbix server is set to 127.0.0.1:10050 and will be listed as red in the availability column.

In the host configuration screen, we need to add “zabbix-agent” as a DNS name for the interface. Then select “Update.” Docker will automatically resolve that DNS name.

It takes 60 seconds for Zabbix to poll the passive check items (more on this later). After 60 seconds you can refresh your browser and confirm that the interface turns green in the availability column.

You could also force Zabbix to poll the passive check items. Select “items:”

Then select the top checkbox so that all the passive check items get selected:
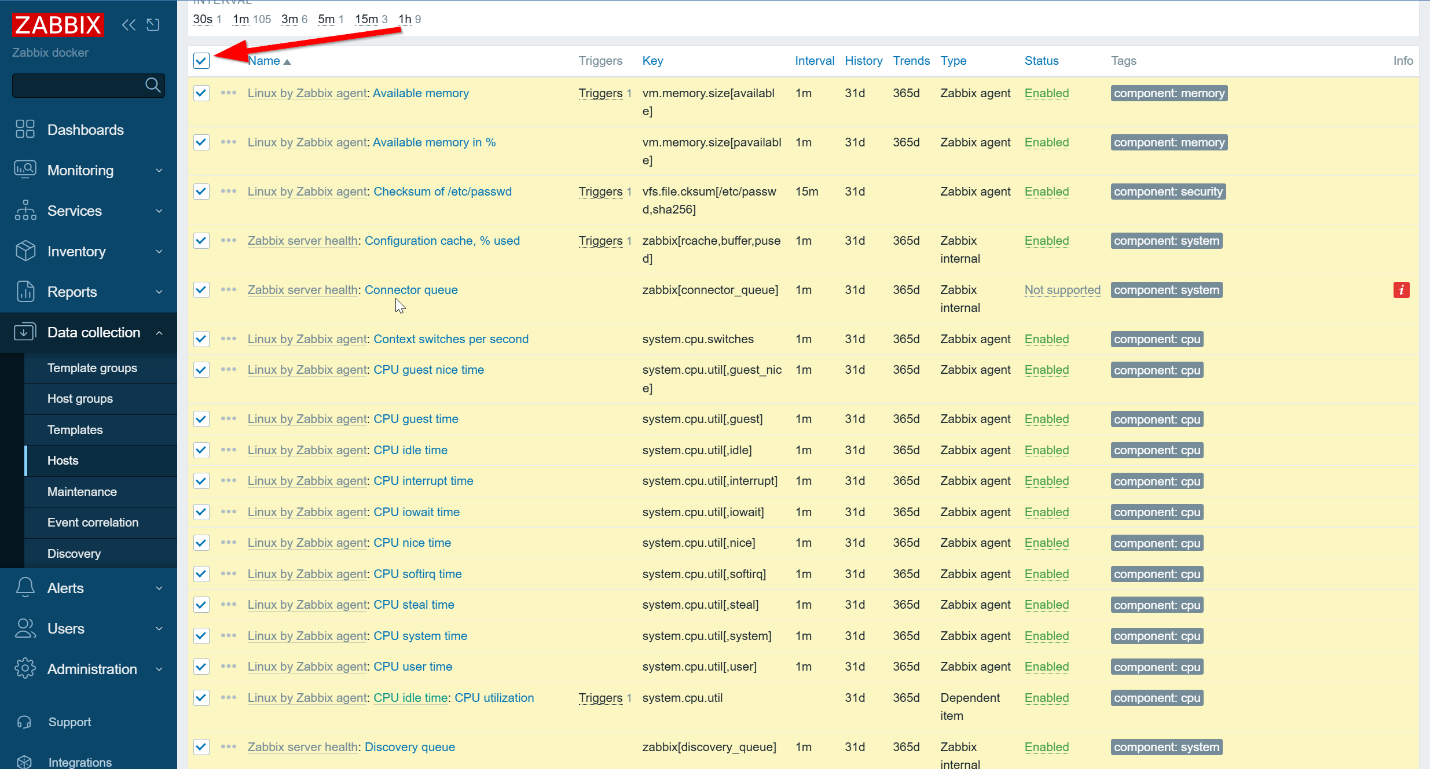
Finally, select “Execute Now” go back to the lists of hosts, and find the Zabbix server host turn green in the availability column (may have to refresh the browser). Be aware that this only works for passive checks.

Installing The Zabbix Agent On The Docker Host
The Zabbix agent works in two different ways: active checks and passive checks. Passive checks are when the Zabbix server initiates the connection with a Zabbix agent to collect data. Active checks are when the client machine initiates the connection with a Zabbix server so it can collect its data.
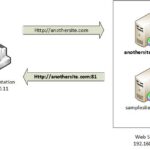
For passive checks to work properly on a docker host, you need to configure the networking in a specific way. By design, Docker does not allow any container-to-host communication. There is a great explanation in this blog for more information:
Here is the workaround at a high level for ensuring bi-directional communication between the Zabbix server and the docker
- Create a dedicated ipvlan interface on the host
- Assign it an IP address on my home network
- Configure a routing policy so that all traffic coming from the host’s new IP address will use the new ipvlan interface.
- Create a startup script that creates the ipvlan interface and routing policy on boot-up
Creating A New Virtual ipvlan Interface
To create a new ipvlan interface SSH into the docker host and use the following command. In the below command <ens18> is the parent interface and <ens18-zabbix> is the name of the interface:
sudo ip link add link ens18 name ens18-zabbix type ipvlan mode l2
Use the following command to give the new interface an IP address:
sudo ip addr add 10.50.20.9/24 dev ens18-zabbix
Finally make sure the interface is up:
sudo ip link set ens18-zabbix up
At this point, you should be able to ping the new IP address. Try to ping it from somewhere on your network.
Creating A Routing Policy
Because I have two interfaces on the host that are on the same subnet, this will create conflicts in the main routing table. This is why we need to create a custom routing table that bypasses the main routing table for destinations in the 10.50.20.0/24 network.
First I need to tell my docker host that all traffic originating from 10.50.20.9 will use a new routing table (table 1o0). I use a /32 subnet mask to tell the routing table that this only applies to this IP address:
sudo ip rule add from 10.50.20.9/32 table 100
Next, I need to add a route to the new custom route table 100. This route will send packets destined for the 10.50.20.0/24 network out to ens18-zabbix
sudo ip route add 10.50.20.0/24 dev ens18-zabbix table 100
Creating A Startup Script
To create a startup script I created a file called setup-ipvlan.service at this file path:
sudo nano /etc/systemd/system/setup-ipvlan.service
Copy the code into the file and then save it:
[Unit]
Description=Set up ipvlan interface ens18-zabbix and routing rules
After=network.target

[Service]
Type=oneshot
ExecStart=/sbin/ip link add link ens18 name ens18-zabbix type ipvlan mode l2
ExecStartPost=/sbin/ip addr add 10.50.20.9/24 dev ens18-zabbix
ExecStartPost=/sbin/ip link set ens18-zabbix up
ExecStartPost=/sbin/ip rule add from 10.50.20.9/32 table 100
ExecStartPost=/sbin/ip route add 10.50.20.0/24 dev ens18-zabbix table 100
RemainAfterExit=true

[Install]
WantedBy=multi-user.target
Reloaded system to recognize the new service:
sudo systemctl daemon-reload
Enable the service:
sudo systemctl enable setup-ipvlan.service
Start the service immediately:
sudo systemctl start setup-ipvlan.service
Check if the service is working:
sudo systemctl status setup-ipvlan.service
Reboot the docker host and check if the changes persist:
ip link show ens18-zabbix
ip rule show
ip route show table 100
Install And Configure The Zabbix Agent
To install the Zabbix agent on the docker host we can do it on the command line. The code below downloads the Zabbix agent package from the repository installs it, and then enables it.
sudo -s
wget https://repo.zabbix.com/zabbix/7.0/ubuntu/pool/main/z/zabbix-release/zabbix-release_latest+ubuntu24.04_all.deb
dpkg -i zabbix-release_latest+ubuntu24.04_all.deb
apt update
apt install zabbix-agent
To configure the Zabbix agent you need to use a text editor to configure the Zabbix_agentd.conf file. Use this command:
nano /etc/zabbix/zabbix_agentd.conf
In the configuration file you must set three values:
Server=
Hostname=
ServerActive=
The value for “Server” should be the IP address of the Zabbix server. Setting this value will allow passive checks to work:

Scroll down and set the same value for “ServerActive” for active checks.
You also need to set the value for Hostname:

After you have finished configuring the agent save the file and then reload the agent:
systemctl restart zabbix-agent
systemctl status zabbix-agent
Configuring The Docker Host In Zabbix
To configure the docker host in Zabbix, select Data collection>Hosts, then select “Create host” in the top right. Below is the configuration of the docker host:

The hostname is case-sensitive. The hostname must match exactly with what is specified in the Zabbix agent configuration. For passive checks select the Linux by Zabbix Agent template. A monitored host must have a Host group set – for this host, it is linked to the Linux servers host group. For the interface, I specified the docker hosts ipvlan interface – 10.50.20.9. Selecting add will finish the host setup.
Troubleshooting And Lessons Learned
- Docker Networking – When I was trying to identify the problem with why my docker containers could not reach the host, I used a few different network modes and learned about what each network mode does and what their limitations are.
- Linux Server Administration – When I was trying to figure out how to create a new virtual interface that would allow my containers to talk to my docker host, I learned that netplan is what the Ubuntu server uses for configuring network interfaces and it did not recognize the ipvlan interface I created. I needed to create a startup script to get past this limitation.
Conclusion
In this guide, I walked through deploying a Zabbix server instance in which the Zabbix server has privileged access to the docker host so that I can monitor it. I learned a lot about Linux, docker networking, and basic Zabbix setup and configuration.