How To Configure A Cisco ASA 5505
If you are studying for the CCNA and your goal is just to pass the test then by all means you can skip reading this blog post. However, if your goal is not only to pass your CCNA but also to learn real-world skills I highly recommend learning how to use and implement firewalls in your lab environments.
Cisco ASA or Adaptive Security Appliances are dirt cheap on eBay and are loads of fun to deploy in your lab environment. If you happen to have one and need a quick and dirty reference for setting up and getting your clients on the internet then this write-up is perfect for you!
Table of Contents
Management Access
There are many protocols you can use to manage an ASA 5505 like Serial, SSH, Telnet, and HTTP. For this lab environment, I will be using the local database on the firewall as an AAA server. On this local database, you can store usernames and passwords.
Global Enable Password
A Cisco ASA with a factory default configuration does not have a global enable password set. To configure an enable password, issue the following command in global configuration mode:
ciscoasa(config)#enable password <password>
Creating a username and password
To create a username and password, issue the following commands in global configuration mode:
ciscoasa(config)#username <username> password <password> privilege 15
Telnet Access
To configure telnet and use the username and password you created on the LOCAL database, issue the following commands in global configuration mode:
ciscoasa(config)#telnet <IP address or subnet> <net mask> inside
ciscoasa(config)#aaa authentication telnet console LOCAL
SSH Access
To configure SSH and use the username and password you created on the LOCAL database, issue the following commands in global configuration mode:
ciscoasa(config)#crypto key generate rsa modulus 1024ciscoasa(config)#write memoryciscoasa(config)#aaa authentication ssh console LOCALciscoasa(config)#ssh <IP address of subnet> <net mask> insideciscoasa(config)#ssh timeout 60ciscoasa(config)#ssh version 2
Configuring Interfaces
To configure an interface on a 5505 series Cisco ASA, you need to configure a VLAN interface with the name of the interface using the nameif command, the security-level, and an IP address.
This process for configuring interfaces on 5505 ASAs is different because it requires the extra step of creating a logical interface and assigning it to a physical interface.
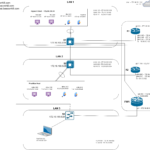
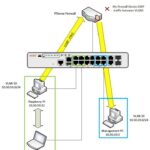
The 5505 ASA in this blog post will have two interfaces – an inside and an outside interface.
Configuring the Outside Interface
Below is the configuration of the Outside interface:

In my lab environment, there is a DHCP server upstream on VLAN 2. This DHCP server is handing out DHCP leases in the 172.16.10.0/24 subnet. For this demonstration, this interface will not have a static IP address.
Now that we have configured the VLAN interface, we must assign it to Ethernet0/0:

Configuring the Inside Interface
Below is the configuration for the inside interface:

Configuring The Security Level
You might have noticed that when you issue the nameif outside command a security level of 0 is assigned. When you issue the nameif inside command, a security level of 100 is assigned.
No access control list (ACL) is configured on any interface by default. The security level is what controls the flow of traffic instead.
On a Cisco ASA, all traffic from a higher security level to a lower security level is allowed and all traffic from a lower security level to a higher security level is blocked.
The actual number used when specifying a security level does not matter. What matters is the relationship of one security level to another.
In my lab environment, I have an ASA with two interfaces. My outside interface has a security level of 0 and my inside interface has a security level of 100.

Effectively all inbound internet traffic going to any other interface is blocked since 0 is the lowest security level configured on any interface on my ASA.
Same Security Level
If you have two interfaces with the same security level the traffic will be blocked automatically. Even if you apply an ACL to the two interfaces that have the same security level and specify that the traffic should be allowed, the traffic will still be blocked.
This is a feature of the Cisco ASA. To disable this feature, issue this command in global configuration mode:
ciscoasa(config)#same-security permit inter-interface
In addition, if traffic comes in one interface and leaves on the same interface the same rule applies. For example, traffic coming inbound on Ethernet0/0 will pass through an interface with a security level of 0. If the traffic then exits the same interface, it will be passing through an interface with a security level of 0. This traffic will be blocked by default.
To disable this feature, issue this command in global configuration mode:
ciscoasa(config)#same-security permit intra-interface
Configuring Access Lists
There are two types of access lists on a Cisco ASA – Standard and Extended. For this demonstration, I will be using Extended ACLs and I will apply one to the outside interface and one to the inside interface.
The configuration for the outside interface is below:

The configuration for the inside interface is below:

On most firewalls there is an implicit deny rule however for these ACLs, I have explicitly specified the deny any any deny rule and made it so that if there is a match on the ACL, these events get logged.
For this simple lab, I am not concerned with security so, I have denied all inbound traffic on the Outside interface and have allowed all inbound traffic on the Inside interface.
ICMP Traffic
Cisco ASA is a stateful firewall meaning that it filters traffic based on the first packet in the flow. If a PC is trying to reach a web server on port 443 and there is an ACL on the inside interface, the ACL will process the packet and if the traffic is permitted, the firewall will forward the traffic.
The return traffic will not be processed by any ACL on the outside interface since the ASA recognizes the return traffic as an established session or state. This is not the case for ICMP traffic.
If you try to ping a DNS server on the internet, the return traffic will be blocked because ICMP traffic does not generate a session or state. To fix this so the firewall can allow the return traffic for ICMP outbound to the internet, issue the following command:
ciscoasa(config)#fixup protocol icmp
If you do a show run, you should see that in the global policy map ICMP traffic should be inspected6.:

Configuring The Default Gateway
If you would like devices in the LAN to reach the internet, you need to configure NAT and you will need to set the default gateway or what the route table calls “the gateway of last resort”
To set the default gateway, issue this command in global configuration mode:
ciscoasa(config)#Route 0.0.0.0 0.0.0.0 <next hop IP address>
ciscoasa(config)#Show route
Configuring NAT
For this demonstration, I will be configuring NAT overload otherwise called “Dynamic PAT” in the Cisco documentation. To do that you will need to create an object for the inside network and then create a NAT statement. In global configuration mode, issue the following commands:
ciscoasa(config)#object network <object name>
ciscoasa(config)#subnet <subnet> <net mask>
ciscoasa(config)#nat (inside,outside) dynamic interface